
Add Search to a Jekyll Blog for Free with Azure Search
Saturday, March 14, 2015
One limitation of a Jekyll-based blog is the lack of server-side code. There are some services that will provide server-side functionality via JavaScript, such as comments with Disqus.
But what about search? Recently, Microsoft released Azure Search. It's a search-as-a-service platform that allows you to add documents (such as blog posts) to an index and run full-text search on them. The amazing thing is it's completely free for under 10,000 documents!
Today we'll walk through how to add basic search functionality to a Jekyll blog using Azure Search. It's also possible to use more advanced features such as autocomplete suggestions, faceting, scoring, and "more like this"; but we'll save those for another day.
tl;dr
The basic steps to add Azure Search to a Jekyll site:
- In Azure Portal
- Create a free Azure account.
- Create a free Search service.
- In Jekyll site
- Generate an RSS feed of all blog posts.
- Create a Node.js app to create an index in the Azure Search Service and insert each blog post from the RSS feed as a document.
- Add a JavaScript search form to the Jekyll site that queries the Azure Search index and displays the results.
Creating an Azure Search Service
If you haven't already, go to Microsoft Azure and create a free trial account. The Free tier of the search service is completely free for under 10,000 documents, even after the trial period expires (you may have to switch to a pay-as-you-go subscription).
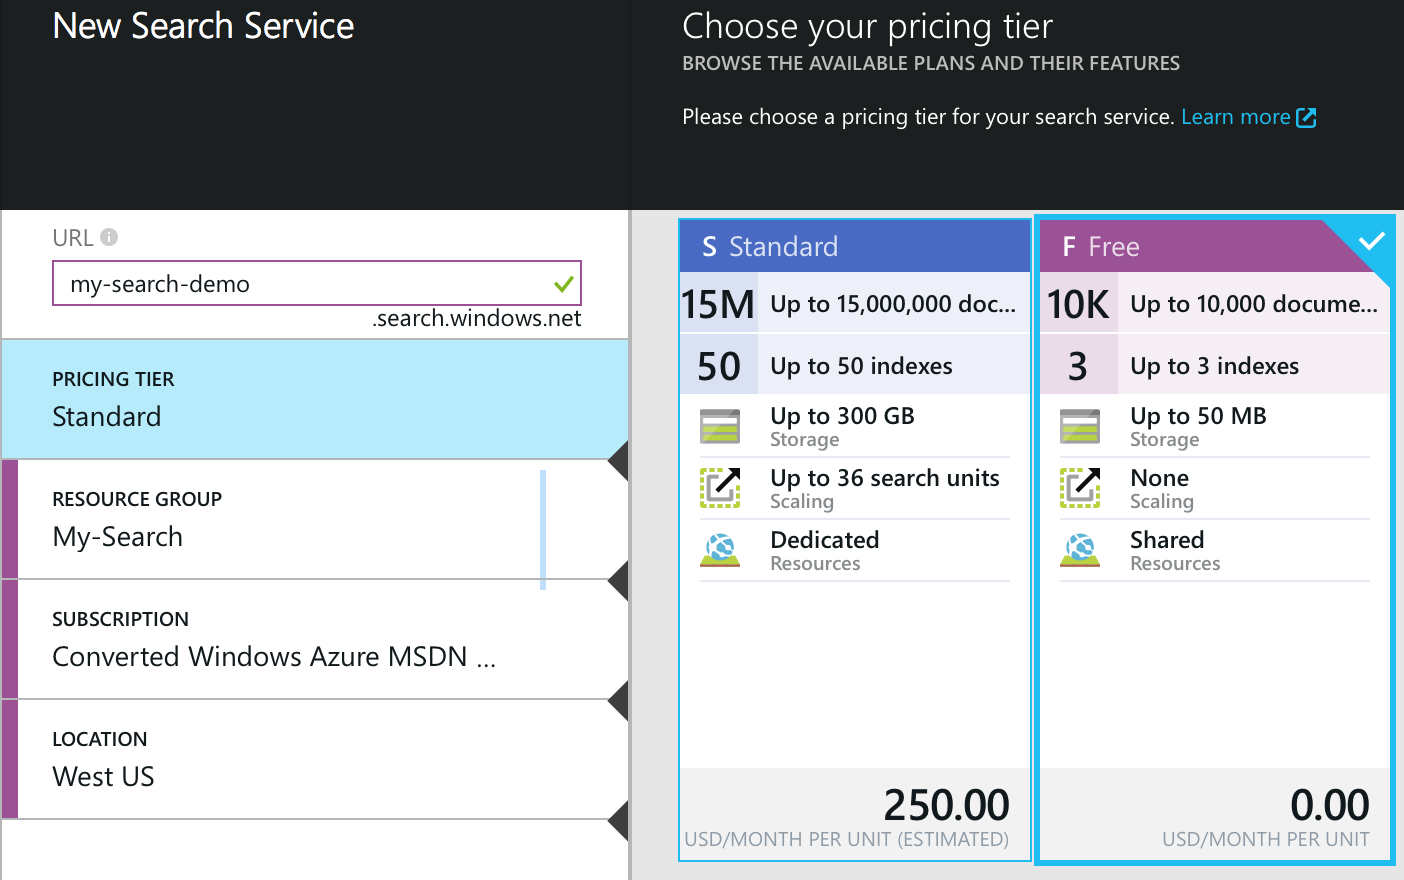
In the new Azure Preview Portal, click New -> Data + storage -> Search. Enter a name for the new Search service. Also select/create a resource group and location. In the Pricing Tier pane, select Free.
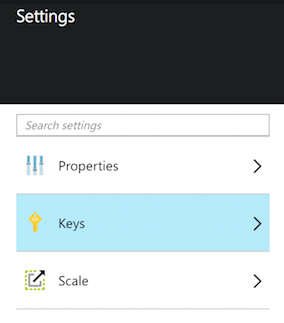
Open up the Settings pane and view the keys. Jot down the primary admin and query keys. We will use the admin key in to manage the index and load documents, and the query key on public web pages to query the index.
Inserting Blog Posts into a Search Index
RSS Feed of All Blog Posts
To insert blog posts into a search index, we first need to extract the articles into a format that can be consumed by an application that we will be writing to communicate with the Azure Search REST API.
One way to do this is to create an RSS feed of the entire site. We can use a modified version of jekyll-rss-feeds. The modified version outputs the full articles instead of the excerpts can be found here:
https://github.com/anthonychu/jekyll-azure-search-demo/blob/master/jekyll-rss-feed/all.xml
Put this somewhere in the Jekyll site and all.xml will be generated each time jekyll build runs.
Node.js App to Add Posts to Index
Now we need something that will read in the RSS feed created in the previous step and send each post as a document to the Azure Search index. We will write a Node.js app to do this.
Azure Search indexes can be managed and queried via a REST API. There is an appropriately named Node.js library called azure-search that will do most of the heavy lifting for us.
The first thing we have to do is create a search index. To do this, we need to define a schema:
var schema = {
    name: indexName,
    fields: [
        {
            name: 'id',
            type: 'Edm.String',
            searchable: false,
            filterable: true,
            retrievable: true,
            sortable: true,
            facetable: false,
            key: true
        },
        {
            name: 'title',
            type: 'Edm.String',
            searchable: true,
            filterable: true,
            retrievable: true,
            sortable: true,
            facetable: false,
            key: false,
            analyzer: 'en.microsoft'
        },

        // ...

    ],

    // ...

    corsOptions: {
        allowedOrigins: ['*']
    }
};
Note that we've also added * to the CORS options to allow query requests from any domain. You may want to limit it to a single domain or a smaller subset.
This is how we create the index and insert each document:
// delete index
searchClient.deleteIndex(indexName, function (err) {
    if (err) console.error(err);

    // create index
    searchClient.createIndex(schema, function (err, schema) {
        if (err) {
            console.dir(err);
            throw err;
        }

        each(posts, function(post, next) {
            // add document to index
            searchClient.addDocuments(indexName, [post], function (err, details) {
                console.log(err ||
                    (details.length && details[0].status ? 'OK' : 'failed'));
                next(err, details);
            });
        }, function (err) {
            console.log('Finished rebuilding index.');
        });
    });
});
There's not a lot of elegance to this code, but it gets the job done. One obvious optimization is to batch upload the posts in groups of 10 to 20 instead of uploading them one at a time (addDocuments takes an array of documents, so we can upload multiples at the same time, subject to the REST API payload limits).
The entire azure-sync.js script can be found here:
https://github.com/anthonychu/jekyll-azure-search-demo/blob/master/node-upload-script/azure-sync.js
The script can be executed like this (substitute the real service URL, admin key, and RSS file page):
$ node azure-sync.js --rss <RSS_PATH> --search-url <URL> --search-key <KEY>
Now a search index is created and is searchable within a few seconds! We have to run this script each time a blog post is added or changed. Grunt, Gulp, or simply a bash script or makefile can simplify this. Just make sure you don't commit your API keys to the repository.
Search the Index with JavaScript
Now the final step is to add client-side JavaScript to the Jekyll site to search the index. We can use the browserified version of the same azure-search library to do this.
The code to query the search index looks like this:
function search(query, callback) {
    var searchOptions = { search: query, '$select': 'id, title, link, pubdate' };
    client.search(indexName, searchOptions, callback);
}
The $select parameter is a comma separated list to indicate which fields should be returned. If omitted, the search service will return the entire contents of each matching blog post.
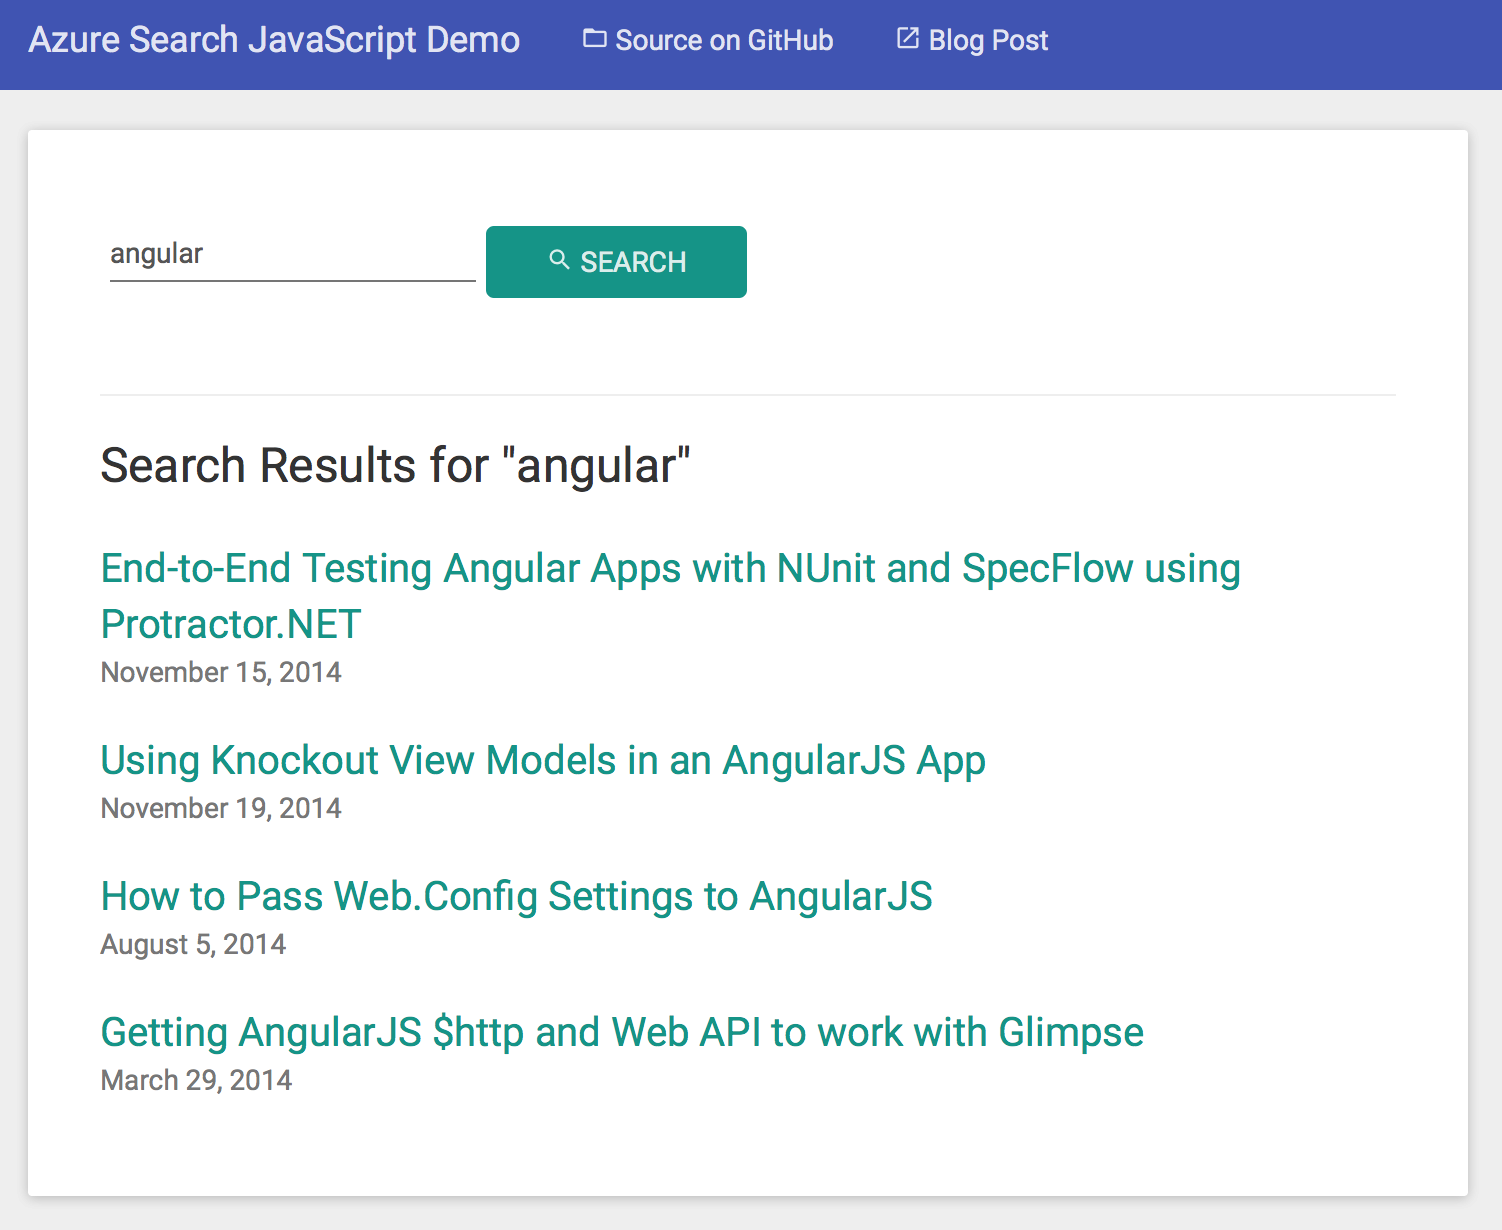
The search on this blog is using Knockout.js. Try it yourself by typing in a search term. View the source of the search results page to see how it works.
I've also created a standalone repo containing the full source of all the code described in this post, including a working demo (it also searches this blog's index)...
- Demo site: http://anthonychu.github.io/jekyll-azure-search-demo/www
- Source code: https://github.com/anthonychu/jekyll-azure-search-demo
One limitation of a Jekyll-based blog is the lack of server-side code. There are some services that will provide server-side functionality via JavaScript, such as comments with Disqus.
But what about search? Recently, Microsoft released Azure Search. It's a search-as-a-service platform that allows you to add documents (such as blog posts) to an index and run full-text search on them. The amazing thing is it's completely free for under 10,000 documents!
Today we'll walk through how to add basic search functionality to a Jekyll blog using Azure Search. It's also possible to use more advanced features such as autocomplete suggestions, faceting, scoring, and "more like this"; but we'll save those for another day.
tl;dr
The basic steps to add Azure Search to a Jekyll site:
- In Azure Portal
- Create a free Azure account.
- Create a free Search service.
- In Jekyll site
- Generate an RSS feed of all blog posts.
- Create a Node.js app to create an index in the Azure Search Service and insert each blog post from the RSS feed as a document.
- Add a JavaScript search form to the Jekyll site that queries the Azure Search index and displays the results.
Creating an Azure Search Service
If you haven't already, go to Microsoft Azure and create a free trial account. The Free tier of the search service is completely free for under 10,000 documents, even after the trial period expires (you may have to switch to a pay-as-you-go subscription).
In the new Azure Preview Portal, click New -> Data + storage -> Search. Enter a name for the new Search service. Also select/create a resource group and location. In the Pricing Tier pane, select Free.
Open up the Settings pane and view the keys. Jot down the primary admin and query keys. We will use the admin key in to manage the index and load documents, and the query key on public web pages to query the index.
Inserting Blog Posts into a Search Index
RSS Feed of All Blog Posts
To insert blog posts into a search index, we first need to extract the articles into a format that can be consumed by an application that we will be writing to communicate with the Azure Search REST API.
One way to do this is to create an RSS feed of the entire site. We can use a modified version of jekyll-rss-feeds. The modified version outputs the full articles instead of the excerpts can be found here:
https://github.com/anthonychu/jekyll-azure-search-demo/blob/master/jekyll-rss-feed/all.xml
Put this somewhere in the Jekyll site and all.xml will be generated each time jekyll build runs.
Node.js App to Add Posts to Index
Now we need something that will read in the RSS feed created in the previous step and send each post as a document to the Azure Search index. We will write a Node.js app to do this.
Azure Search indexes can be managed and queried via a REST API. There is an appropriately named Node.js library called azure-search that will do most of the heavy lifting for us.
The first thing we have to do is create a search index. To do this, we need to define a schema:
var schema = {
name: indexName,
fields: [
{
name: 'id',
type: 'Edm.String',
searchable: false,
filterable: true,
retrievable: true,
sortable: true,
facetable: false,
key: true
},
{
name: 'title',
type: 'Edm.String',
searchable: true,
filterable: true,
retrievable: true,
sortable: true,
facetable: false,
key: false,
analyzer: 'en.microsoft'
},
// ...
],
// ...
corsOptions: {
allowedOrigins: ['*']
}
};
Note that we've also added * to the CORS options to allow query requests from any domain. You may want to limit it to a single domain or a smaller subset.
This is how we create the index and insert each document:
// delete index
searchClient.deleteIndex(indexName, function (err) {
if (err) console.error(err);
// create index
searchClient.createIndex(schema, function (err, schema) {
if (err) {
console.dir(err);
throw err;
}
each(posts, function(post, next) {
// add document to index
searchClient.addDocuments(indexName, [post], function (err, details) {
console.log(err ||
(details.length && details[0].status ? 'OK' : 'failed'));
next(err, details);
});
}, function (err) {
console.log('Finished rebuilding index.');
});
});
});
There's not a lot of elegance to this code, but it gets the job done. One obvious optimization is to batch upload the posts in groups of 10 to 20 instead of uploading them one at a time (addDocuments takes an array of documents, so we can upload multiples at the same time, subject to the REST API payload limits).
The entire azure-sync.js script can be found here:
https://github.com/anthonychu/jekyll-azure-search-demo/blob/master/node-upload-script/azure-sync.js
The script can be executed like this (substitute the real service URL, admin key, and RSS file page):
$ node azure-sync.js --rss <RSS_PATH> --search-url <URL> --search-key <KEY>
Now a search index is created and is searchable within a few seconds! We have to run this script each time a blog post is added or changed. Grunt, Gulp, or simply a bash script or makefile can simplify this. Just make sure you don't commit your API keys to the repository.
Search the Index with JavaScript
Now the final step is to add client-side JavaScript to the Jekyll site to search the index. We can use the browserified version of the same azure-search library to do this.
The code to query the search index looks like this:
function search(query, callback) {
var searchOptions = { search: query, '$select': 'id, title, link, pubdate' };
client.search(indexName, searchOptions, callback);
}
The $select parameter is a comma separated list to indicate which fields should be returned. If omitted, the search service will return the entire contents of each matching blog post.
The search on this blog is using Knockout.js. Try it yourself by typing in a search term. View the source of the search results page to see how it works.
I've also created a standalone repo containing the full source of all the code described in this post, including a working demo (it also searches this blog's index)...
- Demo site: http://anthonychu.github.io/jekyll-azure-search-demo/www
- Source code: https://github.com/anthonychu/jekyll-azure-search-demo