
Restrict Active Directory Login with Azure Static Web Apps Custom Authentication
Monday, February 7, 2022
Azure Static Web Apps includes built-in authentication with identity providers such as Azure Active Directory and GitHub. There's no configuration required to allow users to log in to a static web app.
The built-in Azure Active Directory authentication allows accounts from any Azure AD or personal Microsoft Accounts to log in. To restrict login to users in a specific Azure AD tenant or to specific users in an Azure AD tenant, we can configure Azure Static Web Apps custom authentication.
Configure custom authentication with Azure Active Directory
In this article, we'll be using this simple static web app.
Review staticwebapp.config.json
Like routing rules and other settings, custom authentication is configured in staticwebapp.config.json. This file is typically located in the root of the app to be deployed.
{
  "routes": [
    {
      "route": "/authenticated/*",
      "allowedRoles": [ "authenticated" ]
    }
  ],
  "auth": {
    "identityProviders": {
      "azureActiveDirectory": {
        "userDetailsClaim": "http://schemas.xmlsoap.org/ws/2005/05/identity/claims/name",
        "registration": {
          "openIdIssuer": "https://login.microsoftonline.com/<TENANT_ID>",
          "clientIdSettingName": "AZURE_CLIENT_ID",
          "clientSecretSettingName": "AZURE_CLIENT_SECRET"
        }
      }
    }
  },
  "globalHeaders": {
    "Cache-Control": "no-cache"
  }
}
In the routes section, we've configured a rule to allow only authenticated users to access pages under the /authenticated/* route.
And in the auth section, we've configured Azure Active Directory as a custom identity provider. Ensure we replace <TENANT_ID> with the Azure AD tenant ID that we want to allow logins from. But do not replace AZURE_CLIENT_ID and AZURE_CLIENT_SECRET; they refer to names of application settings that contain the actual values. We'll set those up later.
Deploy to Azure Static Web Apps
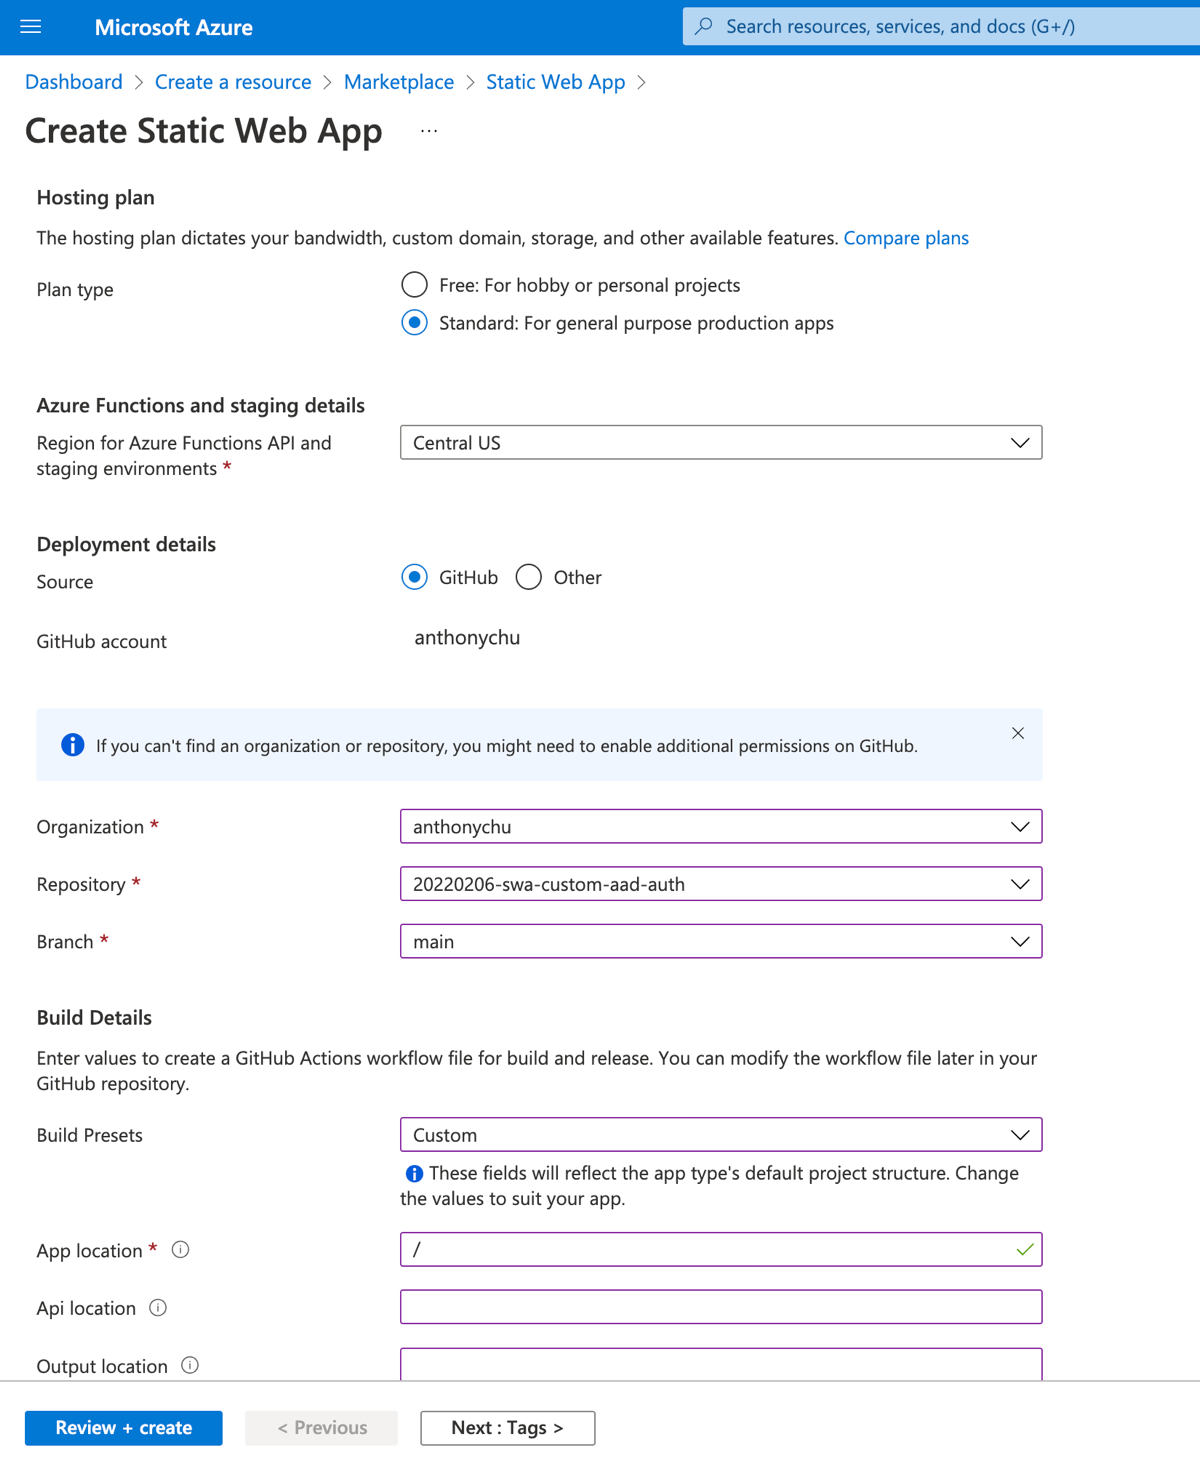
Next, we'll want to deploy our app to Azure Static Web Apps. It's important that we select the Standard plan that is required to use custom authentication.
For build details, our sample app is at the root of the repository, so we'll enter / for app location. Leave API and output locations blank.
Add an Azure AD app registration
To enable custom authentication, we need an app registration in our Azure Active Directory. We can create one in the portal.
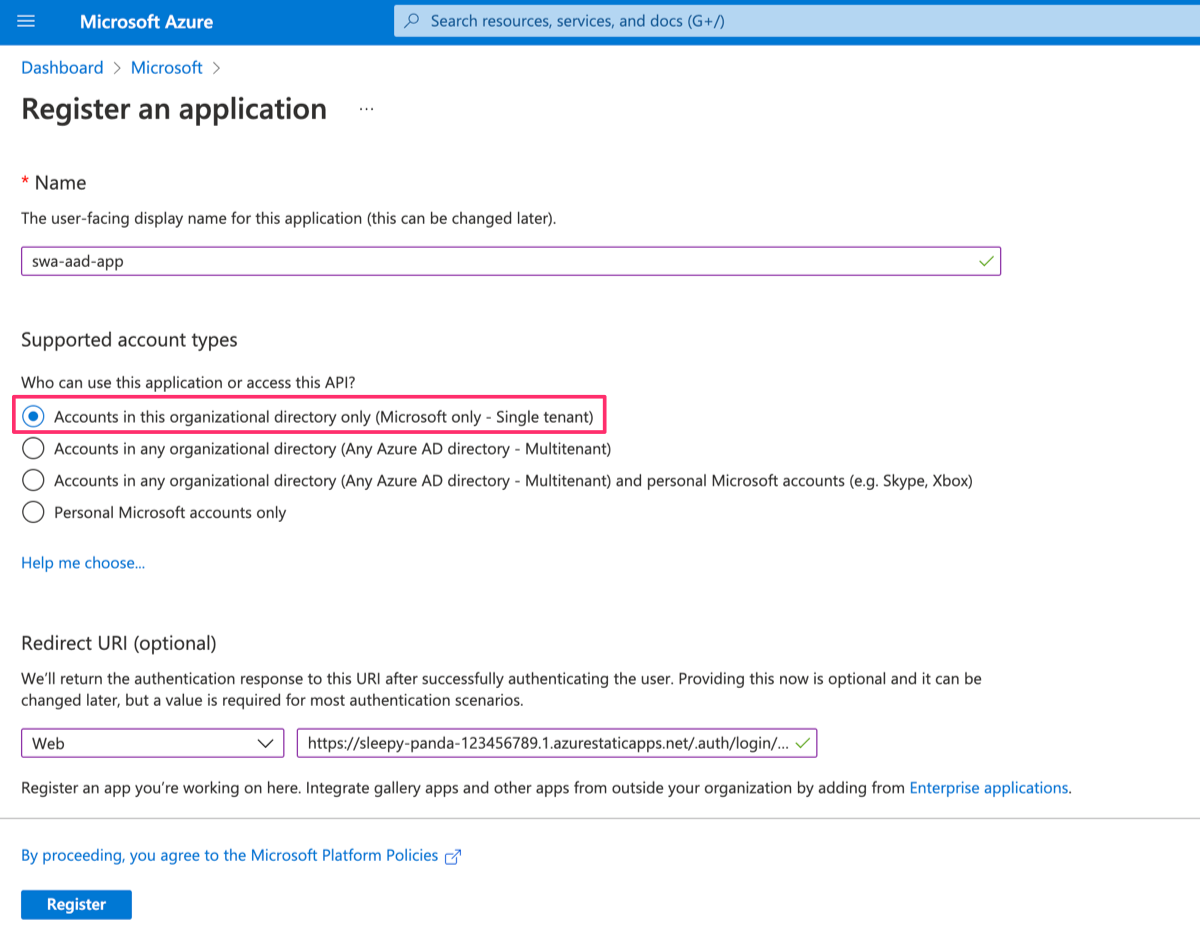
For supported account types, select Accounts in this organizational directory only (Microsoft only - Single tenant).
We'll also add a redirect URI of type Web and a value of https://<YOUR_APP_HOSTNAME>/.auth/login/aad/callback. Replace <YOUR_APP_HOSTNAME> with the actual hostname of our app, for example: https://sleepy-panda-123456789.1.azurestaticapps.net/.auth/login/aad/callback. This is required by Static Web Apps to complete the process each time a user signs in. We can get this URL from our static web app's overview page in the Azure portal.
Configure application settings
The last step to set up custom authentication is to configure the AZURE_CLIENT_ID and AZURE_CLIENT_SECRET app settings we looked at earlier.
For AZURE_CLIENT_ID, we can get its value from the overview page of the app registration.

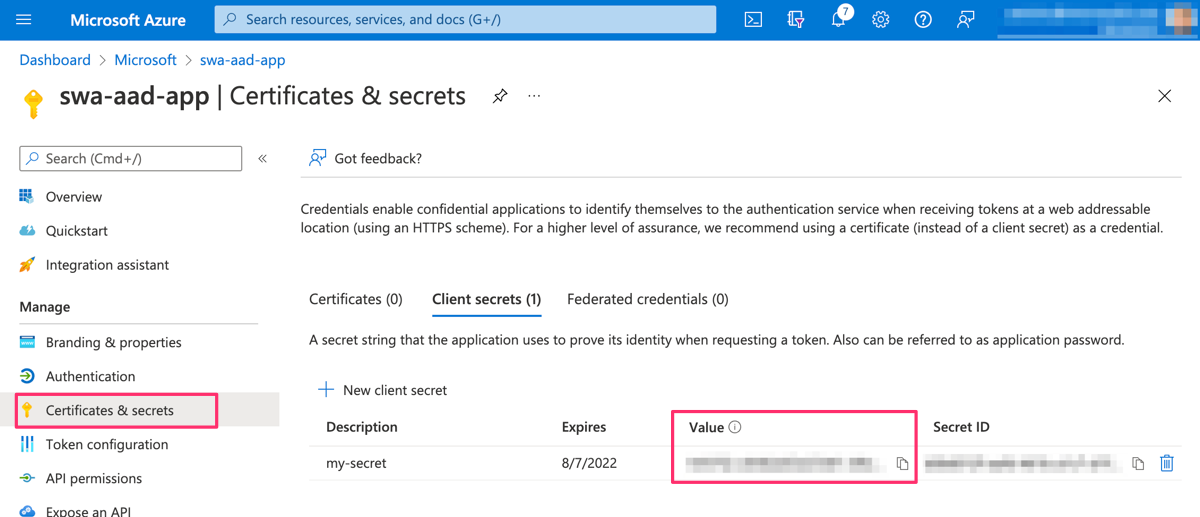
And for AZURE_CLIENT_SECRET, we need to go to the Certificates and secrets section and add a new client secret. The secret value is then displayed.
To create the app settings, go to the Configuration page of our static web app and add them with the values above.

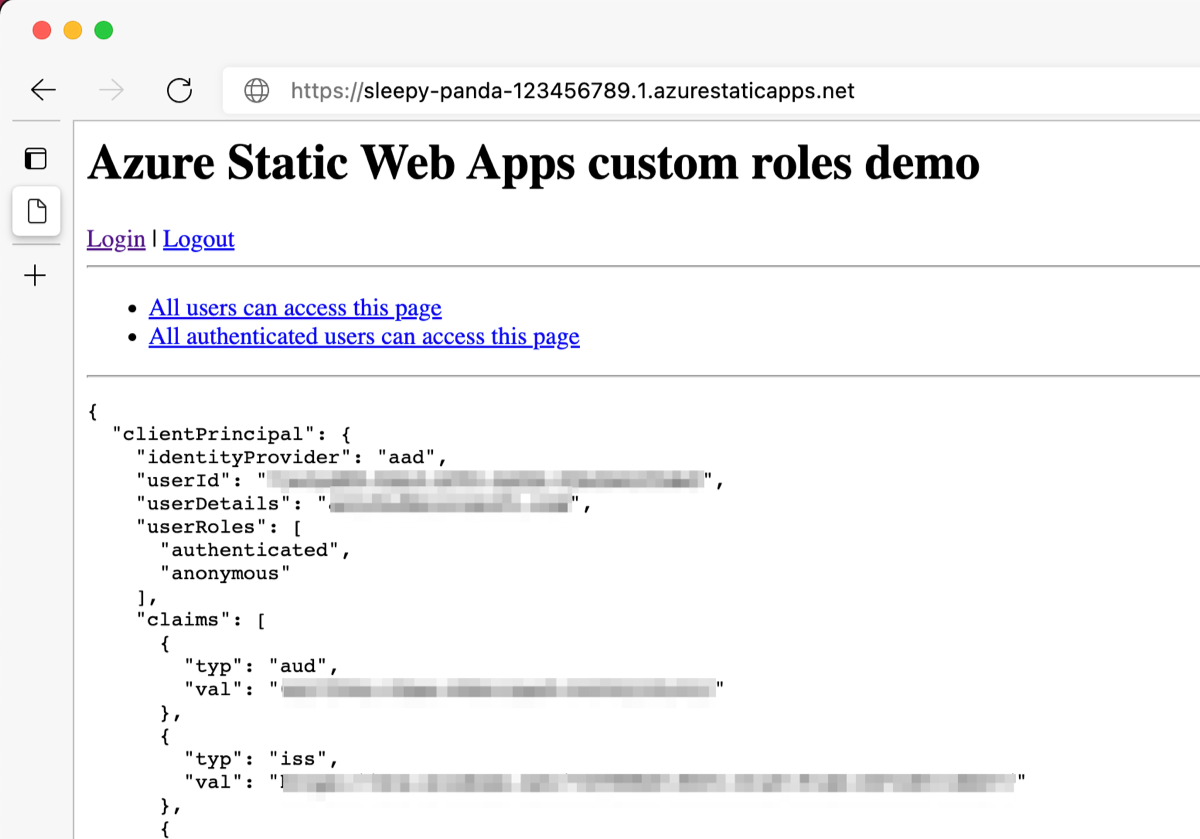
Try it out
Open our static web app in a browser and log in. Any member of this Azure AD can log in. If it all goes well, information about our Azure AD account is displayed and we should be able to visit the /authenticated/ route.
Limiting access to specific users and security groups
To further restrict access to the application, we can specify which users and security groups in our Azure AD can log in to the app.
In the Azure portal, go to our Active Directory and search for our app registration's name in the Enterprise applications page. Open the enterprise application.
In the properties page, change Assignment required? to Yes.
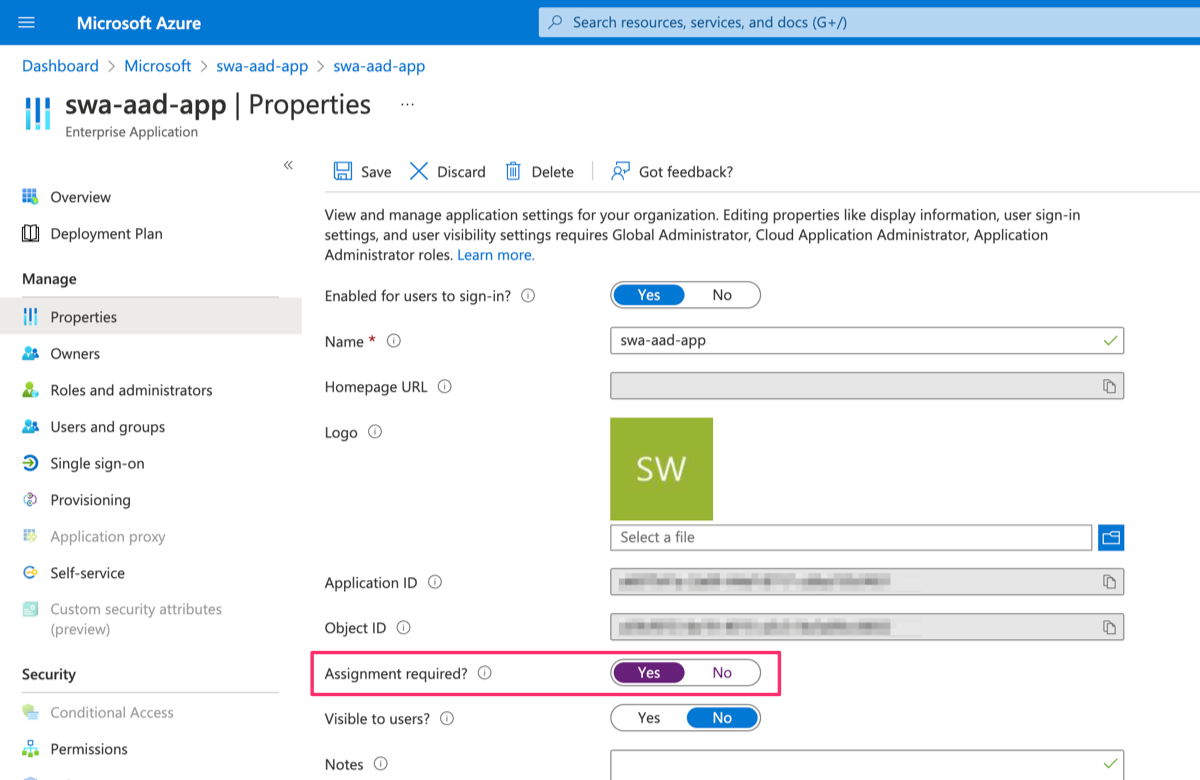
Finally, in the Users and groups page, add the users and security groups that are allowed to sign in to the app.
Conclusion
We're able to restrict who logs in to our static web app by using custom authentication and by configuring our Azure Active Directory app.
For more complex scenarios where we want to assign Static Web Apps roles based on Azure AD groups or app roles, check out this tutorial.
Azure Static Web Apps includes built-in authentication with identity providers such as Azure Active Directory and GitHub. There's no configuration required to allow users to log in to a static web app.
The built-in Azure Active Directory authentication allows accounts from any Azure AD or personal Microsoft Accounts to log in. To restrict login to users in a specific Azure AD tenant or to specific users in an Azure AD tenant, we can configure Azure Static Web Apps custom authentication.
Configure custom authentication with Azure Active Directory
In this article, we'll be using this simple static web app.
Review staticwebapp.config.json
Like routing rules and other settings, custom authentication is configured in staticwebapp.config.json. This file is typically located in the root of the app to be deployed.
{
"routes": [
{
"route": "/authenticated/*",
"allowedRoles": [ "authenticated" ]
}
],
"auth": {
"identityProviders": {
"azureActiveDirectory": {
"userDetailsClaim": "http://schemas.xmlsoap.org/ws/2005/05/identity/claims/name",
"registration": {
"openIdIssuer": "https://login.microsoftonline.com/<TENANT_ID>",
"clientIdSettingName": "AZURE_CLIENT_ID",
"clientSecretSettingName": "AZURE_CLIENT_SECRET"
}
}
}
},
"globalHeaders": {
"Cache-Control": "no-cache"
}
}
In the routes section, we've configured a rule to allow only authenticated users to access pages under the /authenticated/* route.
And in the auth section, we've configured Azure Active Directory as a custom identity provider. Ensure we replace <TENANT_ID> with the Azure AD tenant ID that we want to allow logins from. But do not replace AZURE_CLIENT_ID and AZURE_CLIENT_SECRET; they refer to names of application settings that contain the actual values. We'll set those up later.
Deploy to Azure Static Web Apps
Next, we'll want to deploy our app to Azure Static Web Apps. It's important that we select the Standard plan that is required to use custom authentication.
For build details, our sample app is at the root of the repository, so we'll enter / for app location. Leave API and output locations blank.
Add an Azure AD app registration
To enable custom authentication, we need an app registration in our Azure Active Directory. We can create one in the portal.
For supported account types, select Accounts in this organizational directory only (Microsoft only - Single tenant).
We'll also add a redirect URI of type Web and a value of https://<YOUR_APP_HOSTNAME>/.auth/login/aad/callback. Replace <YOUR_APP_HOSTNAME> with the actual hostname of our app, for example: https://sleepy-panda-123456789.1.azurestaticapps.net/.auth/login/aad/callback. This is required by Static Web Apps to complete the process each time a user signs in. We can get this URL from our static web app's overview page in the Azure portal.
Configure application settings
The last step to set up custom authentication is to configure the AZURE_CLIENT_ID and AZURE_CLIENT_SECRET app settings we looked at earlier.
For AZURE_CLIENT_ID, we can get its value from the overview page of the app registration.
And for AZURE_CLIENT_SECRET, we need to go to the Certificates and secrets section and add a new client secret. The secret value is then displayed.
To create the app settings, go to the Configuration page of our static web app and add them with the values above.
Try it out
Open our static web app in a browser and log in. Any member of this Azure AD can log in. If it all goes well, information about our Azure AD account is displayed and we should be able to visit the /authenticated/ route.
Limiting access to specific users and security groups
To further restrict access to the application, we can specify which users and security groups in our Azure AD can log in to the app.
In the Azure portal, go to our Active Directory and search for our app registration's name in the Enterprise applications page. Open the enterprise application.
In the properties page, change Assignment required? to Yes.
Finally, in the Users and groups page, add the users and security groups that are allowed to sign in to the app.
Conclusion
We're able to restrict who logs in to our static web app by using custom authentication and by configuring our Azure Active Directory app.
For more complex scenarios where we want to assign Static Web Apps roles based on Azure AD groups or app roles, check out this tutorial.