
Realtime Event Processing with Azure WebJobs and Reactive Extensions
Monday, March 30, 2015
Not all events are created equal; and often they need to be processed differently. For example, imagine a web application that generates errors and warnings. Perhaps we want to be notified whenever an error occurs, but we want to ignore warnings unless they exceed a certain threshold over a period of time.
This sort of logic is pretty difficult to write in a web application because we need to aggregate data across different requests. What we need is a background job to process these events, and a programming model that simplifies event processing and aggregation. I recently created a demo that I presented at the Vancouver Azure Meetup that performed event processing using Azure WebJobs and Reactive Extensions, and displayed realtime results on a dashboard built on ASP.NET SignalR.
Azure WebJobs
WebJobs is one of my favorite features on Azure Web Apps (formerly "Azure Websites"). It allows for the creation of one or more background jobs that can be developed and deployed alongside a web application. It's the kind of stuff we used to have to spin up Windows services on separate virtual machines or cloud services to do; WebJobs gives us all this for free — minus the dev, test, and deployment headaches of Windows or cloud services.
WebJobs also comes with an SDK that makes it super simple to work with queues, blobs, and tables. We'll take advantage of this to read errors and warnings off a Storage Queue and write them out to Table Storage.
Our WebJob is basically a console app. Its Main method only has a few lines to bootstrap the WebJobs SDK...
static void Main()
{
    var config = new JobHostConfiguration();
    config.Queues.MaxPollingInterval = TimeSpan.FromSeconds(4);

    var host = new JobHost(config);
    host.RunAndBlock();
}
The WebJobs SDK uses an exponential backoff algorithm to poll queues for new messages. Since we want our queue to be fairly responsive, we're capping the maximum poll interval to 4 seconds.
The only other WebJobs-specific code is a method whose parameters are decorated with Queue, QueueTrigger, and Table attributes...
public static void ProcessErrorMessage(
    [QueueTrigger("logerrors")] string message,
    [Table("logevents")] ICollector<LogEventEntity> logEventsTable)
{
    logEventsTable.Add(new LogEventEntity { EventType = "Error", Message = message });
    Program.EventNotificationHub.AddEvent(new ErrorLogEvent { Message = message });
}
This method will be invoked by the WebJobs SDK whenever a message is added to the "logerrors" queue. From there, it's only one line of code to add the message to a table named "logevents"; and another line to add the event to an EventNotificationHub that we'll create in a little bit.
The method to process warnings from the "logwarnings" queue looks exactly the same...
public static void ProcessWarningMessage(
    [QueueTrigger("logwarnings")] string message,
    [Table("logevents")] ICollector<LogEventEntity> logEventsTable)
{
    logEventsTable.Add(new LogEventEntity { EventType = "Warning", Message = message });
    Program.EventNotificationHub.AddEvent(new WarningLogEvent { Message = message });
}
Reactive Extensions
If WebJobs is my favorite Azure Web Apps feature, then Reactive Extensions (Rx) might be my favorite library in all of .NET. It allows us to work with event streams using LINQ-like operators. It's extremely powerful and the reactive programming model completely changes the way we think of event processing.
The heart of Rx is the Observable. It's an implementation of the IObservable interface in the .NET core. Rx provides dozens of operators to manipulate and filter observables. Our job is to compose together observables and subscribe to them.
To create the event notification hub, we will create a special kind of observable called a subject. A subject is basically an observable that we can publish events to. The AddEvent() call in the WebJobs code above will call the subject's OnNext() method to push an event into the subject's stream...
public class EventNotificationHub
{
    Subject<LogEvent> allLogEventsSubject = new Subject<LogEvent>();
    LogNotifier notifier = new LogNotifier();

    public EventNotificationHub()
    {
        SetUpSubscriptions();
    }

    private void SetUpSubscriptions()
    {
        // add awesome here
    }

    public void AddEvent(LogEvent ev)
    {
        allLogEventsSubject.OnNext(ev);
    }
}
Most of the action occurs in SetUpSubscriptions(). First, we'll create an Observable from the subject...
var allEvents = allLogEventsSubject.AsObservable();
If we were to subscribe to this allEvents observable, we'd get notified on every error or warning event that is pushed into the stream. We can filter this down to just errors and subscribe to it...
var errorEvents = allEvents.OfType<ErrorLogEvent>();
errorEvents.Subscribe(e => notifier.SendError(e.Message));
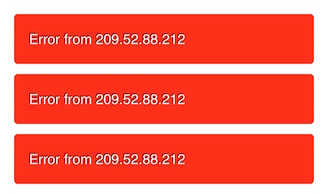
Every time an error appears in the stream, we'll send an error notification to the dashboard. We do this via SignalR and a toast notification on the dashboard. See the full source code for details on how that's done.
Another thing we might want to do is display cumulative totals for each of the two event types. We can use the Scan() operator to aggregate the counts and then use Sample() to get its value every second...
var logEventSummaries = allEvents
                            .Scan(new LogEventsSummary(), (p, e) =>
                            {
                                if (e is ErrorLogEvent)
                                    p.ErrorCount += 1;
                                else if (e is WarningLogEvent)
                                    p.WarningCount += 1;
                                return p;
                            })
                            .Sample(TimeSpan.FromSeconds(1));
logEventSummaries.Subscribe(s => notifier.UpdateSummary(s));
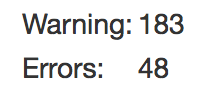
Again, we send the summary to the dashboard using SignalR and it appears on the screen like this...
We've saved the best for last. Let's say we want to monitor warnings and trigger an alert if there are more than 10 warnings in a span of 10 seconds. We also want to send a notification when the warnings have gone below the threshold.
We can use Buffer() to create a sliding 10 second window every 500ms...
var eventBuffers = allEvents
                    .Buffer(TimeSpan.FromSeconds(10), TimeSpan.FromMilliseconds(500));
And we can further manipulate the eventBuffers stream by using Select() to project a "HIGH" or "LOW" value for each buffer. It creates a stream like this...
LOW, LOW, LOW, HIGH, HIGH, HIGH, HIGH, LOW, LOW
We can then use the DistinctUntilChanged() operator to turn that stream into...
LOW, HIGH, LOW
var warningAlertLevelChanges = eventBuffers
                                .Select(b =>
                                {
                                    var warningCount = b.OfType<WarningLogEvent>().Count();
                                    if (warningCount > 10)
                                        return "HIGH";
                                    else
                                        return "LOW";
                                })
                                .DistinctUntilChanged();
warningAlertLevelChanges.Subscribe(s => notifier.UpdateAlertLevel(s));
Now the dashboard will only be notified when the warning level has crossed the 10 in 10 seconds threshold in either direction.
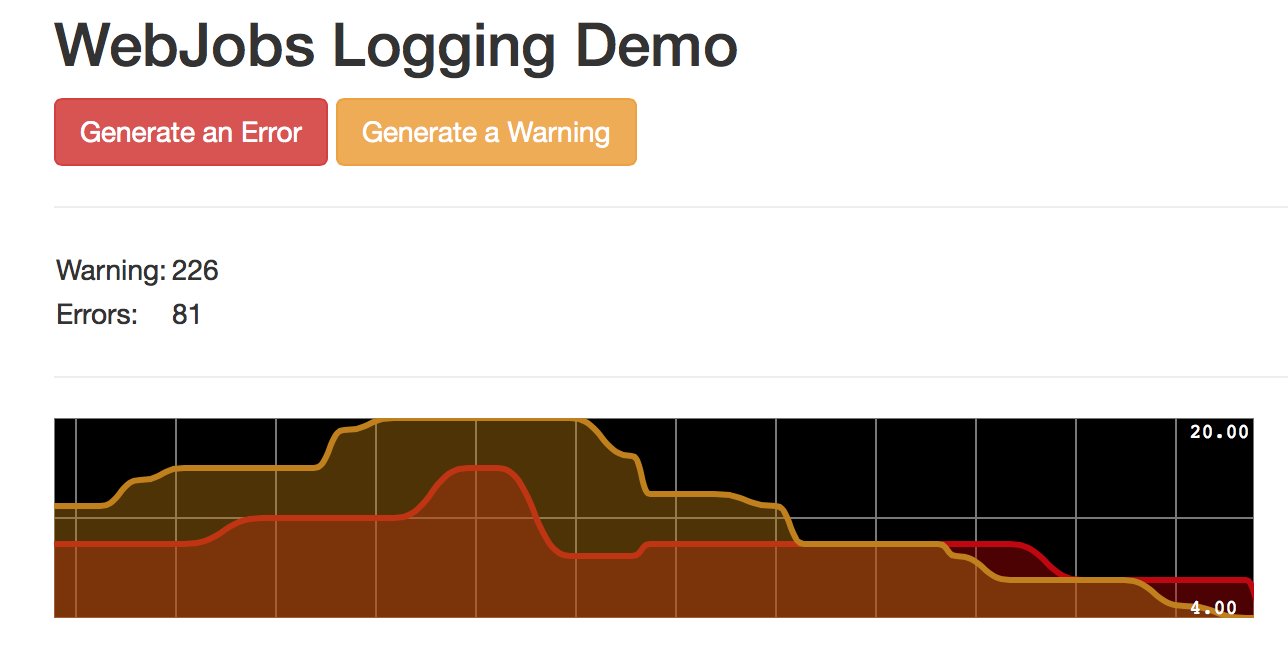
The final thing we want to do is plot the count of warnings and errors in the past 10 seconds on a smoothie.js chart. We can use the same eventBuffers stream from above to do this...
var bufferedEventCounts = eventBuffers
                                .Select(b => new LogEventsSummary
                                {
                                    ErrorCount = b.OfType<ErrorLogEvent>().Count(),
                                    WarningCount = b.OfType<WarningLogEvent>().Count()
                                });
bufferedEventCounts.Subscribe(s => notifier.UpdateChart(s));
Now every 500ms the chart on the screen is updated with the counts for the last 10 seconds...
You can find this and other WebJobs demos by viewing the full source... https://github.com/anthonychu/azure-webjobs-demo
Not all events are created equal; and often they need to be processed differently. For example, imagine a web application that generates errors and warnings. Perhaps we want to be notified whenever an error occurs, but we want to ignore warnings unless they exceed a certain threshold over a period of time.
This sort of logic is pretty difficult to write in a web application because we need to aggregate data across different requests. What we need is a background job to process these events, and a programming model that simplifies event processing and aggregation. I recently created a demo that I presented at the Vancouver Azure Meetup that performed event processing using Azure WebJobs and Reactive Extensions, and displayed realtime results on a dashboard built on ASP.NET SignalR.
Azure WebJobs
WebJobs is one of my favorite features on Azure Web Apps (formerly "Azure Websites"). It allows for the creation of one or more background jobs that can be developed and deployed alongside a web application. It's the kind of stuff we used to have to spin up Windows services on separate virtual machines or cloud services to do; WebJobs gives us all this for free — minus the dev, test, and deployment headaches of Windows or cloud services.
WebJobs also comes with an SDK that makes it super simple to work with queues, blobs, and tables. We'll take advantage of this to read errors and warnings off a Storage Queue and write them out to Table Storage.
Our WebJob is basically a console app. Its Main method only has a few lines to bootstrap the WebJobs SDK...
static void Main()
{
var config = new JobHostConfiguration();
config.Queues.MaxPollingInterval = TimeSpan.FromSeconds(4);
var host = new JobHost(config);
host.RunAndBlock();
}
The WebJobs SDK uses an exponential backoff algorithm to poll queues for new messages. Since we want our queue to be fairly responsive, we're capping the maximum poll interval to 4 seconds.
The only other WebJobs-specific code is a method whose parameters are decorated with Queue, QueueTrigger, and Table attributes...
public static void ProcessErrorMessage(
[QueueTrigger("logerrors")] string message,
[Table("logevents")] ICollector<LogEventEntity> logEventsTable)
{
logEventsTable.Add(new LogEventEntity { EventType = "Error", Message = message });
Program.EventNotificationHub.AddEvent(new ErrorLogEvent { Message = message });
}
This method will be invoked by the WebJobs SDK whenever a message is added to the "logerrors" queue. From there, it's only one line of code to add the message to a table named "logevents"; and another line to add the event to an EventNotificationHub that we'll create in a little bit.
The method to process warnings from the "logwarnings" queue looks exactly the same...
public static void ProcessWarningMessage(
[QueueTrigger("logwarnings")] string message,
[Table("logevents")] ICollector<LogEventEntity> logEventsTable)
{
logEventsTable.Add(new LogEventEntity { EventType = "Warning", Message = message });
Program.EventNotificationHub.AddEvent(new WarningLogEvent { Message = message });
}
Reactive Extensions
If WebJobs is my favorite Azure Web Apps feature, then Reactive Extensions (Rx) might be my favorite library in all of .NET. It allows us to work with event streams using LINQ-like operators. It's extremely powerful and the reactive programming model completely changes the way we think of event processing.
The heart of Rx is the Observable. It's an implementation of the IObservable interface in the .NET core. Rx provides dozens of operators to manipulate and filter observables. Our job is to compose together observables and subscribe to them.
To create the event notification hub, we will create a special kind of observable called a subject. A subject is basically an observable that we can publish events to. The AddEvent() call in the WebJobs code above will call the subject's OnNext() method to push an event into the subject's stream...
public class EventNotificationHub
{
Subject<LogEvent> allLogEventsSubject = new Subject<LogEvent>();
LogNotifier notifier = new LogNotifier();
public EventNotificationHub()
{
SetUpSubscriptions();
}
private void SetUpSubscriptions()
{
// add awesome here
}
public void AddEvent(LogEvent ev)
{
allLogEventsSubject.OnNext(ev);
}
}
Most of the action occurs in SetUpSubscriptions(). First, we'll create an Observable from the subject...
var allEvents = allLogEventsSubject.AsObservable();
If we were to subscribe to this allEvents observable, we'd get notified on every error or warning event that is pushed into the stream. We can filter this down to just errors and subscribe to it...
var errorEvents = allEvents.OfType<ErrorLogEvent>();
errorEvents.Subscribe(e => notifier.SendError(e.Message));
Every time an error appears in the stream, we'll send an error notification to the dashboard. We do this via SignalR and a toast notification on the dashboard. See the full source code for details on how that's done.
Another thing we might want to do is display cumulative totals for each of the two event types. We can use the Scan() operator to aggregate the counts and then use Sample() to get its value every second...
var logEventSummaries = allEvents
.Scan(new LogEventsSummary(), (p, e) =>
{
if (e is ErrorLogEvent)
p.ErrorCount += 1;
else if (e is WarningLogEvent)
p.WarningCount += 1;
return p;
})
.Sample(TimeSpan.FromSeconds(1));
logEventSummaries.Subscribe(s => notifier.UpdateSummary(s));
Again, we send the summary to the dashboard using SignalR and it appears on the screen like this...
We've saved the best for last. Let's say we want to monitor warnings and trigger an alert if there are more than 10 warnings in a span of 10 seconds. We also want to send a notification when the warnings have gone below the threshold.
We can use Buffer() to create a sliding 10 second window every 500ms...
var eventBuffers = allEvents
.Buffer(TimeSpan.FromSeconds(10), TimeSpan.FromMilliseconds(500));
And we can further manipulate the eventBuffers stream by using Select() to project a "HIGH" or "LOW" value for each buffer. It creates a stream like this...
LOW, LOW, LOW, HIGH, HIGH, HIGH, HIGH, LOW, LOW
We can then use the DistinctUntilChanged() operator to turn that stream into...
LOW, HIGH, LOW
var warningAlertLevelChanges = eventBuffers
.Select(b =>
{
var warningCount = b.OfType<WarningLogEvent>().Count();
if (warningCount > 10)
return "HIGH";
else
return "LOW";
})
.DistinctUntilChanged();
warningAlertLevelChanges.Subscribe(s => notifier.UpdateAlertLevel(s));
Now the dashboard will only be notified when the warning level has crossed the 10 in 10 seconds threshold in either direction.
The final thing we want to do is plot the count of warnings and errors in the past 10 seconds on a smoothie.js chart. We can use the same eventBuffers stream from above to do this...
var bufferedEventCounts = eventBuffers
.Select(b => new LogEventsSummary
{
ErrorCount = b.OfType<ErrorLogEvent>().Count(),
WarningCount = b.OfType<WarningLogEvent>().Count()
});
bufferedEventCounts.Subscribe(s => notifier.UpdateChart(s));
Now every 500ms the chart on the screen is updated with the counts for the last 10 seconds...
You can find this and other WebJobs demos by viewing the full source... https://github.com/anthonychu/azure-webjobs-demo