
Free Jekyll Blog Hosting with Amazon S3 and CloudFlare
Saturday, March 7, 2015
For the past year, this blog ran on the MiniBlog engine and was hosted on a low-cost ASP.NET web host. While it served its purpose, the host was far from reliable — most recently experiencing a 7-hour outage due to an IIS misconfiguration.
I had also become accustomed to creating content with Markdown on StackOverflow and GitHub; so using Windows Live Writer to write blog posts became less and less appealing to me.
With those requirements in mind (and now that I use a Mac), the Ruby-based Jekyll static site generator is a perfect fit. Its blog posts are simply Markdown files, and the layout is easy to customize. And because it generates a completely static site, I no longer need a web host that supports a certain technology; anything that can serve static web pages will do.
Ironically, the solution to the unreliable $5/month web host problem is (essentially) free. This site is now hosted in an Amazon S3 bucket with CloudFlare as its DNS service. So far, so good.
I'll probably create another post on the MiniBlog to Jekyll conversion. Today, I'll focus on the hosting and DNS side of things with Amazon S3 and CloudFlare.
Website Hosting on Amazon S3
As a long-time Microsoft Azure advocate, I'm pretty familiar with Azure Websites and I recommend it for 99% of scenarios out there. Unfortunately, my blog falls into the other 1% — costs matter and the free tier won't do because it doesn't allow custom domains (it would cost $10/month for the Shared tier).
That's where Amazon S3 comes in. S3 is Amazon's storage service (for Azure folks, it's directly comparable Azure Blob Storage). One thing that sets S3 apart here is you can turn any S3 bucket into a website.
S3 website features:
- Allows default pages (required for Jekyll pages without a
.html extension)
- Custom domain names
- Can be configured to redirect all pages to a different domain (redirects all traffic to www.anthonychu.ca or anthonychu.com to anthonychu.ca)
- Highly reliable (more than a cheapo web host, anyway)
If you're eligible for the Amazon free usage tier, there is a fair amount of traffic included. If you go over, here's what it costs in the US Standard region right now:
- Storage: 3 cents per GB
- GET requests: 4 cents per 100000 requests
- Outbound transfers: 9 cents per GB
I think even I can afford that!
Creating the S3 Website
Setting up an S3 bucket as a website is pretty simple. Simply follow their instructions:
When naming your site, pay close attention to the conventions in this article: Customizing Amazon S3 URLs with CNAMEs.
Domain Redirection
To redirect traffic to the main site from the "www." domain or from a different domain altogether, you must set up a bucket for each domain to redirect from, and enter the domain to redirect to in the bucket's website settings. That's all it takes to redirect all traffic from other domains to the main domain. It'll even retain the path after the redirection so it'll work for deep links too.
Uploading to S3
The best tool I've found to upload a site to S3 is s3_website (installs as a Ruby gem). By default, knows how to find Jekyll's /_site folder and upload it.
After installing it, create a file called s3_website.yml and fill it with the key and bucket information (make sure to exclude this file from your git repo!):
s3_id: <S3_ID>
s3_secret: <S3_SECRET>
s3_bucket: blog.example.com
Then uploading a site is as easy as running s3_website push.
s3_website can also configure other S3 bucket features such as GZip compression and additional redirect rules.
DNS Hosting on CloudFlare
Amazon has a DNS service called Route 53. But it costs about $1 a month per DNS zone; that's too expensive for me!
Thankfully, there's CloudFlare. CloudFlare offers a lot in their free plan. It can be used strictly as a DNS service, which is what I'm currently using it for. It also offers a CDN and SSL at no cost.
It's pretty simple to use. Sign up for an account and add a website. It will walk you through setting up a DNS zone for a domain. It'll even pull in the domain's existing DNS records. Add CNAME records to point it to the S3 bucket...
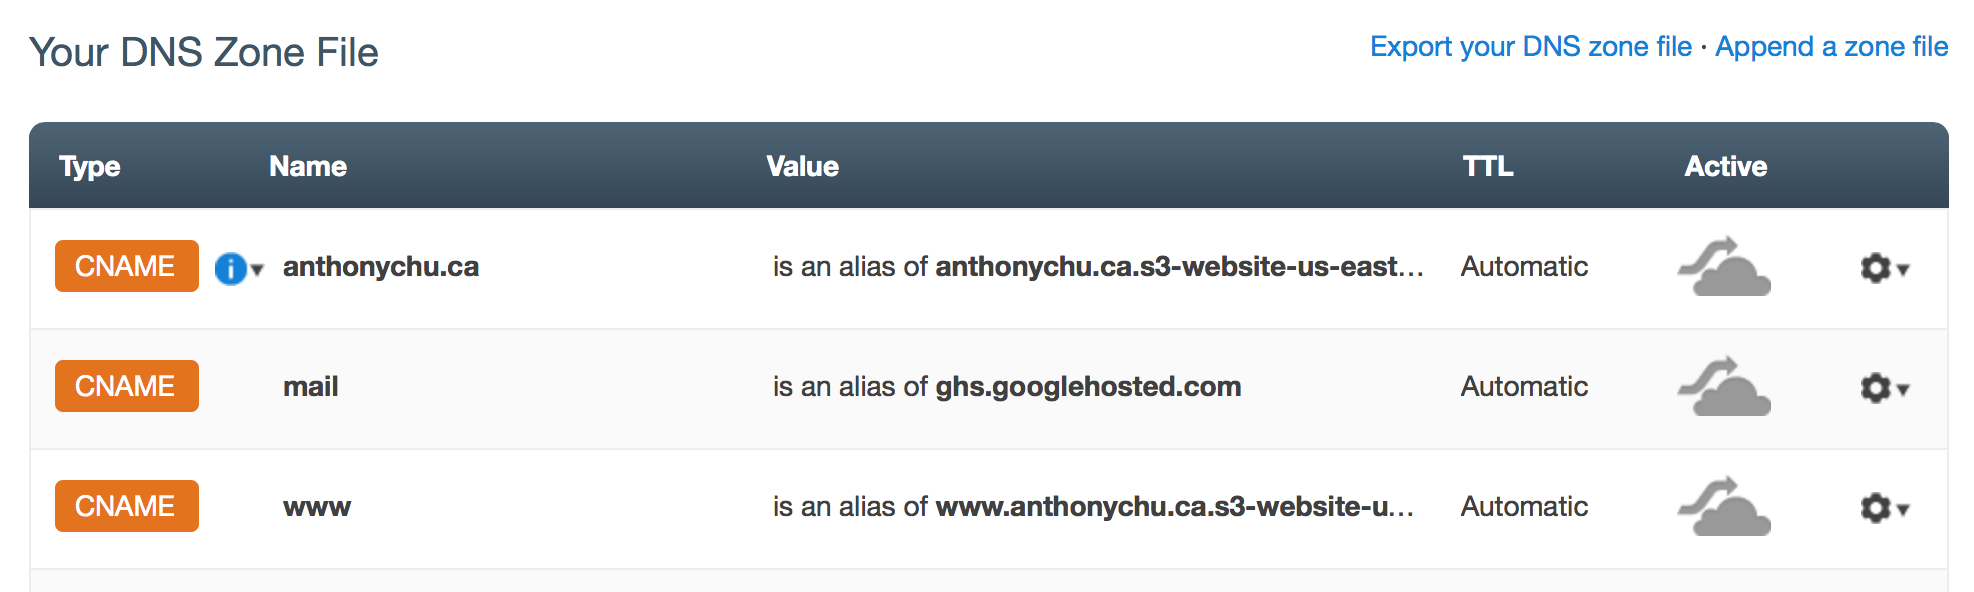
If the "cloud" in the Active column is orange, it means traffic will be routed through CloudFlare's infrastructure (where CloudFlare can add SSL, CDN, and other optimizations). Click them to send traffic directly to your S3 bucket (they'll turn gray). I'll be trying out the free CDN and SSL features later.
At this point, the domain is added to CloudFlare's name servers. The final step is to log into the domain's registrar and change the domain's name servers to the ones at CloudFlare.
And that's it! Wait a few minutes or a few hours for the DNS information to propagate.
For the past year, this blog ran on the MiniBlog engine and was hosted on a low-cost ASP.NET web host. While it served its purpose, the host was far from reliable — most recently experiencing a 7-hour outage due to an IIS misconfiguration.
I had also become accustomed to creating content with Markdown on StackOverflow and GitHub; so using Windows Live Writer to write blog posts became less and less appealing to me.
With those requirements in mind (and now that I use a Mac), the Ruby-based Jekyll static site generator is a perfect fit. Its blog posts are simply Markdown files, and the layout is easy to customize. And because it generates a completely static site, I no longer need a web host that supports a certain technology; anything that can serve static web pages will do.
Ironically, the solution to the unreliable $5/month web host problem is (essentially) free. This site is now hosted in an Amazon S3 bucket with CloudFlare as its DNS service. So far, so good.
I'll probably create another post on the MiniBlog to Jekyll conversion. Today, I'll focus on the hosting and DNS side of things with Amazon S3 and CloudFlare.
Website Hosting on Amazon S3
As a long-time Microsoft Azure advocate, I'm pretty familiar with Azure Websites and I recommend it for 99% of scenarios out there. Unfortunately, my blog falls into the other 1% — costs matter and the free tier won't do because it doesn't allow custom domains (it would cost $10/month for the Shared tier).
That's where Amazon S3 comes in. S3 is Amazon's storage service (for Azure folks, it's directly comparable Azure Blob Storage). One thing that sets S3 apart here is you can turn any S3 bucket into a website.
S3 website features:
- Allows default pages (required for Jekyll pages without a
.htmlextension) - Custom domain names
- Can be configured to redirect all pages to a different domain (redirects all traffic to www.anthonychu.ca or anthonychu.com to anthonychu.ca)
- Highly reliable (more than a cheapo web host, anyway)
If you're eligible for the Amazon free usage tier, there is a fair amount of traffic included. If you go over, here's what it costs in the US Standard region right now:
- Storage: 3 cents per GB
- GET requests: 4 cents per 100000 requests
- Outbound transfers: 9 cents per GB
I think even I can afford that!
Creating the S3 Website
Setting up an S3 bucket as a website is pretty simple. Simply follow their instructions:
When naming your site, pay close attention to the conventions in this article: Customizing Amazon S3 URLs with CNAMEs.
Domain Redirection
To redirect traffic to the main site from the "www." domain or from a different domain altogether, you must set up a bucket for each domain to redirect from, and enter the domain to redirect to in the bucket's website settings. That's all it takes to redirect all traffic from other domains to the main domain. It'll even retain the path after the redirection so it'll work for deep links too.
Uploading to S3
The best tool I've found to upload a site to S3 is s3_website (installs as a Ruby gem). By default, knows how to find Jekyll's /_site folder and upload it.
After installing it, create a file called s3_website.yml and fill it with the key and bucket information (make sure to exclude this file from your git repo!):
s3_id: <S3_ID>
s3_secret: <S3_SECRET>
s3_bucket: blog.example.com
Then uploading a site is as easy as running s3_website push.
s3_website can also configure other S3 bucket features such as GZip compression and additional redirect rules.
DNS Hosting on CloudFlare
Amazon has a DNS service called Route 53. But it costs about $1 a month per DNS zone; that's too expensive for me!
Thankfully, there's CloudFlare. CloudFlare offers a lot in their free plan. It can be used strictly as a DNS service, which is what I'm currently using it for. It also offers a CDN and SSL at no cost.
It's pretty simple to use. Sign up for an account and add a website. It will walk you through setting up a DNS zone for a domain. It'll even pull in the domain's existing DNS records. Add CNAME records to point it to the S3 bucket...
If the "cloud" in the Active column is orange, it means traffic will be routed through CloudFlare's infrastructure (where CloudFlare can add SSL, CDN, and other optimizations). Click them to send traffic directly to your S3 bucket (they'll turn gray). I'll be trying out the free CDN and SSL features later.
At this point, the domain is added to CloudFlare's name servers. The final step is to log into the domain's registrar and change the domain's name servers to the ones at CloudFlare.
And that's it! Wait a few minutes or a few hours for the DNS information to propagate.