
Deploying Windows Containers with Azure Container Instances (ACI) Connector for Kubernetes
Sunday, November 19, 2017
Update (January 2018) The ACI Connector has been replaced by the Virual Kubelet project. The functionalities are similar but the installation steps are slightly different.
Azure Container Instances (ACI) allows us to run containers without worrying about infrastructure. We can give it any container image and it'll happily run it; it'll even provision an external IP address for the container. It's "serverless containers": we're only charged when the containers run. It's great for batch workloads or long-running containers where we don't want to deal with infrastructure.
ACI provides a low-level infrastructure building block for running containers. We can sort of think of it like a VM; instead of running a VM image, it runs a container image.
One exciting example of how ACI can be used in combination with a container orchestrator is the experimental ACI Connector for Kubernetes. When installed in a Kubernetes cluster, the ACI Connector creates virtual nodes in the cluster. They behave like nodes with unlimited capacity. We can schedule pods to run on them, but they will actually be run as container groups on ACI.
Perhaps, one day, ACI Connector will be the foundation that enables "serverless Kubernetes"... imagine an Azure Container Service (AKS) Kubernetes cluster that has no physical nodes, and all work is scheduled on Azure Container Instances!
Recently, Windows container support was added to ACI Connector for Kubernetes. Today, we'll take a look at how to use it to run Windows containers.

Set up an Azure Container Service for Kubernetes (AKS) cluster
It's extremely easy to create a managed Kubernetes cluster in Azure using AKS. Simply run these Azure CLI commands:
$ az group create -n antchu-aks-temp
$ az aks create -g antchu-aks-temp -n antchu-aks-temp -c 1 -l eastus -k 1.8.2
This creates a resource group and an AKS resource. We set the agent pool size to 1, its location to eastus, and the initial Kubernetes version to 1.8.2.
Once the cluster is ready, we can use the Azure CLI to install the latest Kubernetes CLI (kubectl) and download the configuration file for our cluster:
$ az aks install-cli
$ az aks get-credentials -g antchu-aks-temp -n antchu-aks-temp
Now we can see one node in our cluster.
$ kubectl get nodes
NAME                        STATUS    ROLES     AGE       VERSION
aks-agentpool1-16617890-0   Ready     agent     2m        v1.8.2
Install the ACI Connector for Kubernetes
Create a resouce group
Before installing the ACI connector, we need to first create a resource group that the ACI resources will be deployed into:
$ az group create -n antchu-aci-temp -l eastus
{
  "id": "/subscriptions/<subscription-id>/resourceGroups/antchu-aci-temp",
  "location": "eastus",
  "managedBy": null,
  "name": "antchu-aci-temp",
  "properties": {
    "provisioningState": "Succeeded"
  },
  "tags": null
}
Note the ID of the new resource group.
Create a service principal
Next, we need to create a service principal that the ACI Connector will use to create, manage, and delete container instances in the newly created resource group. The service principal needs to be assigned the contributor role in the resource group. To create the service principal and role assignment, we run the following command using the full resource group ID from the previous step:
$ az ad sp create-for-rbac -n antchu-aks-aci-temp --role contributor --scopes <resource-group-id>
{
  "appId": "<app-id>",
  "displayName": "antchu-aks-aci-temp",
  "name": "http://antchu-aks-aci-temp",
  "password": "<password>",
  "tenant": "<tenant-id>"
}
Note that values of the appId, password, and tenant properties that are returned.
Install the ACI connector
The ACI connector is available as an image on Docker Hub. To get Windows support, we currently need to use the canary build. Create the following file called aci-connector.yaml. It defines a Kubernetes deployment with one pod that runs a container from the microsoft/aci-connector-k8s:canary image:
apiVersion: extensions/v1beta1
kind: Deployment
metadata:
  name: aci-connector
  namespace: default
spec:
  replicas: 1
  template:
    metadata:
      labels:
        app: aci-connector
    spec:
      containers:
      - name: aci-connector
        image: microsoft/aci-connector-k8s:canary
        imagePullPolicy: Always
        env:
        - name: AZURE_CLIENT_ID
          value: <tenant-id>
        - name: AZURE_CLIENT_KEY
          value: <app-id>
        - name: AZURE_TENANT_ID
          value: <tenant-id>
        - name: AZURE_SUBSCRIPTION_ID
          value: <subscription-id>
        - name: ACI_RESOURCE_GROUP
          value: antchu-aci-temp
Replace the environment variables with values obtained from the previous commands. Then create the deployment in Kubernetes:
$ kubectl create -f aci-connector.yaml
Now when we look at the nodes in our cluster, we have two more virtual nodes:
$ kubectl get nodes
NAME                        STATUS    ROLES     AGE       VERSION
aci-connector-0             Ready     <none>    10s       v1.6.6
aci-connector-1             Ready     <none>    10s       v1.6.6
aks-agentpool1-16617890-0   Ready     agent     9m        v1.8.2
Scheduling work on aci-connector-0 will run Linux containers in ACI; aci-connector-1 will run Windows containers in ACI.
To prevent Kubernetes from accidentally scheduling pods on them, the ACI Connector nodes have the azure.com/aci:NoSchedule taint added. We can see this if we look at the properties of the node:
$ kubectl describe node aci-connector-1
Name:               aci-connector-1
Roles:              <none>
Labels:             beta.kubernetes.io/os=1
Annotations:        node.alpha.kubernetes.io/ttl=0
Taints:             azure.com/aci:NoSchedule
...
Schedule a Windows container to run on ACI
Create a file called iis-pod.yaml with the following content. It describes a single pod running the microsoft/iis:windowsservercore Windows container image.
apiVersion: v1
kind: Pod
metadata:
  name: iis-winsvrcore
spec:
  containers:
  - image: microsoft/iis:windowsservercore
    imagePullPolicy: Always
    name: iis-winsvrcore
  dnsPolicy: ClusterFirst
  nodeName: aci-connector-1
Note that we are explicitly stating that this pod should run on the node named aci-connector-1. Now, we create the pod:
$ kubectl create -f iis-pod.yaml
pod "iis-winsvrcore" created
And if we list our pods, it'll appear in the list:
$ kubectl get pods -o wide
NAME                             READY  STATUS    RESTARTS   AGE   IP              NODE
aci-connector-54b97586f5-l96l9   1/1    Running   0          32m   10.244.0.10     aks-agentpool1-16617890-0
iis-winsvrcore                   1/1    Running   0          2m    13.88.182.114   aci-connector-1
It will take several minutes for ACI to pull the image and run it. There's currently a bug in the ACI Connector where it'll show the pod as "Running" even if it's still creating. We should see the status of the container instance by running this Azure CLI command:
$ az container list -o table
Name               ResourceGroup    ProvisioningState    Image                            IP:ports           CPU/Memory       OsType    Location
-----------------  ---------------  -------------------  -------------------------------  -----------------  ---------------  --------  ----------
iis-winsvrcore     antchu-aci-temp  Creating             microsoft/iis:windowsservercore  13.88.182.114:80   1.0 core/1.5 gb  Windows   westus
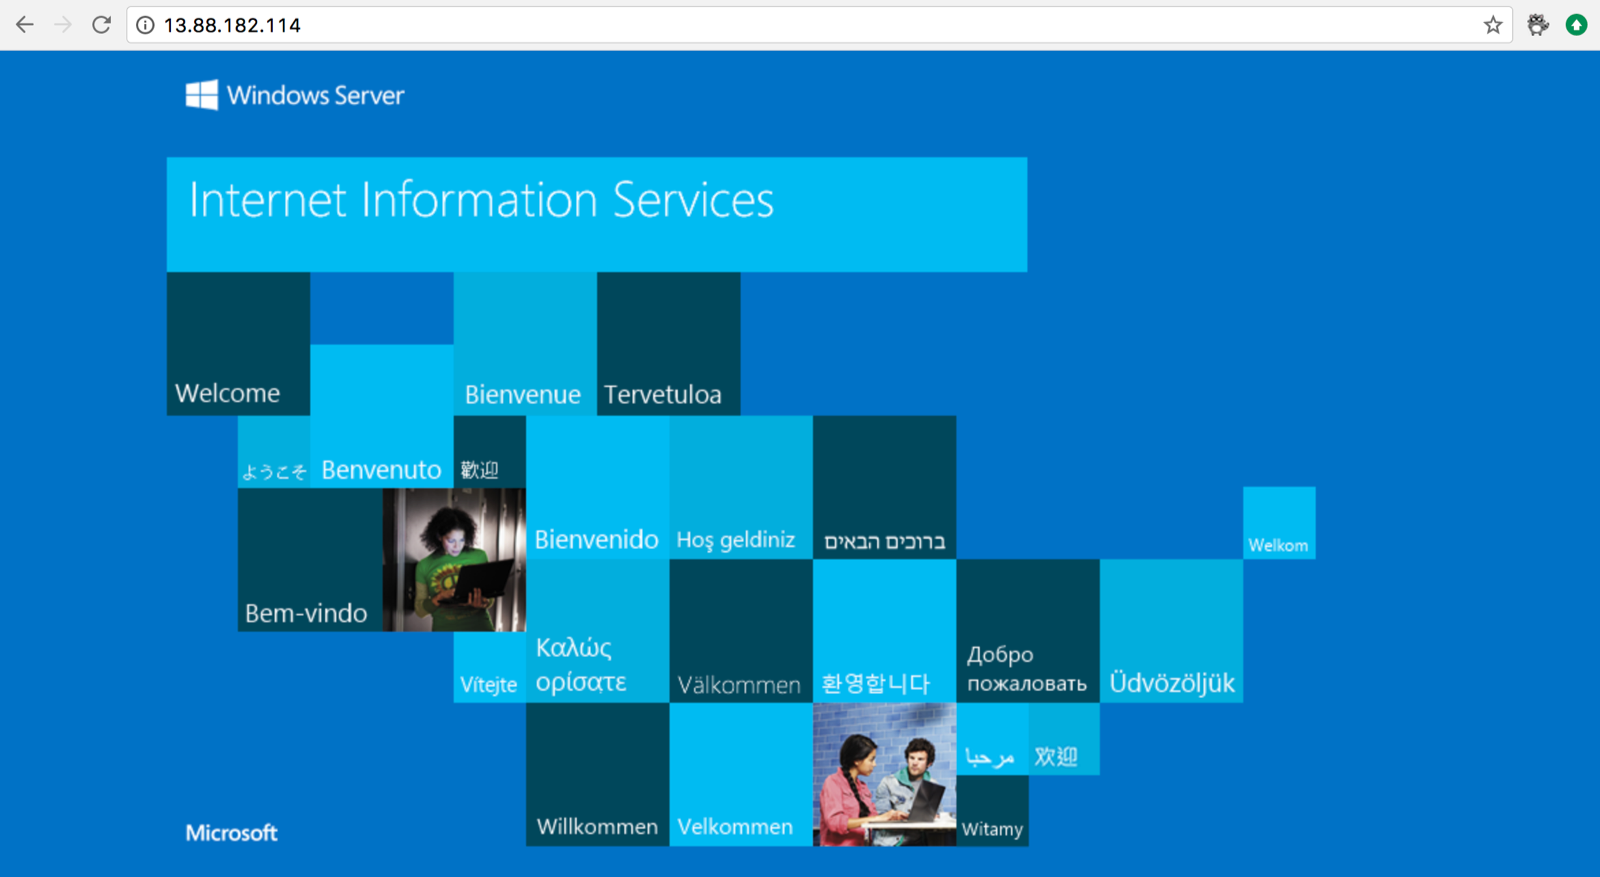
When the provisioning state becomes "Succeeded", we can browse to the container's IP. We can obtain the IP from the kubectl get pods -o wide or az container list output above.
Contribute to aci-connector-k8s
The ACI Connector for Kubernetes can be found on GitHub. The project is extremely experimental at this point. Please help make it awesome by submitting issues and pull requests!
Update - November 21, 2017
Check out this video by Ria Bhatia who's a program manager working on ACI and ACI Connector. A great demo of the technologies we talked about, and she will donate 10 cents from every view to fight breast cancer! Check it out and follow her on Twitter @rbitia.
Update (January 2018) The ACI Connector has been replaced by the Virual Kubelet project. The functionalities are similar but the installation steps are slightly different.
Azure Container Instances (ACI) allows us to run containers without worrying about infrastructure. We can give it any container image and it'll happily run it; it'll even provision an external IP address for the container. It's "serverless containers": we're only charged when the containers run. It's great for batch workloads or long-running containers where we don't want to deal with infrastructure.
ACI provides a low-level infrastructure building block for running containers. We can sort of think of it like a VM; instead of running a VM image, it runs a container image.
One exciting example of how ACI can be used in combination with a container orchestrator is the experimental ACI Connector for Kubernetes. When installed in a Kubernetes cluster, the ACI Connector creates virtual nodes in the cluster. They behave like nodes with unlimited capacity. We can schedule pods to run on them, but they will actually be run as container groups on ACI.
Perhaps, one day, ACI Connector will be the foundation that enables "serverless Kubernetes"... imagine an Azure Container Service (AKS) Kubernetes cluster that has no physical nodes, and all work is scheduled on Azure Container Instances!
Recently, Windows container support was added to ACI Connector for Kubernetes. Today, we'll take a look at how to use it to run Windows containers.
Set up an Azure Container Service for Kubernetes (AKS) cluster
It's extremely easy to create a managed Kubernetes cluster in Azure using AKS. Simply run these Azure CLI commands:
$ az group create -n antchu-aks-temp
$ az aks create -g antchu-aks-temp -n antchu-aks-temp -c 1 -l eastus -k 1.8.2
This creates a resource group and an AKS resource. We set the agent pool size to 1, its location to eastus, and the initial Kubernetes version to 1.8.2.
Once the cluster is ready, we can use the Azure CLI to install the latest Kubernetes CLI (kubectl) and download the configuration file for our cluster:
$ az aks install-cli
$ az aks get-credentials -g antchu-aks-temp -n antchu-aks-temp
Now we can see one node in our cluster.
$ kubectl get nodes
NAME STATUS ROLES AGE VERSION
aks-agentpool1-16617890-0 Ready agent 2m v1.8.2
Install the ACI Connector for Kubernetes
Create a resouce group
Before installing the ACI connector, we need to first create a resource group that the ACI resources will be deployed into:
$ az group create -n antchu-aci-temp -l eastus
{
"id": "/subscriptions/<subscription-id>/resourceGroups/antchu-aci-temp",
"location": "eastus",
"managedBy": null,
"name": "antchu-aci-temp",
"properties": {
"provisioningState": "Succeeded"
},
"tags": null
}
Note the ID of the new resource group.
Create a service principal
Next, we need to create a service principal that the ACI Connector will use to create, manage, and delete container instances in the newly created resource group. The service principal needs to be assigned the contributor role in the resource group. To create the service principal and role assignment, we run the following command using the full resource group ID from the previous step:
$ az ad sp create-for-rbac -n antchu-aks-aci-temp --role contributor --scopes <resource-group-id>
{
"appId": "<app-id>",
"displayName": "antchu-aks-aci-temp",
"name": "http://antchu-aks-aci-temp",
"password": "<password>",
"tenant": "<tenant-id>"
}
Note that values of the appId, password, and tenant properties that are returned.
Install the ACI connector
The ACI connector is available as an image on Docker Hub. To get Windows support, we currently need to use the canary build. Create the following file called aci-connector.yaml. It defines a Kubernetes deployment with one pod that runs a container from the microsoft/aci-connector-k8s:canary image:
apiVersion: extensions/v1beta1
kind: Deployment
metadata:
name: aci-connector
namespace: default
spec:
replicas: 1
template:
metadata:
labels:
app: aci-connector
spec:
containers:
- name: aci-connector
image: microsoft/aci-connector-k8s:canary
imagePullPolicy: Always
env:
- name: AZURE_CLIENT_ID
value: <tenant-id>
- name: AZURE_CLIENT_KEY
value: <app-id>
- name: AZURE_TENANT_ID
value: <tenant-id>
- name: AZURE_SUBSCRIPTION_ID
value: <subscription-id>
- name: ACI_RESOURCE_GROUP
value: antchu-aci-temp
Replace the environment variables with values obtained from the previous commands. Then create the deployment in Kubernetes:
$ kubectl create -f aci-connector.yaml
Now when we look at the nodes in our cluster, we have two more virtual nodes:
$ kubectl get nodes
NAME STATUS ROLES AGE VERSION
aci-connector-0 Ready <none> 10s v1.6.6
aci-connector-1 Ready <none> 10s v1.6.6
aks-agentpool1-16617890-0 Ready agent 9m v1.8.2
Scheduling work on aci-connector-0 will run Linux containers in ACI; aci-connector-1 will run Windows containers in ACI.
To prevent Kubernetes from accidentally scheduling pods on them, the ACI Connector nodes have the azure.com/aci:NoSchedule taint added. We can see this if we look at the properties of the node:
$ kubectl describe node aci-connector-1
Name: aci-connector-1
Roles: <none>
Labels: beta.kubernetes.io/os=1
Annotations: node.alpha.kubernetes.io/ttl=0
Taints: azure.com/aci:NoSchedule
...
Schedule a Windows container to run on ACI
Create a file called iis-pod.yaml with the following content. It describes a single pod running the microsoft/iis:windowsservercore Windows container image.
apiVersion: v1
kind: Pod
metadata:
name: iis-winsvrcore
spec:
containers:
- image: microsoft/iis:windowsservercore
imagePullPolicy: Always
name: iis-winsvrcore
dnsPolicy: ClusterFirst
nodeName: aci-connector-1
Note that we are explicitly stating that this pod should run on the node named aci-connector-1. Now, we create the pod:
$ kubectl create -f iis-pod.yaml
pod "iis-winsvrcore" created
And if we list our pods, it'll appear in the list:
$ kubectl get pods -o wide
NAME READY STATUS RESTARTS AGE IP NODE
aci-connector-54b97586f5-l96l9 1/1 Running 0 32m 10.244.0.10 aks-agentpool1-16617890-0
iis-winsvrcore 1/1 Running 0 2m 13.88.182.114 aci-connector-1
It will take several minutes for ACI to pull the image and run it. There's currently a bug in the ACI Connector where it'll show the pod as "Running" even if it's still creating. We should see the status of the container instance by running this Azure CLI command:
$ az container list -o table
Name ResourceGroup ProvisioningState Image IP:ports CPU/Memory OsType Location
----------------- --------------- ------------------- ------------------------------- ----------------- --------------- -------- ----------
iis-winsvrcore antchu-aci-temp Creating microsoft/iis:windowsservercore 13.88.182.114:80 1.0 core/1.5 gb Windows westus
When the provisioning state becomes "Succeeded", we can browse to the container's IP. We can obtain the IP from the kubectl get pods -o wide or az container list output above.
Contribute to aci-connector-k8s
The ACI Connector for Kubernetes can be found on GitHub. The project is extremely experimental at this point. Please help make it awesome by submitting issues and pull requests!
Update - November 21, 2017
Check out this video by Ria Bhatia who's a program manager working on ACI and ACI Connector. A great demo of the technologies we talked about, and she will donate 10 cents from every view to fight breast cancer! Check it out and follow her on Twitter @rbitia.