
Using VSTS to Deploy to Azure Functions and App Service with Run-From-Zip
Thursday, February 15, 2018
Update May 14, 2018 - The app setting WEBSITE_USE_ZIP is now WEBSITE_RUN_FROM_ZIP. This article as been updated to reflect this.
Yesterday, Azure announced a new way to deploy our applications to Azure Functions and App Service called Run-From-Zip, currently in preview. It allows us to mount the contents of a zip file into wwwroot instead of copying files into that folder.
In this article we'll take a look at how to use Visual Studio Team Services (VSTS) to build and deploy an application to Azure Functions and Azure Web Apps.
How Run-From-Zip works
Run-From-Zip is enabled by creating an app setting called WEBSITE_RUN_FROM_ZIP with the URL to a zip file that contains the contents of the web or function app to deploy.
App Service will download the file and mount the zip file in read-only mode at wwwroot. This allows deployments to be more atomic and, in some cases, more performant.
It also provides a way to build our application into an immutable package (a zip file) and deploy the exact same bits to all environment in a build pipeline. No more surprises when there's a stray file left in a folder on one environment.
Unlike GitHub and Git deployment, App Service does not build the application from code when using Run-From-Zip. We can use a build and release system like VSTS to build the application, deploy the zip file to a place accessible from App Service (e.g., Blob Storage), and update the WEBSITE_RUN_FROM_ZIP app setting in our application.
Currently, Run-From-Zip only works on Windows App Service, so we need to use Windows (**VS2017) hosted build agents to build applications that are platform dependent (Node.js apps with native modules).
Deploy to Azure Functions from VSTS
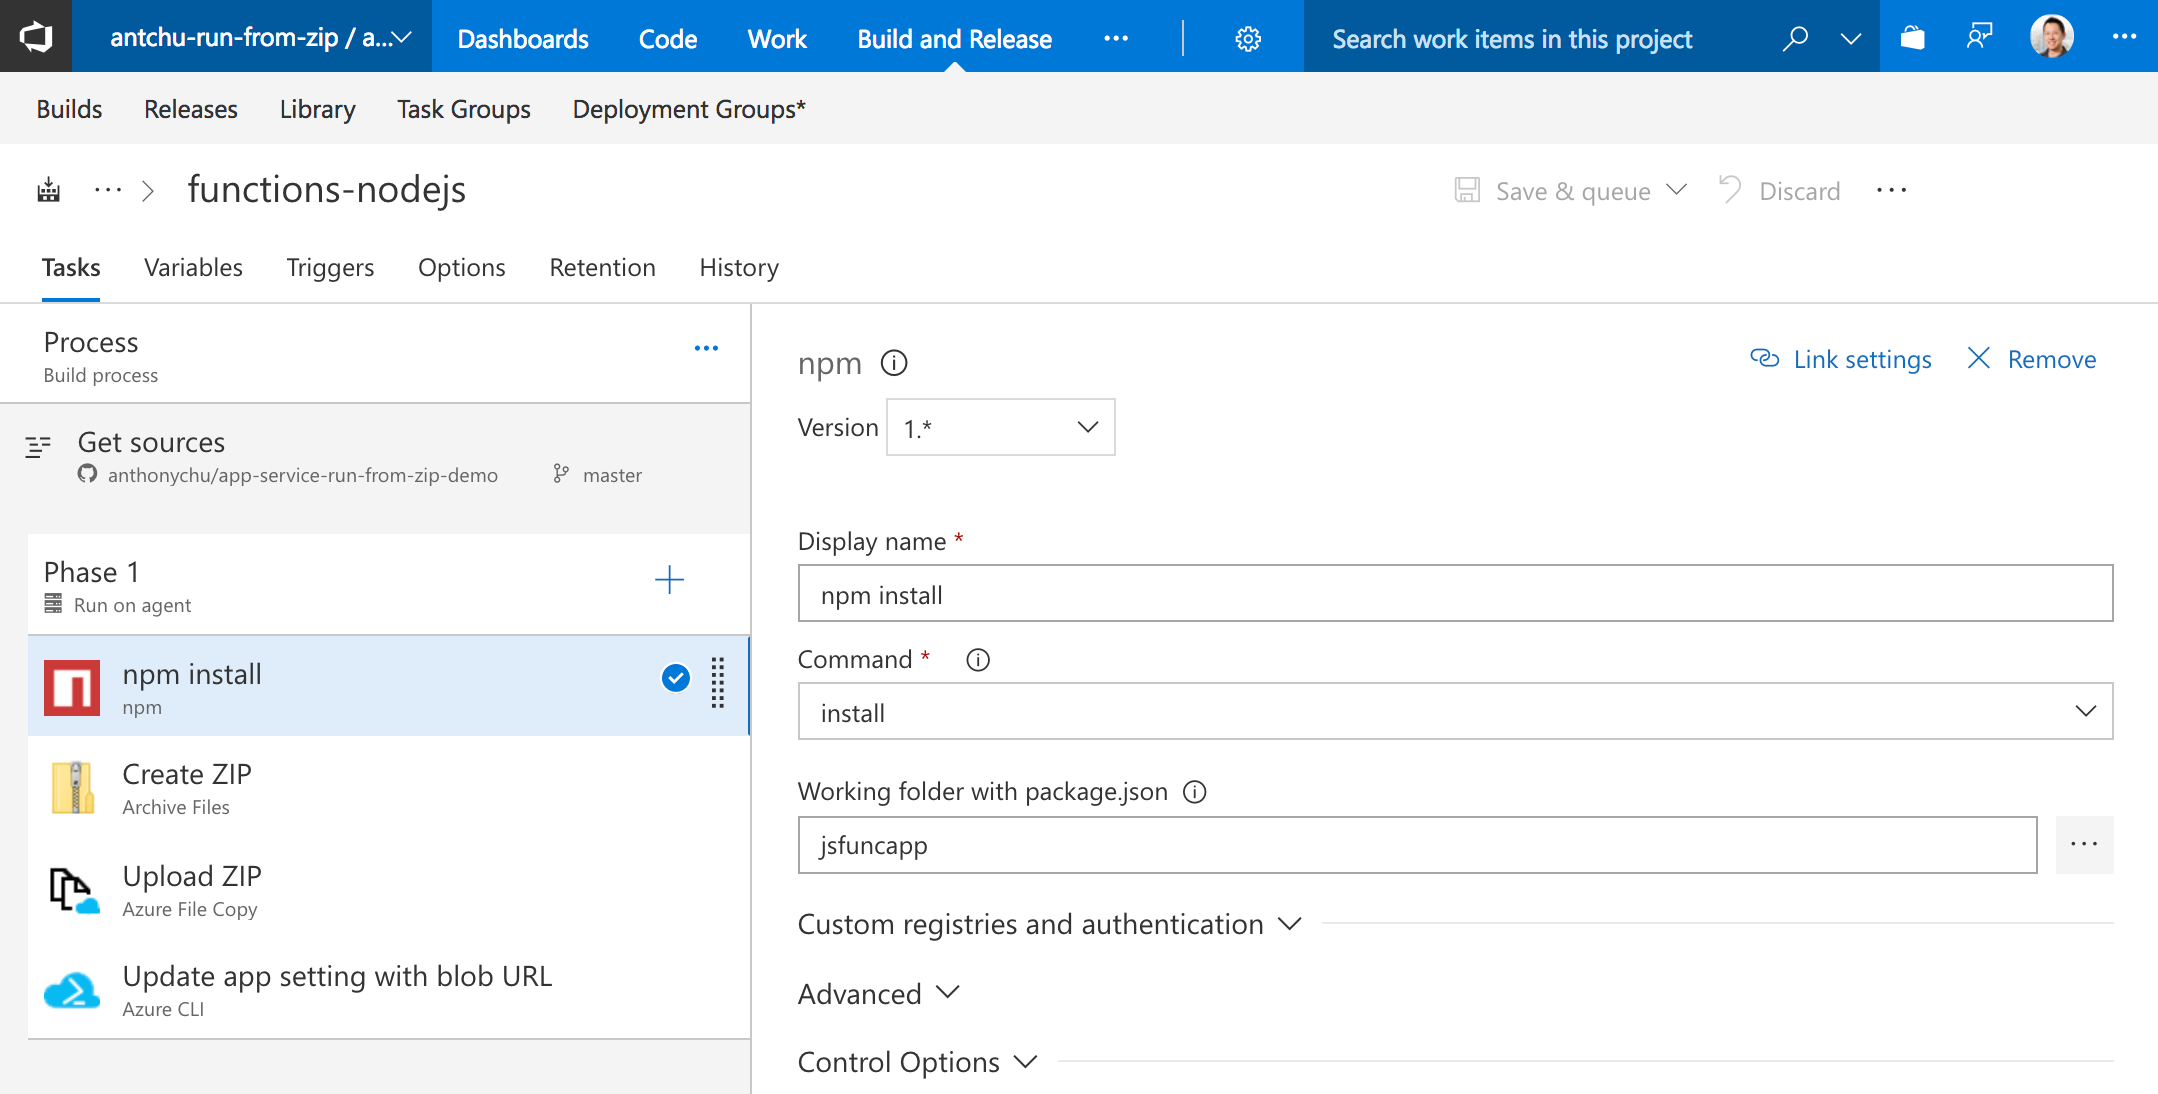
It's pretty straight-forward to build and deploy using Run-From-Zip from VSTS. We'll set up a build using this simple Node.js function app that has an NPM dependency. The build has 4 steps:
- NPM install - Our function app has a
package.json at the root so we need to run NPM install to bring in our Node dependencies.
- Archive files - Zip the entire folder into a file called
jsfuncapp.$(Build.BuildId).zip. When the task runs, $(Build.BuildId) is replaced by the Build ID.
- Azure File Copy - Upload the zip file to an Azure Blob Storage container. Make sure we set our container's access level to "Private" so our application cannot be downloaded by the public.
Azure CLI - We use the Azure CLI to do two things:
- Obtain the URL and a shared access signature (SAS) token that allows App Service to download the file from Storage. We set the SAS expiry to the year 2099 because App Service will re-download the file when an instance restarts or a scale-out happens; we need to make sure it will always have access to download it.
- Use the
az functionapp config appsettings set command to set the WEBSITE_RUN_FROM_ZIP app setting in our function app.
for /f %%i in ('az storage blob generate-sas --account-name ziptest9887 -c runfromzipjs -n jsfuncapp.$(Build.BuildId).zip --expiry 2099-12-31T23:59:59Z --permissions r -o tsv') do set SAS="%%i"
for /f %%i in ('az storage blob url --account-name ziptest9887 -c runfromzipjs -n jsfuncapp.$(Build.BuildId).zip -o tsv') do set URL="%%i"
SET FULL_URL="%URL:"=%?%SAS:"=%"

az functionapp config appsettings set -g test-run-from-zip -n run-from-zip-func --settings WEBSITE_RUN_FROM_ZIP=%FULL_URL%
If you don't want to use the Azure CLI, check out the custom VSTS tasks at the end of this article.
Deploy to Azure Web Apps from VSTS
Deploying to Web Apps using Run-From-Zip from VSTS follows a very similar process. We'll set up a build using this ASP.NET Core app. Our steps:
.NET Core - We run dotnet publish to build and publish the application to a folder named aspnetcore.$(Build.BuildId).
Set the argument to dotnet publish to:
-o $(System.DefaultWorkingDirectory)\aspnetcore\aspnetcore.$(Build.BuildId)
Check off the Zip Published Project to automatically generate a zip file (aspnetcore.$(Build.BuildId).zip).
Azure File Copy - Upload the zip file to an Azure Blob Storage container. Make sure we set our container's access level to "Private" so our application cannot be downloaded by the public.
Azure CLI - Again, we use the Azure CLI to do two things:
- Obtain the URL and a shared access signature (SAS) token that allows App Service to download the file from Storage. We set the SAS expiry to the year 2099 because App Service will re-download the file when an instance restarts or a scale-out happens; we need to make sure it will always have access to download it.
- Use the
az webapp config appsettings set command to set the WEBSITE_RUN_FROM_ZIP app setting in our function app.
for /f %%i in ('az storage blob generate-sas --account-name ziptest9887 -c runfromzipcs -n aspnetcore.$(Build.BuildId).zip --expiry 2099-12-31T23:59:59Z --permissions r -o tsv') do set SAS="%%i"
for /f %%i in ('az storage blob url --account-name ziptest9887 -c runfromzipcs -n aspnetcore.$(Build.BuildId).zip -o tsv') do set URL="%%i"
SET FULL_URL="%URL:"=%?%SAS:"=%"

az webapp config appsettings set -g test-run-from-zip -n run-from-zip-aspnetcore --settings WEBSITE_RUN_FROM_ZIP=%FULL_URL%

Next steps
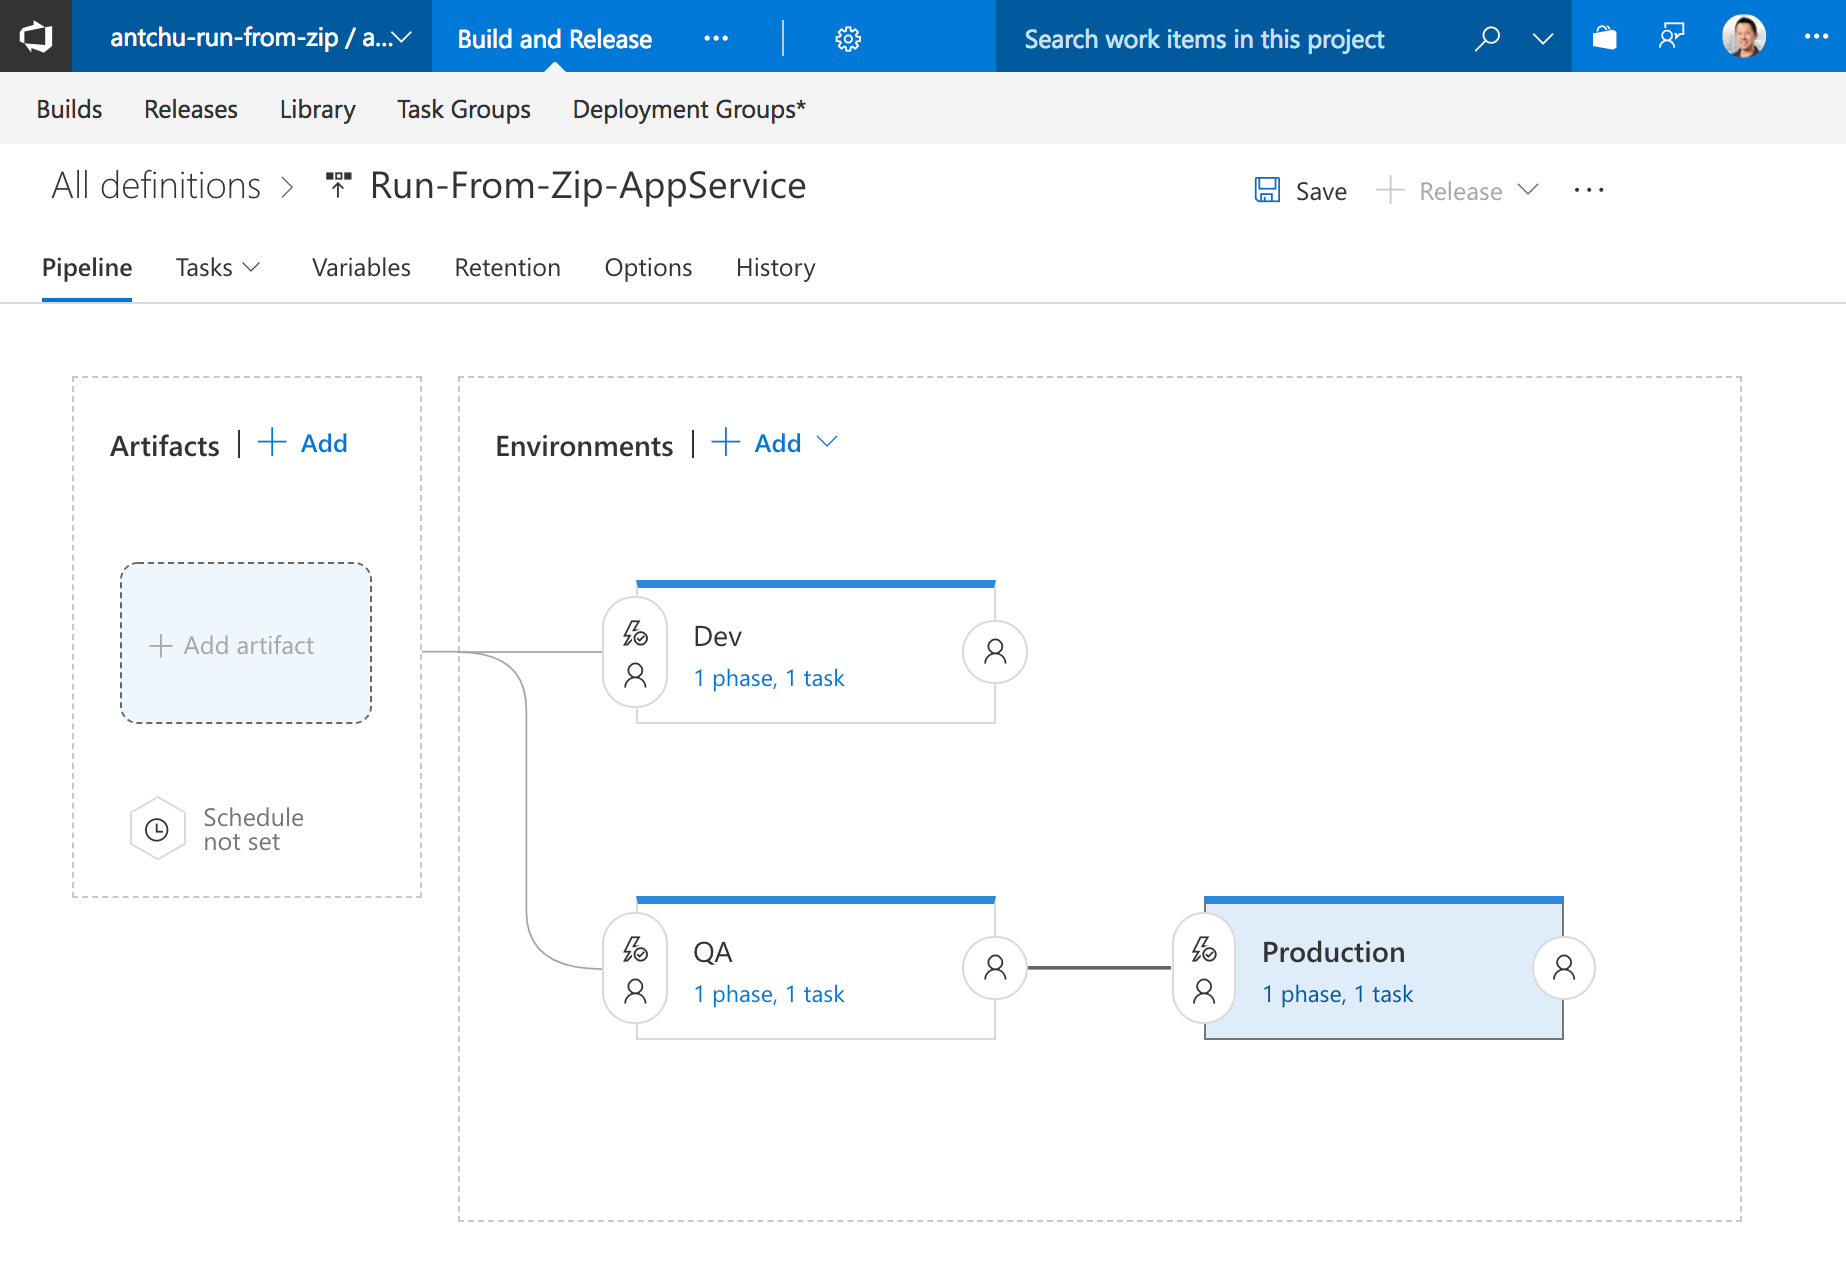
Separate build and release
For simplicity, we've been using a VSTS build definition to build and release the application. In the real world, we probably want to have a separate release definition for deployment to one or more environments.
To do this, we simply need to create a new release definition and move the Azure CLI task (the one that generates and update the zip file URL in the web app) to the release definition.
Use tasks from the Marketplace
The Azure CLI task can be replaced by tasks from the VSTS Marketplace, because not everyone likes to google how to write batch scripts:
Source code
Update May 14, 2018 - The app setting
WEBSITE_USE_ZIPis nowWEBSITE_RUN_FROM_ZIP. This article as been updated to reflect this.
Yesterday, Azure announced a new way to deploy our applications to Azure Functions and App Service called Run-From-Zip, currently in preview. It allows us to mount the contents of a zip file into wwwroot instead of copying files into that folder.
In this article we'll take a look at how to use Visual Studio Team Services (VSTS) to build and deploy an application to Azure Functions and Azure Web Apps.
How Run-From-Zip works
Run-From-Zip is enabled by creating an app setting called WEBSITE_RUN_FROM_ZIP with the URL to a zip file that contains the contents of the web or function app to deploy.
App Service will download the file and mount the zip file in read-only mode at wwwroot. This allows deployments to be more atomic and, in some cases, more performant.
It also provides a way to build our application into an immutable package (a zip file) and deploy the exact same bits to all environment in a build pipeline. No more surprises when there's a stray file left in a folder on one environment.
Unlike GitHub and Git deployment, App Service does not build the application from code when using Run-From-Zip. We can use a build and release system like VSTS to build the application, deploy the zip file to a place accessible from App Service (e.g., Blob Storage), and update the WEBSITE_RUN_FROM_ZIP app setting in our application.
Currently, Run-From-Zip only works on Windows App Service, so we need to use Windows (**VS2017) hosted build agents to build applications that are platform dependent (Node.js apps with native modules).
Deploy to Azure Functions from VSTS
It's pretty straight-forward to build and deploy using Run-From-Zip from VSTS. We'll set up a build using this simple Node.js function app that has an NPM dependency. The build has 4 steps:
- NPM install - Our function app has a
package.jsonat the root so we need to run NPM install to bring in our Node dependencies. - Archive files - Zip the entire folder into a file called
jsfuncapp.$(Build.BuildId).zip. When the task runs,$(Build.BuildId)is replaced by the Build ID. - Azure File Copy - Upload the zip file to an Azure Blob Storage container. Make sure we set our container's access level to "Private" so our application cannot be downloaded by the public.
Azure CLI - We use the Azure CLI to do two things:
- Obtain the URL and a shared access signature (SAS) token that allows App Service to download the file from Storage. We set the SAS expiry to the year 2099 because App Service will re-download the file when an instance restarts or a scale-out happens; we need to make sure it will always have access to download it.
- Use the
az functionapp config appsettings setcommand to set theWEBSITE_RUN_FROM_ZIPapp setting in our function app.
for /f %%i in ('az storage blob generate-sas --account-name ziptest9887 -c runfromzipjs -n jsfuncapp.$(Build.BuildId).zip --expiry 2099-12-31T23:59:59Z --permissions r -o tsv') do set SAS="%%i" for /f %%i in ('az storage blob url --account-name ziptest9887 -c runfromzipjs -n jsfuncapp.$(Build.BuildId).zip -o tsv') do set URL="%%i" SET FULL_URL="%URL:"=%?%SAS:"=%" az functionapp config appsettings set -g test-run-from-zip -n run-from-zip-func --settings WEBSITE_RUN_FROM_ZIP=%FULL_URL%If you don't want to use the Azure CLI, check out the custom VSTS tasks at the end of this article.
Deploy to Azure Web Apps from VSTS
Deploying to Web Apps using Run-From-Zip from VSTS follows a very similar process. We'll set up a build using this ASP.NET Core app. Our steps:
.NET Core - We run dotnet publish to build and publish the application to a folder named
aspnetcore.$(Build.BuildId).Set the argument to
dotnet publishto:-o $(System.DefaultWorkingDirectory)\aspnetcore\aspnetcore.$(Build.BuildId)Check off the Zip Published Project to automatically generate a zip file (
aspnetcore.$(Build.BuildId).zip).
Azure File Copy - Upload the zip file to an Azure Blob Storage container. Make sure we set our container's access level to "Private" so our application cannot be downloaded by the public.
Azure CLI - Again, we use the Azure CLI to do two things:
- Obtain the URL and a shared access signature (SAS) token that allows App Service to download the file from Storage. We set the SAS expiry to the year 2099 because App Service will re-download the file when an instance restarts or a scale-out happens; we need to make sure it will always have access to download it.
- Use the
az webapp config appsettings setcommand to set theWEBSITE_RUN_FROM_ZIPapp setting in our function app.
for /f %%i in ('az storage blob generate-sas --account-name ziptest9887 -c runfromzipcs -n aspnetcore.$(Build.BuildId).zip --expiry 2099-12-31T23:59:59Z --permissions r -o tsv') do set SAS="%%i" for /f %%i in ('az storage blob url --account-name ziptest9887 -c runfromzipcs -n aspnetcore.$(Build.BuildId).zip -o tsv') do set URL="%%i" SET FULL_URL="%URL:"=%?%SAS:"=%" az webapp config appsettings set -g test-run-from-zip -n run-from-zip-aspnetcore --settings WEBSITE_RUN_FROM_ZIP=%FULL_URL%
Next steps
Separate build and release
For simplicity, we've been using a VSTS build definition to build and release the application. In the real world, we probably want to have a separate release definition for deployment to one or more environments.
To do this, we simply need to create a new release definition and move the Azure CLI task (the one that generates and update the zip file URL in the web app) to the release definition.
Use tasks from the Marketplace
The Azure CLI task can be replaced by tasks from the VSTS Marketplace, because not everyone likes to google how to write batch scripts: