
Create a Hybrid Kubernetes Linux/Windows Cluster in 7 Easy Steps
Sunday, December 3, 2017
Azure Container Service (ACS) makes it really easy to provision a Kubernetes cluster in Azure. Today, we'll walk through the steps to set up a hybrid Kubernetes cluster with two agent pools: one for Linux and one for Windows. We'll also install an ingress controller and set it up with free and automatic SSL certificate management using Let's Encrypt. We should be able to do this in a few steps and under 20 minutes.
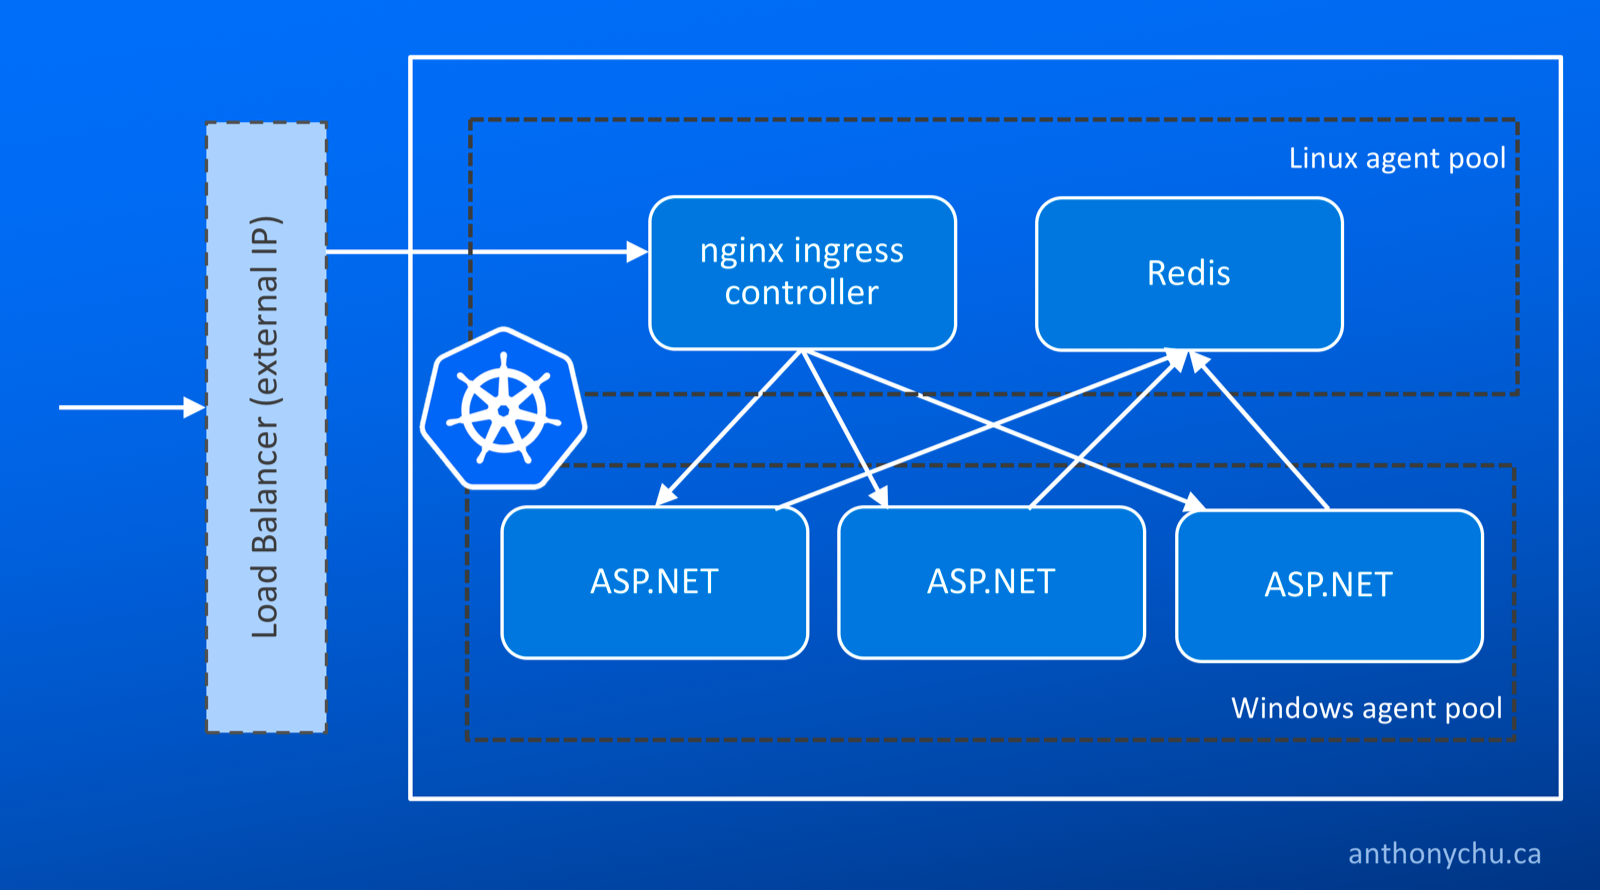
We'll then test out our cluster by deploying a hybrid application consisting of an ASP.NET application in a Windows container and a Redis instance in a Linux container.
Here's a simplified view of what we'll be deploying:
Note: Currently (December 3, 2017), the new managed Kubernetes service on Azure (AKS) does not yet support Windows agents.
0. Set up the Cloud Shell environment
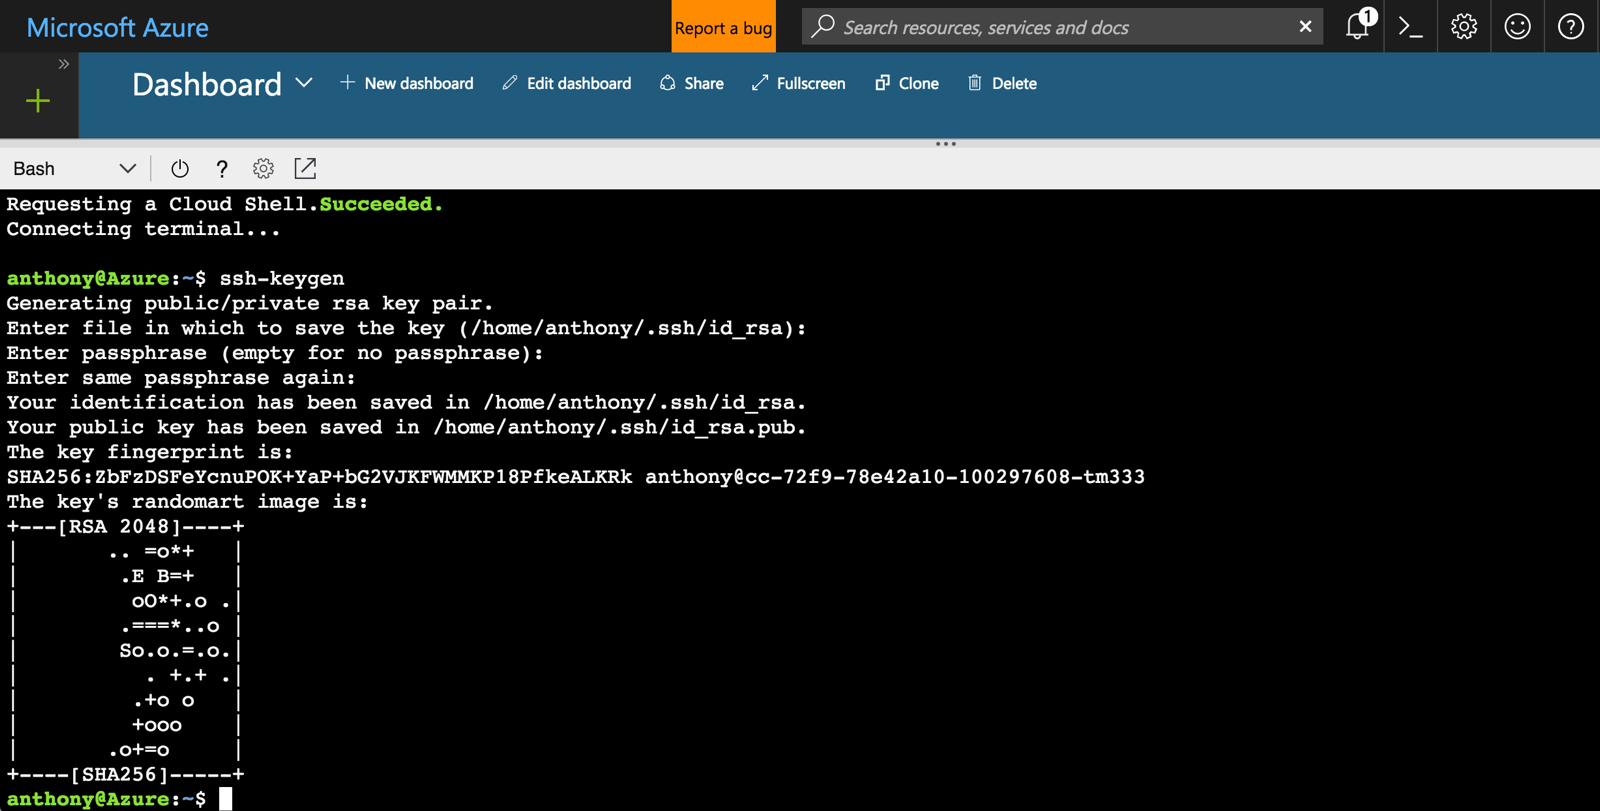
The Cloud Shell in the Azure portal has all the tools we need preinstalled. However, if we've never set up an SSH key, we'll have to do that first. The SSH key is required in case we need to log on to Linux machines in the cluster.
To check if an SSH key already exists, start the Cloud Shell and check if there are files named id_rsa and id_rsa.pub in the ~/.ssh directory. If they don't exist, we can generate them by running this command and taking the defaults (do not enter a password):
$ ssh-keygen
Now we're ready to get started!
1. Create a service principal
ACS needs a service principal in order to manage the cluster's resources on our behalf. It's best to create a dedicated service principal for this purpose.
In the Cloud Shell, run this command to create the service principal:
az ad sp create-for-rbac --skip-assignment -n <service-principal-name>
The service principal does not require any role assignments. The ACS resource provider will assign its roles when the cluster is created.
After the service principal is created, the CLI outputs some values. Note the AppId and Password.
2. Create the cluster
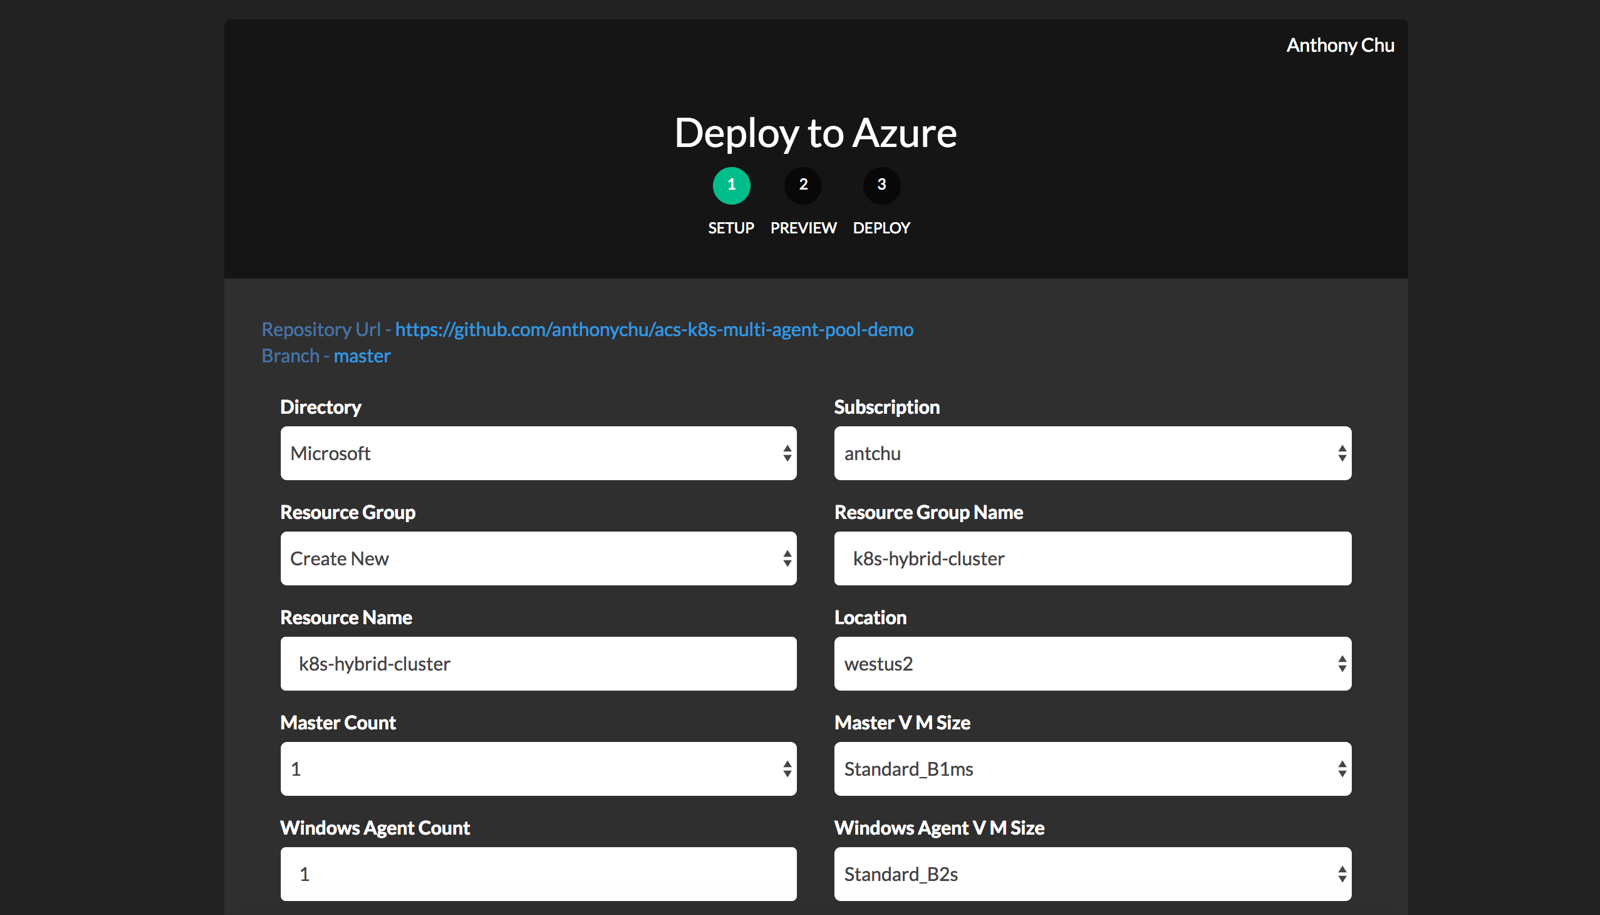
ACS currently supports multi-agent pool clusters in a few preview regions. I've created an ARM template that simplifies creating the cluster. Click the following button or run the template in the Azure CLI.

In general, the defaults should work fine. For the blank spaces, we can use these values:
- Resource Name - Enter a unique name.
- Location - There are other regions, but West US 2 should be available in most accounts.
- SSH RSA Public Key - Get this value by running
cat ~/.ssh/id_rsa.pub in Cloud Shell.
- Service Principal Client ID -
AppId from service principal, see Step 1.
- Service Principal Client Secret
Password from service principal, see Step 1.
Click Next and then Deploy. It will take a few minutes for the cluster to be created.
3. Download the KUBECONFIG
Before we can connect to our new cluster, we need to download the configuration. In the Cloud Shell:
$ az acs kubernetes get-credentials -n {acs-name} -g {resource-group-name}
This will connect to the master using the SSH key and download the Kubernetes configuration file to its default location at ~/.kube/config.
4. Update Helm/Tiller
We'll be installing a couple of Helm charts. To get ready for this, we need to make sure Tiller is installed and up-to-date.
Tiller should already be installed in our cluster, but we should make sure it's a new version. And because we have both Windows and Linux nodes in our cluster, we should set its nodeSelector to Linux. Run this command (Helm is already installed in Cloud Shell):
$ helm init --node-selectors "beta.kubernetes.io/os"="linux" --upgrade
5. Install the nginx ingress controller
An ingress controller makes it easy to expose services to the outside world without the need to set up additional load balancers for each new service. We can install the nginx ingress controller using Helm. Again, we use node selectors to ensure it is placed on Linux nodes.
$ helm install --name nginx-ingress \
    --set controller.nodeSelector."beta\.kubernetes\.io\/os"=linux \
    --set defaultBackend.nodeSelector."beta\.kubernetes\.io\/os"=linux \
    stable/nginx-ingress
An ingress controller provides a centralized service for routing incoming HTTP requests based on host name to the corresponding services inside the cluster.
6. Install Kube-Lego (Let's Encrypt)
Let's Encrypt is a certificate authority that provides an automated way to obtain free SSL certificates. It's extremely easy to integrate it into the nginx ingress controller using a project called Kube-Lego. We can also install this using Helm. We need to provide an email address.
$ helm install --name kube-lego \
    --set config.LEGO_EMAIL=<your-email-address> \
    --set config.LEGO_URL=https://acme-v01.api.letsencrypt.org/directory \
    --set nodeSelector."beta\.kubernetes\.io\/os"=linux \
    stable/kube-lego
7. Add a wildcard DNS entry
To finish our setup, we need to add a wildcard DNS entry that points to the IP address of our ingress controller. With the wildcard entry in place, we can easily add new services without adding any more DNS entries. And with Kube-Lego installed, we automatically get SSL certs too!
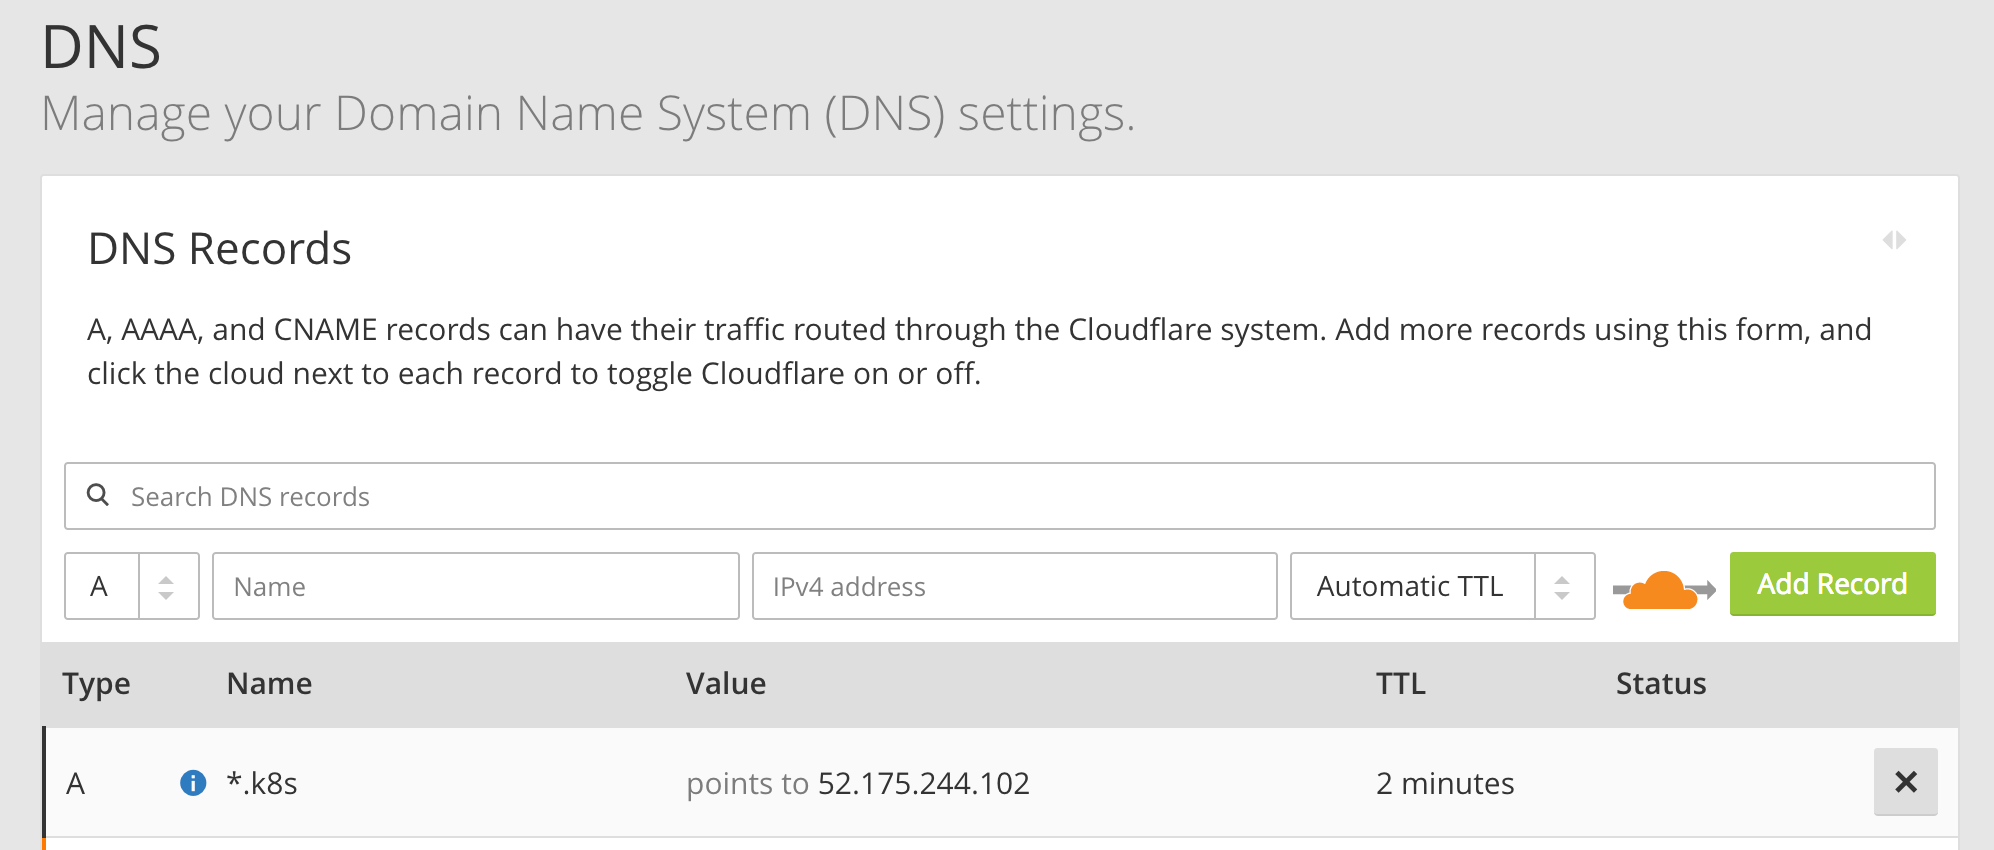
For instance, we can set up a wildcard DNS for *.k8s.anthonychu.com. When we create a new service, we can simply specify its hostname in the form of {servicename}.k8s.anthonychu.com in its ingress resource, and the nginx ingress controller will know how to route traffic to it.
Before we set up the DNS entry, we first need to get the ingress controller's external IP address by running:
$ kubectl get svc
NAME                                          TYPE           CLUSTER-IP     EXTERNAL-IP     PORT(S)                      AGE
kubernetes                                    ClusterIP      10.0.0.1       <none>          443/TCP                      1h
nginx-ingress-nginx-ingress-controller        LoadBalancer   10.0.46.60     52.175.244.102  80:32658/TCP,443:30830/TCP   3m
nginx-ingress-nginx-ingress-default-backend   ClusterIP      10.0.128.186   <none>          80/TCP                       3m
The process for setting up the wildcard DNS depends on your DNS service. I currently use CloudFlare, and I added a record like this:
Azure has a similar process.
At this point, we have a 3-node Kubernetes cluster (Linux master, Linux agent, Windows agent). We also have an ingress controller and SSL certificate management set up.
Deploy a hybrid Linux/Windows app
It's time to deploy an application. We'll be running Redis in a Linux container, and an ASP.NET Web Forms application in a Windows container. The Web Forms app will be externally exposed via the ingress controller, and it will use Redis to store data.
Redis
To deploy Redis, use this manifest. Simply run this command in the Cloud Shell:
$ kubectl create -f https://raw.githubusercontent.com/anthonychu/acs-k8s-multi-agent-pool-demo/master/redis.yaml
This will create a deployment for a single pod running Redis. It'll also create an internal service for it named redis.
ASP.NET application
Before we can deploy the ASP.NET application, we need to make a slight modification to its manifest to specify the hostname that will be used to access it externally.
First, download this manifest in the Cloud Shell:
$ curl -LO https://raw.githubusercontent.com/anthonychu/acs-k8s-multi-agent-pool-demo/master/aspnet-webforms-redis-sample.yaml
Now, we can use VIM to edit the file. There are 2 values named HOSTNAME. Replace them with a hostname that matches the wildcard DNS that we set up earlier. We'll use counter.k8s.anthonychu.com for this example.
After we save the file, we can run this command:
$ kubectl create -f aspnet-webforms-redis-sample.yaml
This will create a deployment for a simple ASP.NET app, plus a service and an ingress resource for it.
Here's the ingress resource in the manifest:
apiVersion: extensions/v1beta1
kind: Ingress
metadata:
  name: aspnet-redis-service
  annotations:
    kubernetes.io/tls-acme: "true"
    kubernetes.io/ingress.class: "nginx"
spec:
  tls:
  - hosts:
    - counter.k8s.anthonychu.com
    secretName: aspnet-redis-service-tls
  rules:
  - host: counter.k8s.anthonychu.com
    http:
      paths:
      - path: /
        backend:
          serviceName: aspnet-redis-service
          servicePort: 80
How this works
- The
kubernetes.io/ingress.class: "nginx" annotation and the host on the ingress resource instruct the nginx ingress controller to route traffic with the specified host name to the service.
- The
kubernetes.io/tls-acme: "true" annotation on the ingress resource instructs Kube-Lego to obtain and manage SSL certs for the ingress' host name using Let's Encrypt.
- The
REDIS_HOST environment variable in the application's container is set to redis.default.svc.cluster.local. This fully qualified DNS name will resolve to the Redis service inside the cluster.
The Windows container image is pretty big, so it might take a few minutes to pull it down the first time. Run $ kubectl get pods to check on its status.
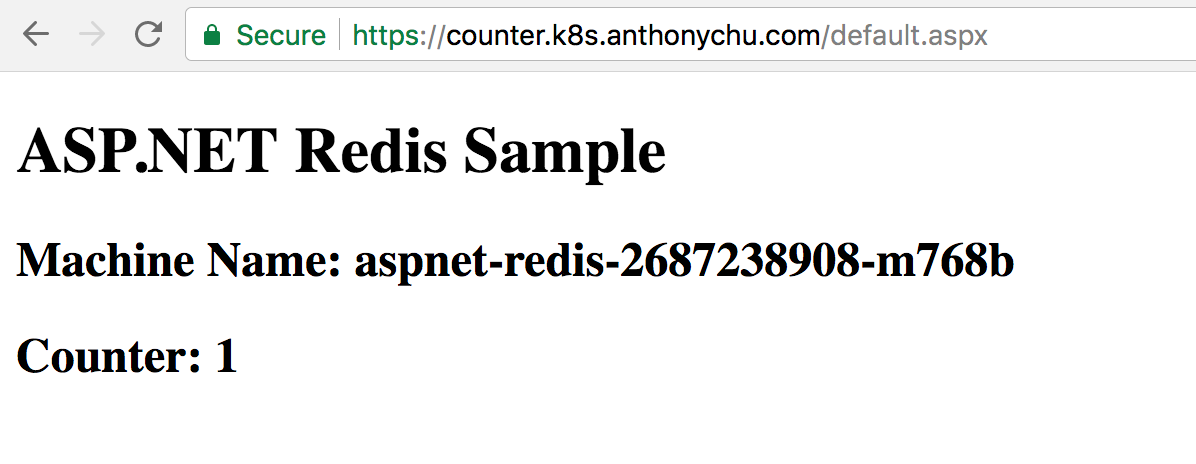
Once all the pods are ready, we can hit the site by going to the domain we specified:
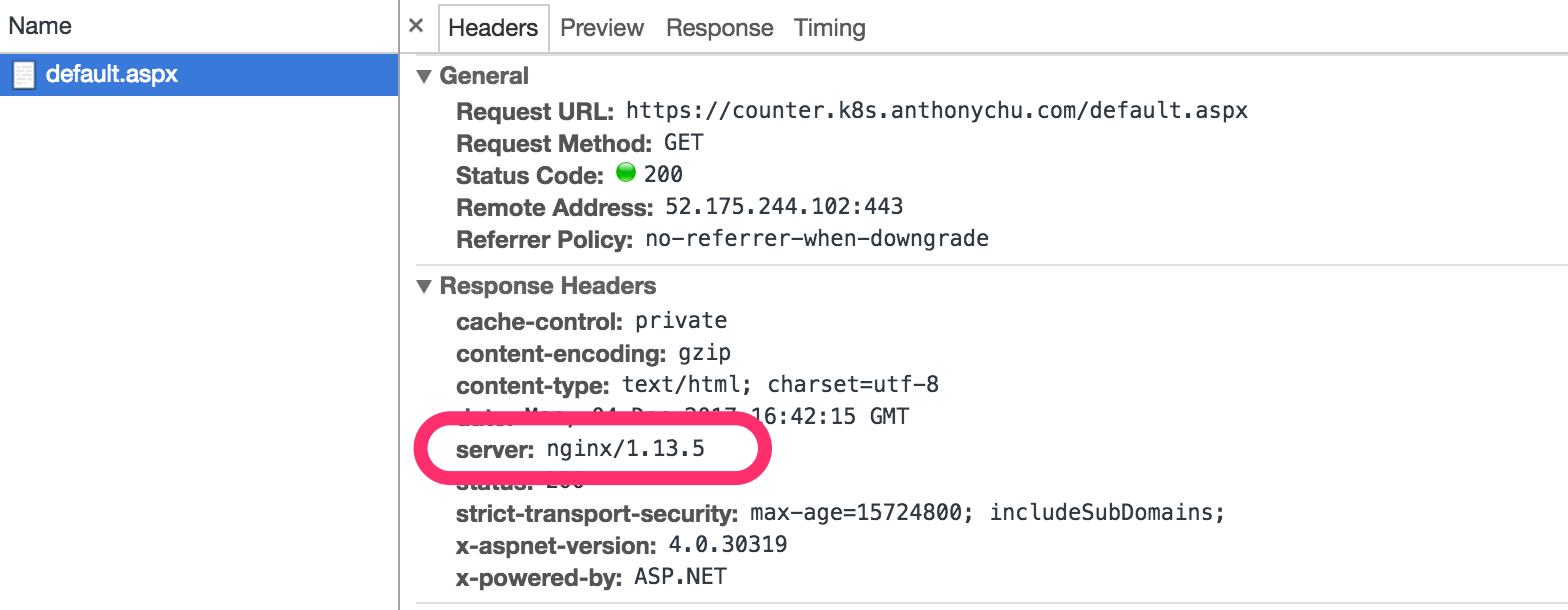
If we take a look at the response headers, we'll see that it's coming through nginx.
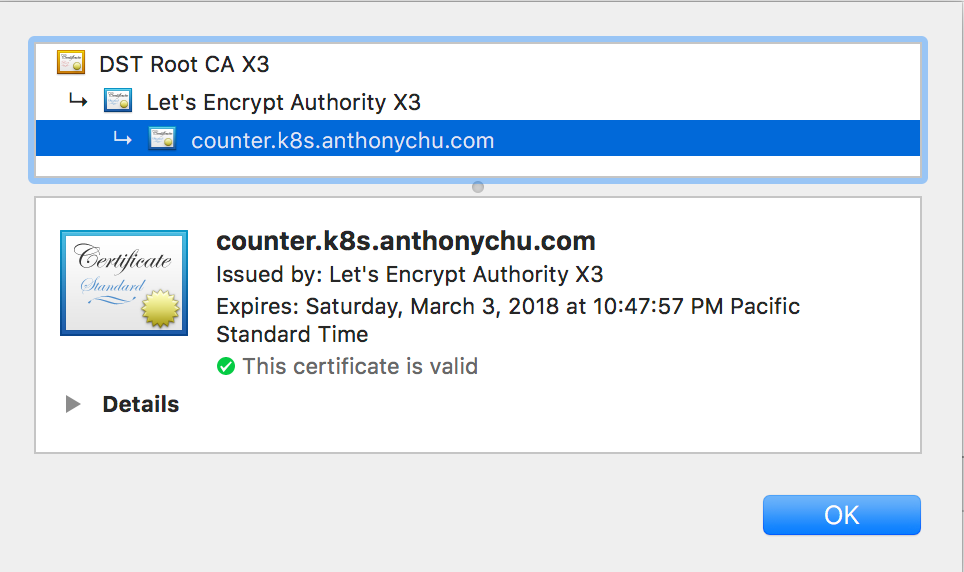
And we have a valid certificate issued by Let's Encrypt.
Scale the application
We can really quickly scale out the application:
$ kubectl scale --replicas=3 deployment aspnet-redis
It should take under a minute for the new pods to spin up and start receiving requests from the ingress. As we refresh the page, we'll see the counter increase and the machine name change as the requests are routed to different pods in the cluster.
Source code
Azure Container Service (ACS) makes it really easy to provision a Kubernetes cluster in Azure. Today, we'll walk through the steps to set up a hybrid Kubernetes cluster with two agent pools: one for Linux and one for Windows. We'll also install an ingress controller and set it up with free and automatic SSL certificate management using Let's Encrypt. We should be able to do this in a few steps and under 20 minutes.
We'll then test out our cluster by deploying a hybrid application consisting of an ASP.NET application in a Windows container and a Redis instance in a Linux container.
Here's a simplified view of what we'll be deploying:
Note: Currently (December 3, 2017), the new managed Kubernetes service on Azure (AKS) does not yet support Windows agents.
0. Set up the Cloud Shell environment
The Cloud Shell in the Azure portal has all the tools we need preinstalled. However, if we've never set up an SSH key, we'll have to do that first. The SSH key is required in case we need to log on to Linux machines in the cluster.
To check if an SSH key already exists, start the Cloud Shell and check if there are files named id_rsa and id_rsa.pub in the ~/.ssh directory. If they don't exist, we can generate them by running this command and taking the defaults (do not enter a password):
$ ssh-keygen
Now we're ready to get started!
1. Create a service principal
ACS needs a service principal in order to manage the cluster's resources on our behalf. It's best to create a dedicated service principal for this purpose.
In the Cloud Shell, run this command to create the service principal:
az ad sp create-for-rbac --skip-assignment -n <service-principal-name>
The service principal does not require any role assignments. The ACS resource provider will assign its roles when the cluster is created.
After the service principal is created, the CLI outputs some values. Note the AppId and Password.
2. Create the cluster
ACS currently supports multi-agent pool clusters in a few preview regions. I've created an ARM template that simplifies creating the cluster. Click the following button or run the template in the Azure CLI.
In general, the defaults should work fine. For the blank spaces, we can use these values:
- Resource Name - Enter a unique name.
- Location - There are other regions, but West US 2 should be available in most accounts.
- SSH RSA Public Key - Get this value by running
cat ~/.ssh/id_rsa.pubin Cloud Shell. - Service Principal Client ID -
AppIdfrom service principal, see Step 1. - Service Principal Client Secret
Passwordfrom service principal, see Step 1.
Click Next and then Deploy. It will take a few minutes for the cluster to be created.
3. Download the KUBECONFIG
Before we can connect to our new cluster, we need to download the configuration. In the Cloud Shell:
$ az acs kubernetes get-credentials -n {acs-name} -g {resource-group-name}
This will connect to the master using the SSH key and download the Kubernetes configuration file to its default location at ~/.kube/config.
4. Update Helm/Tiller
We'll be installing a couple of Helm charts. To get ready for this, we need to make sure Tiller is installed and up-to-date.
Tiller should already be installed in our cluster, but we should make sure it's a new version. And because we have both Windows and Linux nodes in our cluster, we should set its nodeSelector to Linux. Run this command (Helm is already installed in Cloud Shell):
$ helm init --node-selectors "beta.kubernetes.io/os"="linux" --upgrade
5. Install the nginx ingress controller
An ingress controller makes it easy to expose services to the outside world without the need to set up additional load balancers for each new service. We can install the nginx ingress controller using Helm. Again, we use node selectors to ensure it is placed on Linux nodes.
$ helm install --name nginx-ingress \
--set controller.nodeSelector."beta\.kubernetes\.io\/os"=linux \
--set defaultBackend.nodeSelector."beta\.kubernetes\.io\/os"=linux \
stable/nginx-ingress
An ingress controller provides a centralized service for routing incoming HTTP requests based on host name to the corresponding services inside the cluster.
6. Install Kube-Lego (Let's Encrypt)
Let's Encrypt is a certificate authority that provides an automated way to obtain free SSL certificates. It's extremely easy to integrate it into the nginx ingress controller using a project called Kube-Lego. We can also install this using Helm. We need to provide an email address.
$ helm install --name kube-lego \
--set config.LEGO_EMAIL=<your-email-address> \
--set config.LEGO_URL=https://acme-v01.api.letsencrypt.org/directory \
--set nodeSelector."beta\.kubernetes\.io\/os"=linux \
stable/kube-lego
7. Add a wildcard DNS entry
To finish our setup, we need to add a wildcard DNS entry that points to the IP address of our ingress controller. With the wildcard entry in place, we can easily add new services without adding any more DNS entries. And with Kube-Lego installed, we automatically get SSL certs too!
For instance, we can set up a wildcard DNS for *.k8s.anthonychu.com. When we create a new service, we can simply specify its hostname in the form of {servicename}.k8s.anthonychu.com in its ingress resource, and the nginx ingress controller will know how to route traffic to it.
Before we set up the DNS entry, we first need to get the ingress controller's external IP address by running:
$ kubectl get svc
NAME TYPE CLUSTER-IP EXTERNAL-IP PORT(S) AGE
kubernetes ClusterIP 10.0.0.1 <none> 443/TCP 1h
nginx-ingress-nginx-ingress-controller LoadBalancer 10.0.46.60 52.175.244.102 80:32658/TCP,443:30830/TCP 3m
nginx-ingress-nginx-ingress-default-backend ClusterIP 10.0.128.186 <none> 80/TCP 3m
The process for setting up the wildcard DNS depends on your DNS service. I currently use CloudFlare, and I added a record like this:
Azure has a similar process.
At this point, we have a 3-node Kubernetes cluster (Linux master, Linux agent, Windows agent). We also have an ingress controller and SSL certificate management set up.
Deploy a hybrid Linux/Windows app
It's time to deploy an application. We'll be running Redis in a Linux container, and an ASP.NET Web Forms application in a Windows container. The Web Forms app will be externally exposed via the ingress controller, and it will use Redis to store data.
Redis
To deploy Redis, use this manifest. Simply run this command in the Cloud Shell:
$ kubectl create -f https://raw.githubusercontent.com/anthonychu/acs-k8s-multi-agent-pool-demo/master/redis.yaml
This will create a deployment for a single pod running Redis. It'll also create an internal service for it named redis.
ASP.NET application
Before we can deploy the ASP.NET application, we need to make a slight modification to its manifest to specify the hostname that will be used to access it externally.
First, download this manifest in the Cloud Shell:
$ curl -LO https://raw.githubusercontent.com/anthonychu/acs-k8s-multi-agent-pool-demo/master/aspnet-webforms-redis-sample.yaml
Now, we can use VIM to edit the file. There are 2 values named HOSTNAME. Replace them with a hostname that matches the wildcard DNS that we set up earlier. We'll use counter.k8s.anthonychu.com for this example.
After we save the file, we can run this command:
$ kubectl create -f aspnet-webforms-redis-sample.yaml
This will create a deployment for a simple ASP.NET app, plus a service and an ingress resource for it.
Here's the ingress resource in the manifest:
apiVersion: extensions/v1beta1
kind: Ingress
metadata:
name: aspnet-redis-service
annotations:
kubernetes.io/tls-acme: "true"
kubernetes.io/ingress.class: "nginx"
spec:
tls:
- hosts:
- counter.k8s.anthonychu.com
secretName: aspnet-redis-service-tls
rules:
- host: counter.k8s.anthonychu.com
http:
paths:
- path: /
backend:
serviceName: aspnet-redis-service
servicePort: 80
How this works
- The
kubernetes.io/ingress.class: "nginx"annotation and thehoston the ingress resource instruct the nginx ingress controller to route traffic with the specified host name to the service.- The
kubernetes.io/tls-acme: "true"annotation on the ingress resource instructs Kube-Lego to obtain and manage SSL certs for the ingress' host name using Let's Encrypt.- The
REDIS_HOSTenvironment variable in the application's container is set toredis.default.svc.cluster.local. This fully qualified DNS name will resolve to the Redis service inside the cluster.
The Windows container image is pretty big, so it might take a few minutes to pull it down the first time. Run $ kubectl get pods to check on its status.
Once all the pods are ready, we can hit the site by going to the domain we specified:
If we take a look at the response headers, we'll see that it's coming through nginx.
And we have a valid certificate issued by Let's Encrypt.
Scale the application
We can really quickly scale out the application:
$ kubectl scale --replicas=3 deployment aspnet-redis
It should take under a minute for the new pods to spin up and start receiving requests from the ingress. As we refresh the page, we'll see the counter increase and the machine name change as the requests are routed to different pods in the cluster.