
RESTful APIs and Swagger (OpenAPI) in Azure Functions
Monday, December 26, 2016
Azure Functions doesn't have formal support for exposing Swagger (OpenAPI) specifications yet. But since it's built on top of Azure App Service, we can create Swagger metadata manually and use API Apps features such as API Metadata to light up tooling in Azure and Visual Studio.
Today, we'll look at how to create a RESTful API in Azure Functions and expose Swagger metadata for it. We'll then look at different ways of consuming the Swagger metadata.
Building an API in Azure Functions
It's really easy to build RESTful APIs with Azure Functions. One of the features that makes this possible is its rich support for routing templates. Using routing templates, we have full control over the routes and HTTP methods that each function will respond to.
Route prefix
By default, Azure Functions uses api as its route prefix. This means that HTTP triggered functions have the route /api/function-name. If we want to customize the prefix, we can edit host.json in the script root.
{
    "http": {
        "routePrefix": "services"
    }
}
Routes
Most RESTful APIs use the same routes for interacting with the same resource, using the HTTP method to determine the action to be taken. For instance, GET fetches a resource and PUT can be used for updating it.
To do this with Azure Functions, we create a different function for each HTTP method but give them the same route. We can set each function's route in its Integrate tab in the Azure Functions portal.
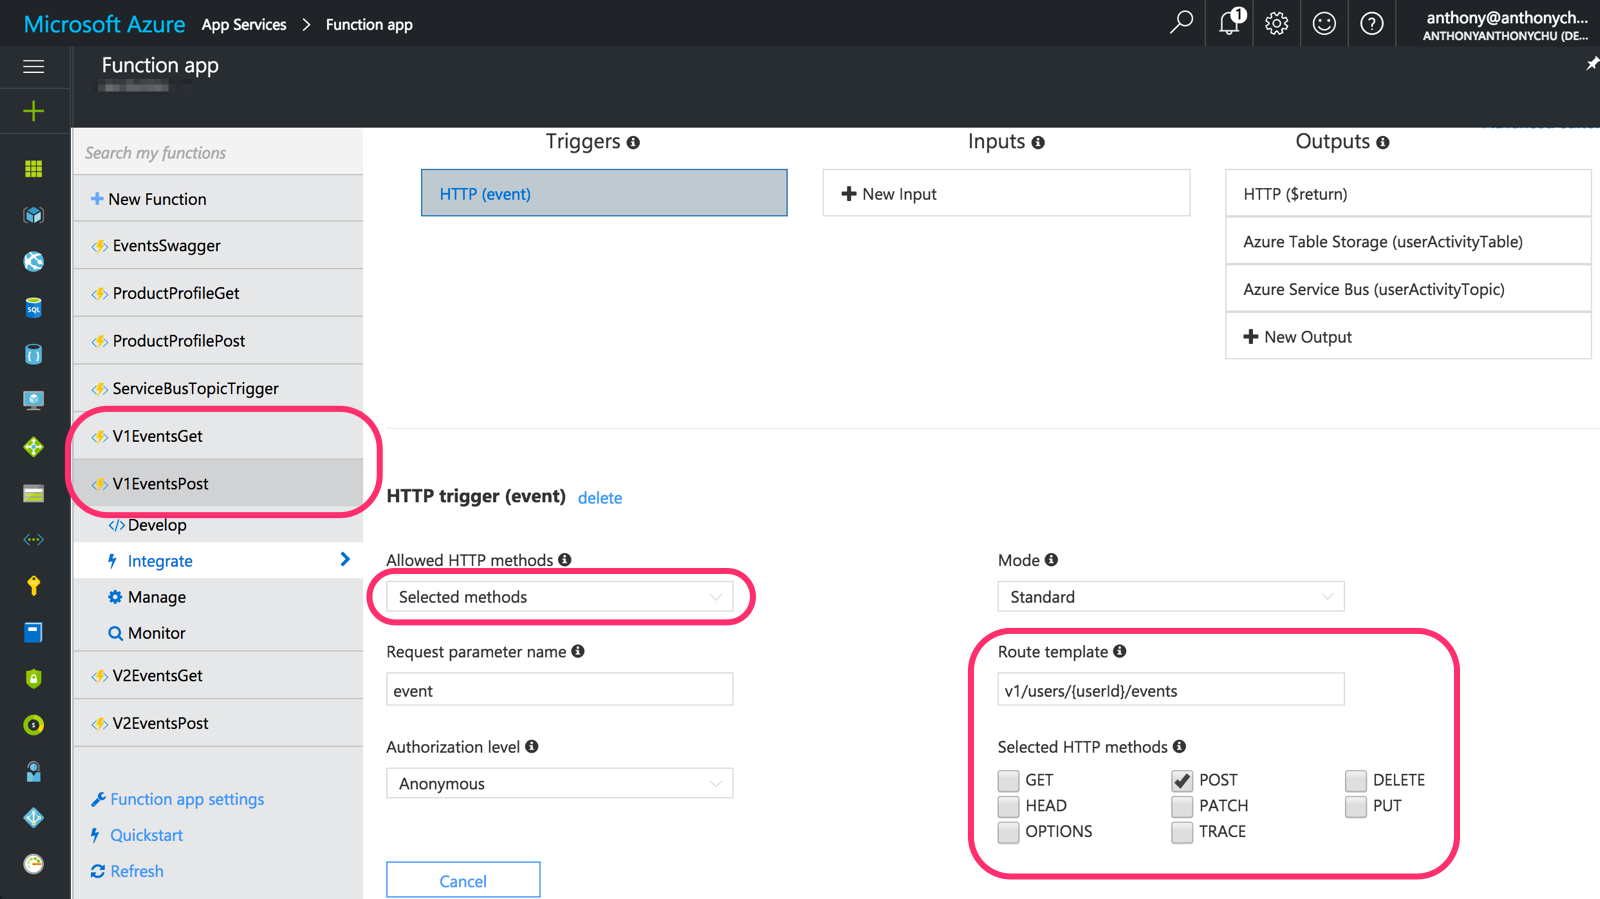
In the above application, we have have a function for GET and a function for POST to the same route (v1/users/{userId}/events).
We can also do the same in function.json.
{
  "bindings": [
    {
      "authLevel": "anonymous",
      "name": "event",
      "type": "httpTrigger",
      "direction": "in",
      "route": "v1/users/{userId}/events",
      "methods": [
        "post"
      ]
    }
}
Creating a Swagger definition
Now that we have our API functional and with the desired routing, we can add a Swagger specification for it.
Swagger Editor
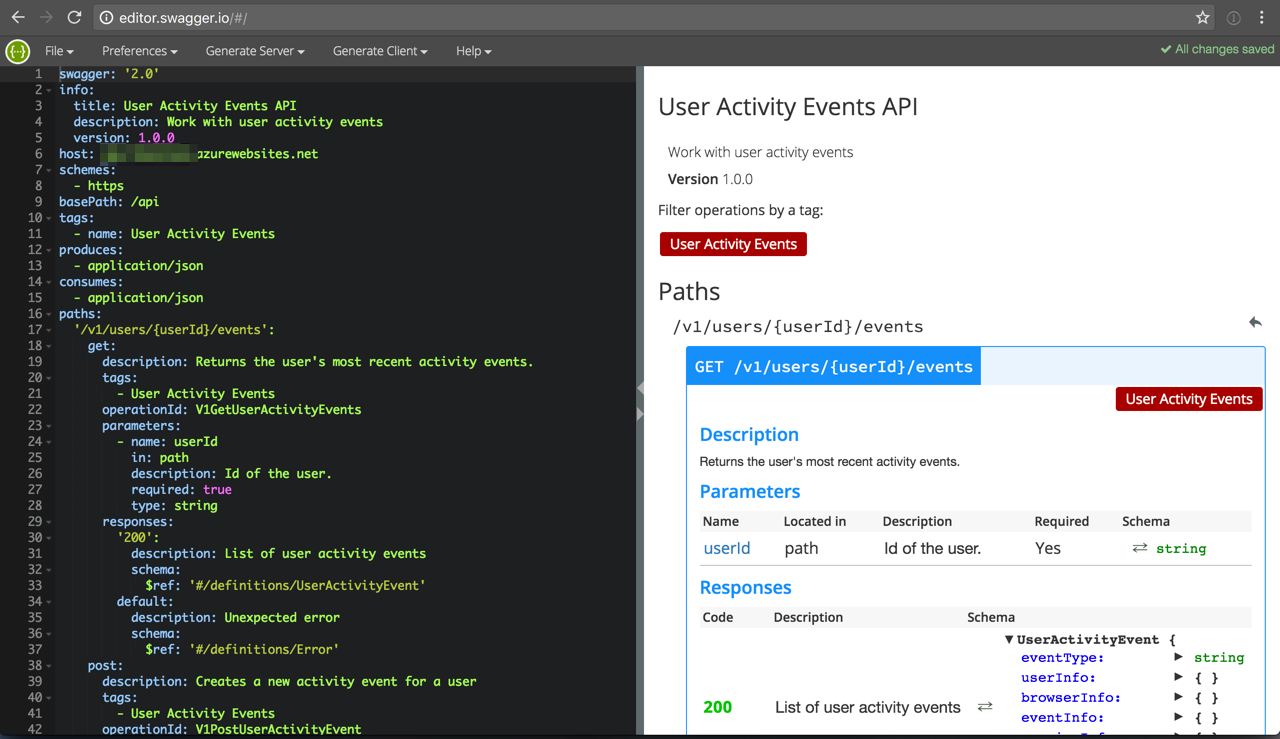
There's no automatic generation of Swagger in Azure Functions yet; so we will have to create the Swagger document manually. This is fairly straight-forward using the Swagger Editor at editor.swagger.io. We can start from the sample and edit the YAML to describe our Azure Functions API. When we're done, we can download the Swagger file in JSON using the File menu.
Returning Swagger definition from Azure Functions
Now that we have the Swagger file, we have to serve it from Azure Functions. To do this, we can create a function that serves this file. A few months ago, I wrote about how to return HTML files from Azure Functions. We'll use the same mechanism for the Swagger file.
Create a C# HTTP triggered function and add this code. Also save the swagger file with the function. In my example, my function is called EventsSwagger and the file is swagger.json.
using System.Net;
using System.Net.Http.Headers;
using System.IO;

public static HttpResponseMessage Run(HttpRequestMessage req, TraceWriter log)
{
    var response = new HttpResponseMessage(HttpStatusCode.OK);
    var stream = new FileStream(Path.Combine(GetScriptPath(),
        @"EventsSwagger\swagger.json"), FileMode.Open);
    response.Content = new StreamContent(stream);
    response.Content.Headers.ContentType =
        new MediaTypeHeaderValue("application/json");
    return response;
}

private static string GetScriptPath()
    => Path.Combine(GetEnvironmentVariable("HOME"), @"site\wwwroot");

private static string GetEnvironmentVariable(string name)
    => System.Environment.GetEnvironmentVariable(name, EnvironmentVariableTarget.Process);
Now if we hit the URL, it should return the contents of the Swagger file.
Swagger UI and CORS
Having the API return Swagger metadata enables a few things. One use is Swagger UI, which generates API documentation from the metadata and provides an UI that allows us to interact with the API.
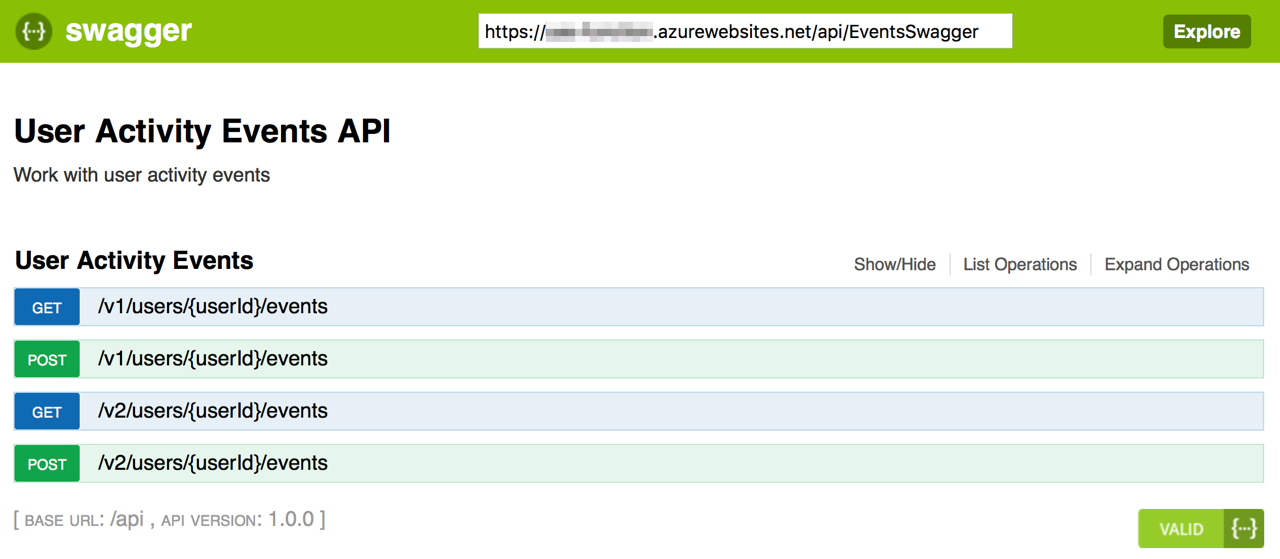
Swagger UI can be downloaded from GitHub. But there's a demo hosted at petstore.swagger.io. We can open it and enter the URL to our Swagger file in the box up top to load Swagger for our API.
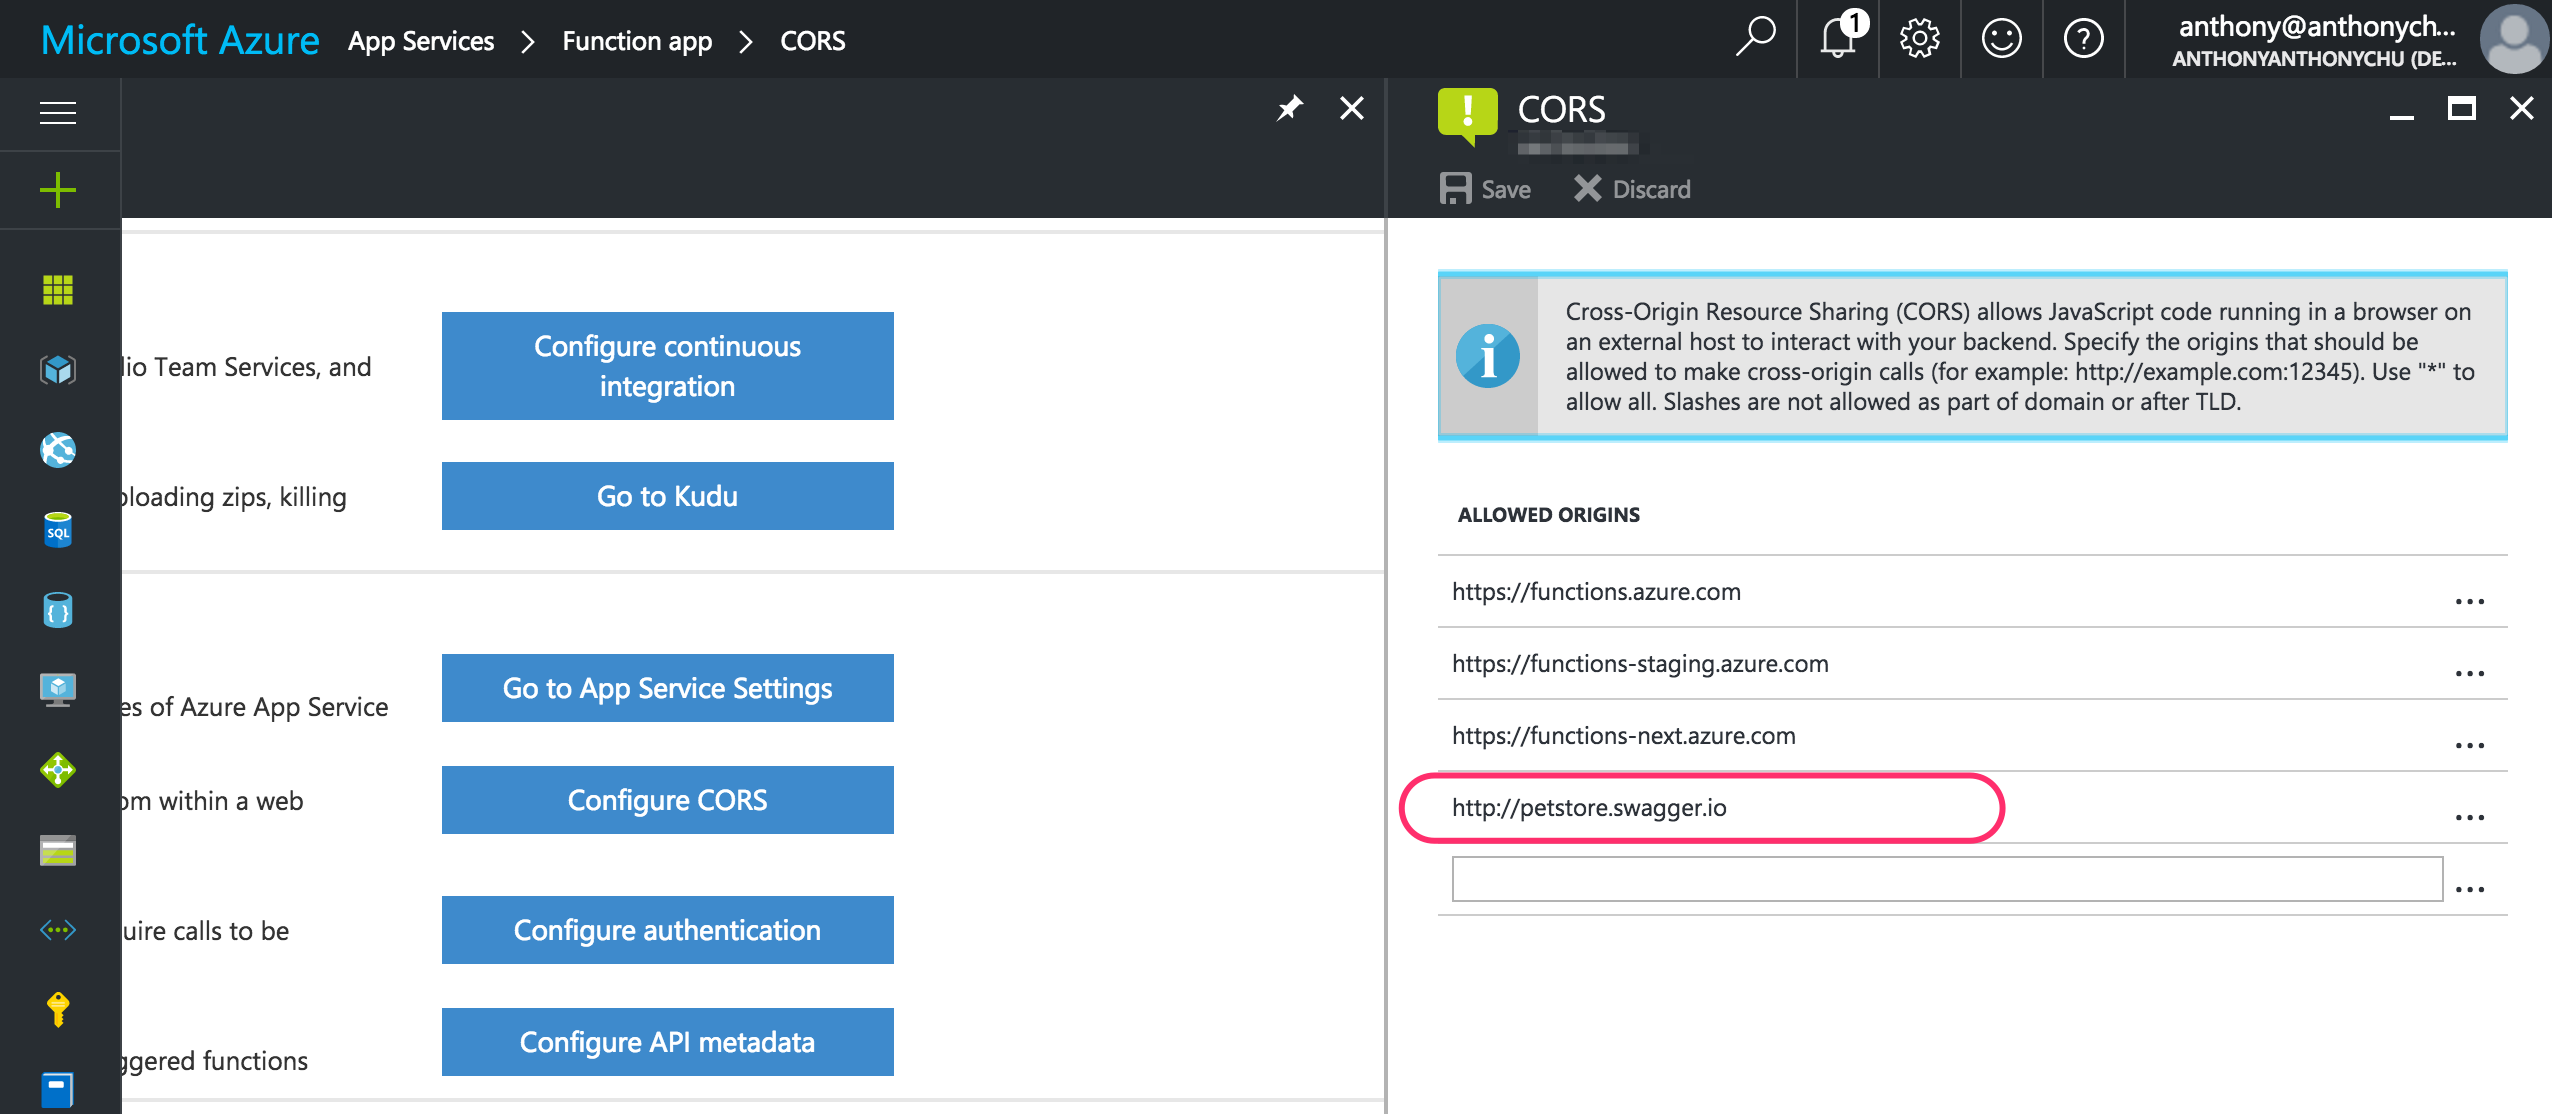
Because Swagger UI downloads the Swagger file from another domain using JavaScript, it won't work until we enable CORS. This is simple to do in Azure Functions. In the function app's CORS settings, add Swagger UI's origin. In this case, it's http://petstore.swagger.io.
Now Swagger UI is able to load our Swagger file.
If we expand an API operation, we can use the UI to test it right from the browser.
Consuming Swagger from Logic Apps
Another place that can take advantage of our Swagger metadata is Azure Logic Apps. Normally, for Logic Apps to integrate with Azure Functions, the function app must contain HTTP Webhook functions. This means the API we created does not automatically work with Logic Apps. But thanks to Swagger, that's not a problem.
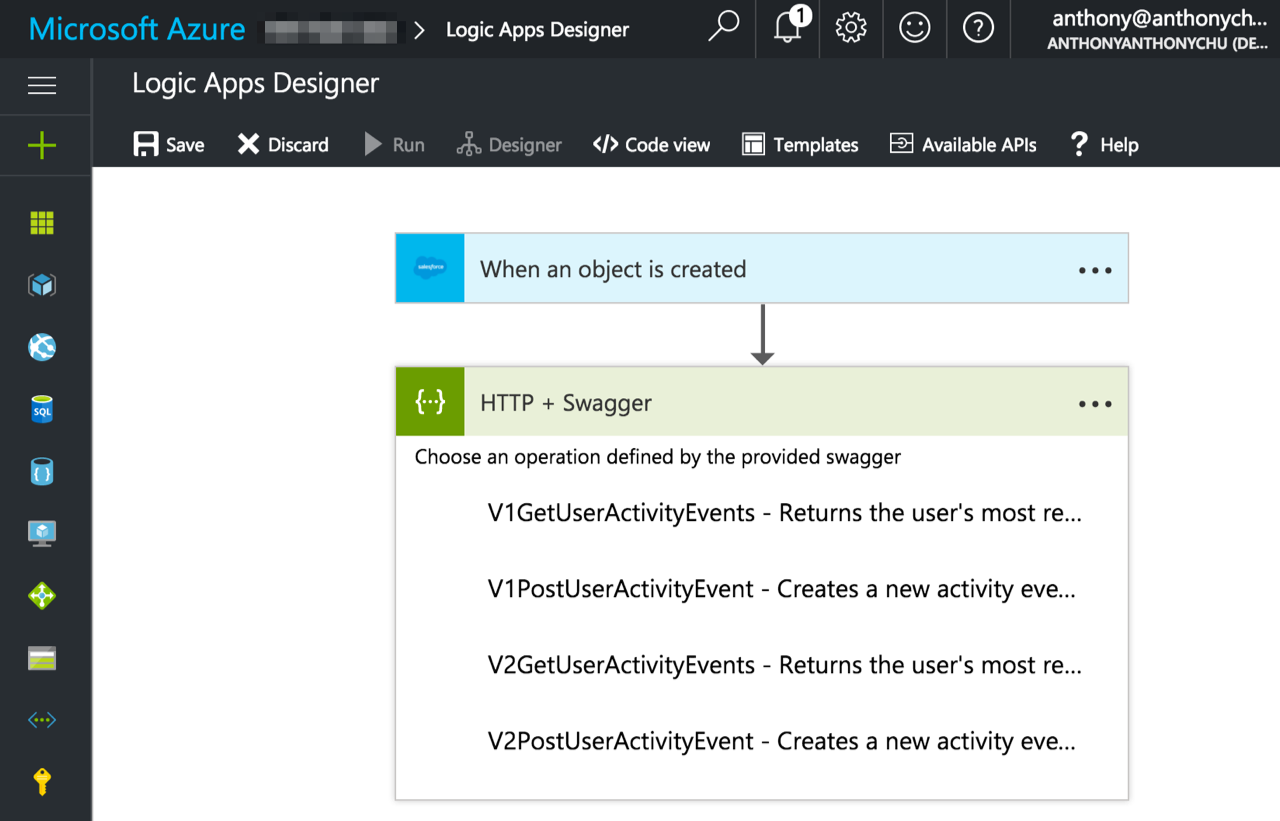
In our Logic App, we can add a step called "HTTP + Swagger". That step takes a URL to a Swagger file. When we enter the URL, we get a list of operations supported by our Azure Functions API (we may have to add a CORS origin for https://ema.hosting.portal.azure.net for this to work in the Logic Apps designer).
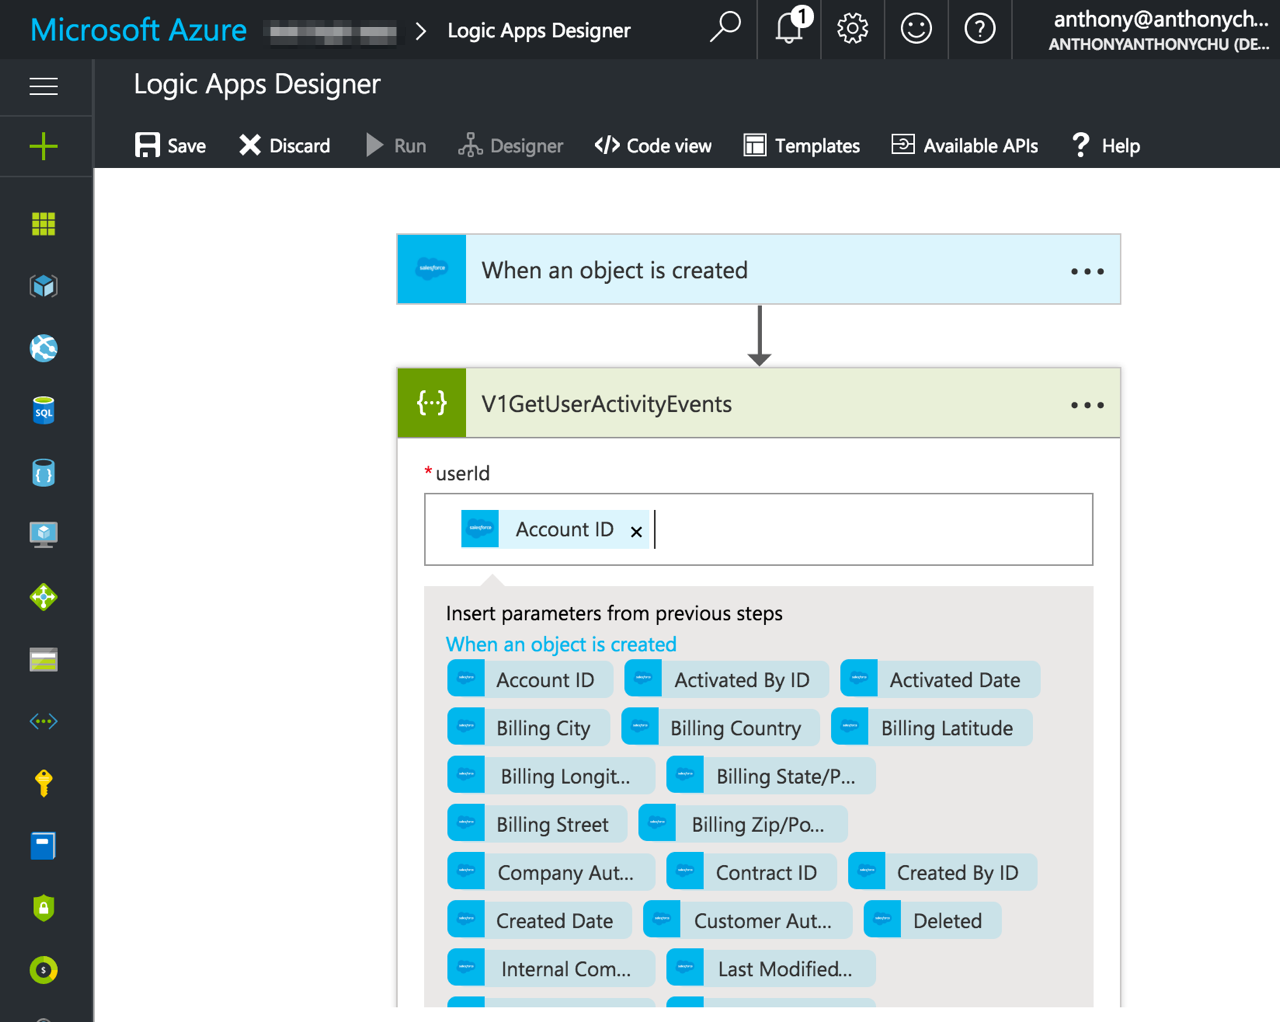
Select an operation and the UI automatically prompts us for the information needed to call it. In this example, we are triggering the Logic App when a Salesforce order is created. The fields from the Salesforce order object are automatically available for us to use in our API call.
Visual Studio client generation
One last place where Swagger is useful is for generating clients for our API. Visual Studio can do this automatically for C# applications.
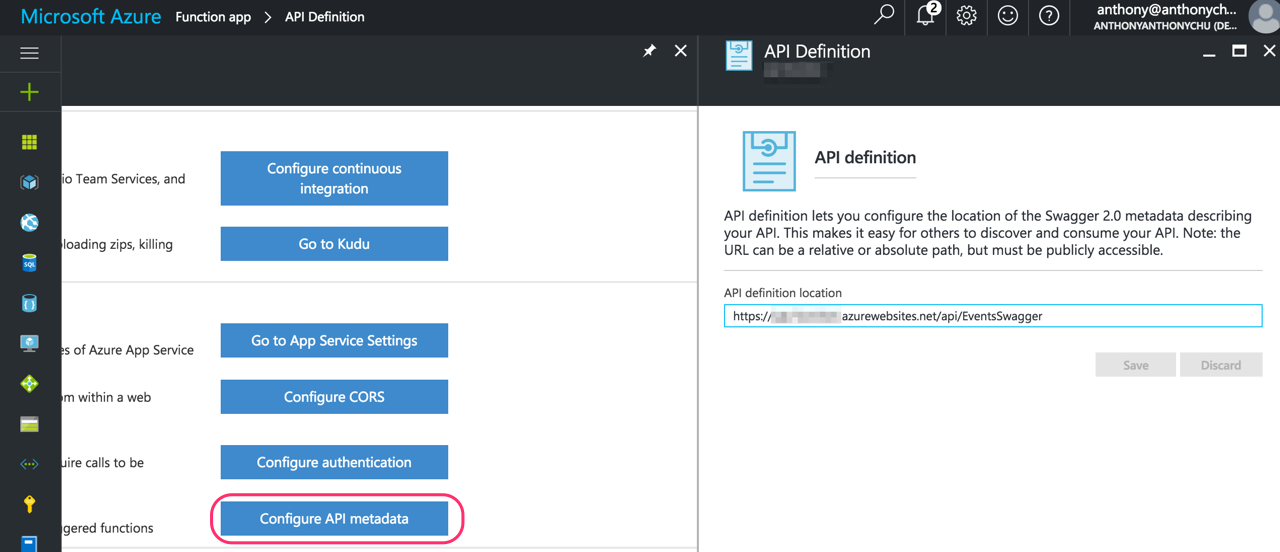
Visual Studio automatically discovers API Apps in our Azure account. In order for it to discover our Azure Function app, we have to set the app's API Metadata.
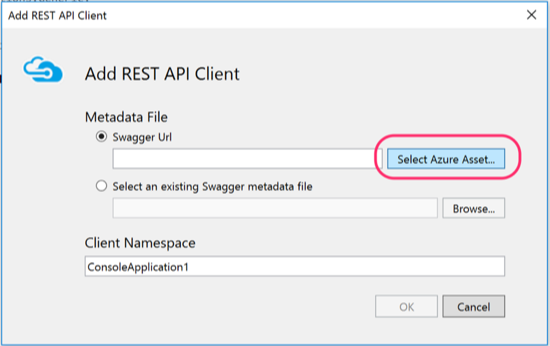
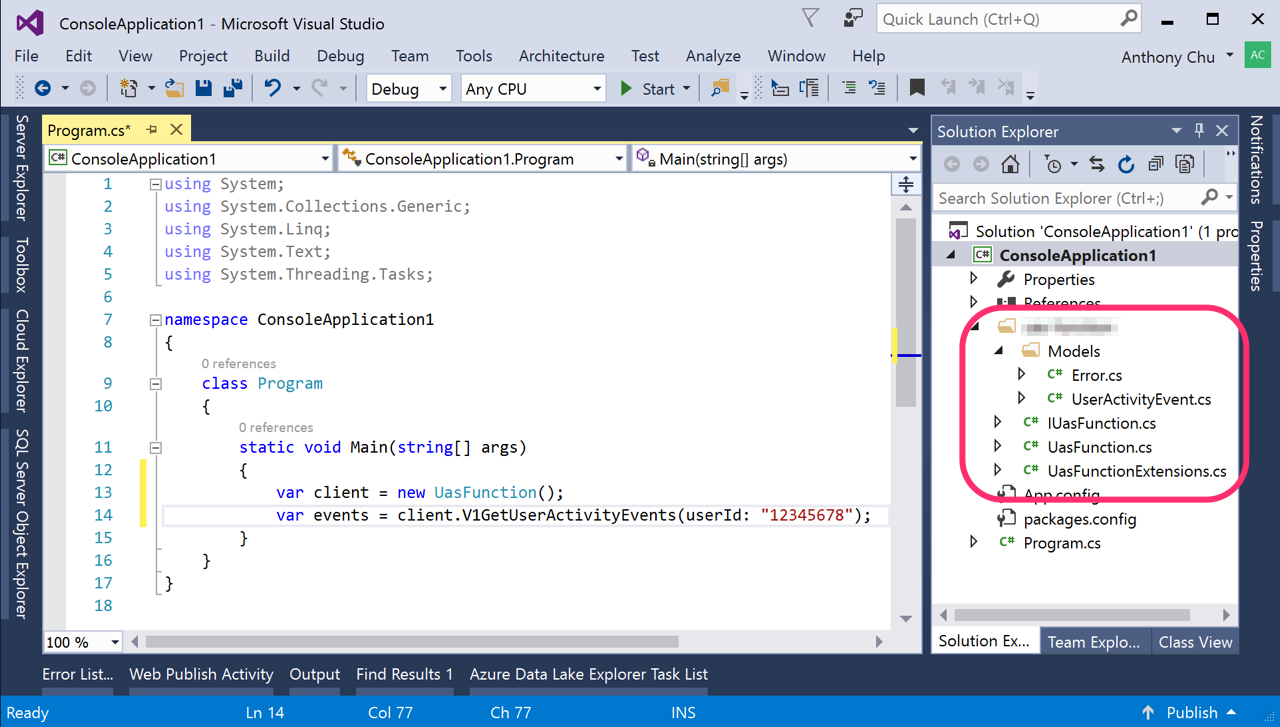
Now, in any C# project in Visual Studio, we can right click in Solution Explorer and select Add -> REST API Client. In the dialog box, click Select Azure Asset. We should be able to locate our function app. Selecting it will load its Swagger URL. Click OK to generate the API client.
When the API client is generated, we can use it to call our API:
Azure Functions doesn't have formal support for exposing Swagger (OpenAPI) specifications yet. But since it's built on top of Azure App Service, we can create Swagger metadata manually and use API Apps features such as API Metadata to light up tooling in Azure and Visual Studio.
Today, we'll look at how to create a RESTful API in Azure Functions and expose Swagger metadata for it. We'll then look at different ways of consuming the Swagger metadata.
Building an API in Azure Functions
It's really easy to build RESTful APIs with Azure Functions. One of the features that makes this possible is its rich support for routing templates. Using routing templates, we have full control over the routes and HTTP methods that each function will respond to.
Route prefix
By default, Azure Functions uses api as its route prefix. This means that HTTP triggered functions have the route /api/function-name. If we want to customize the prefix, we can edit host.json in the script root.
{
"http": {
"routePrefix": "services"
}
}
Routes
Most RESTful APIs use the same routes for interacting with the same resource, using the HTTP method to determine the action to be taken. For instance, GET fetches a resource and PUT can be used for updating it.
To do this with Azure Functions, we create a different function for each HTTP method but give them the same route. We can set each function's route in its Integrate tab in the Azure Functions portal.
In the above application, we have have a function for GET and a function for POST to the same route (v1/users/{userId}/events).
We can also do the same in function.json.
{
"bindings": [
{
"authLevel": "anonymous",
"name": "event",
"type": "httpTrigger",
"direction": "in",
"route": "v1/users/{userId}/events",
"methods": [
"post"
]
}
}
Creating a Swagger definition
Now that we have our API functional and with the desired routing, we can add a Swagger specification for it.
Swagger Editor
There's no automatic generation of Swagger in Azure Functions yet; so we will have to create the Swagger document manually. This is fairly straight-forward using the Swagger Editor at editor.swagger.io. We can start from the sample and edit the YAML to describe our Azure Functions API. When we're done, we can download the Swagger file in JSON using the File menu.
Returning Swagger definition from Azure Functions
Now that we have the Swagger file, we have to serve it from Azure Functions. To do this, we can create a function that serves this file. A few months ago, I wrote about how to return HTML files from Azure Functions. We'll use the same mechanism for the Swagger file.
Create a C# HTTP triggered function and add this code. Also save the swagger file with the function. In my example, my function is called EventsSwagger and the file is swagger.json.
using System.Net;
using System.Net.Http.Headers;
using System.IO;
public static HttpResponseMessage Run(HttpRequestMessage req, TraceWriter log)
{
var response = new HttpResponseMessage(HttpStatusCode.OK);
var stream = new FileStream(Path.Combine(GetScriptPath(),
@"EventsSwagger\swagger.json"), FileMode.Open);
response.Content = new StreamContent(stream);
response.Content.Headers.ContentType =
new MediaTypeHeaderValue("application/json");
return response;
}
private static string GetScriptPath()
=> Path.Combine(GetEnvironmentVariable("HOME"), @"site\wwwroot");
private static string GetEnvironmentVariable(string name)
=> System.Environment.GetEnvironmentVariable(name, EnvironmentVariableTarget.Process);
Now if we hit the URL, it should return the contents of the Swagger file.
Swagger UI and CORS
Having the API return Swagger metadata enables a few things. One use is Swagger UI, which generates API documentation from the metadata and provides an UI that allows us to interact with the API.
Swagger UI can be downloaded from GitHub. But there's a demo hosted at petstore.swagger.io. We can open it and enter the URL to our Swagger file in the box up top to load Swagger for our API.
Because Swagger UI downloads the Swagger file from another domain using JavaScript, it won't work until we enable CORS. This is simple to do in Azure Functions. In the function app's CORS settings, add Swagger UI's origin. In this case, it's http://petstore.swagger.io.
Now Swagger UI is able to load our Swagger file.
If we expand an API operation, we can use the UI to test it right from the browser.
Consuming Swagger from Logic Apps
Another place that can take advantage of our Swagger metadata is Azure Logic Apps. Normally, for Logic Apps to integrate with Azure Functions, the function app must contain HTTP Webhook functions. This means the API we created does not automatically work with Logic Apps. But thanks to Swagger, that's not a problem.
In our Logic App, we can add a step called "HTTP + Swagger". That step takes a URL to a Swagger file. When we enter the URL, we get a list of operations supported by our Azure Functions API (we may have to add a CORS origin for https://ema.hosting.portal.azure.net for this to work in the Logic Apps designer).
Select an operation and the UI automatically prompts us for the information needed to call it. In this example, we are triggering the Logic App when a Salesforce order is created. The fields from the Salesforce order object are automatically available for us to use in our API call.
Visual Studio client generation
One last place where Swagger is useful is for generating clients for our API. Visual Studio can do this automatically for C# applications.
Visual Studio automatically discovers API Apps in our Azure account. In order for it to discover our Azure Function app, we have to set the app's API Metadata.
Now, in any C# project in Visual Studio, we can right click in Solution Explorer and select Add -> REST API Client. In the dialog box, click Select Azure Asset. We should be able to locate our function app. Selecting it will load its Swagger URL. Click OK to generate the API client.
When the API client is generated, we can use it to call our API: