
Running Microsoft Bot Framework in Azure Functions
Wednesday, April 13, 2016
Update: The new Azure Bot Service uses Azure Functions to build a bot. Check out this video in which Shaun Luttin and I build a bot with it.
Microsoft announced an endless stream of awesome stuff during the Build conference this year. Two of my favorite are the new Microsoft Bot Framework and Azure Functions.
The Bot Framework makes it super easy to create a chat bot. The bots we create can be connected to platforms like Slack, Twilio, and Skype without writing additional code. We can also add machine learning to the mix by easily integrating Microsoft's LUIS (Language Understanding Intelligent Service) into any Bot Framework application.
The core logic of a bot is a REST endpoint. In the article, I'll walk through how to create a bot application and host it on Azure Functions. I'll assume a basic understanding of how to work with Azure Functions.
Anatomy of a Bot Application
A bot application is the gray box on the left side of this diagram from Microsoft:
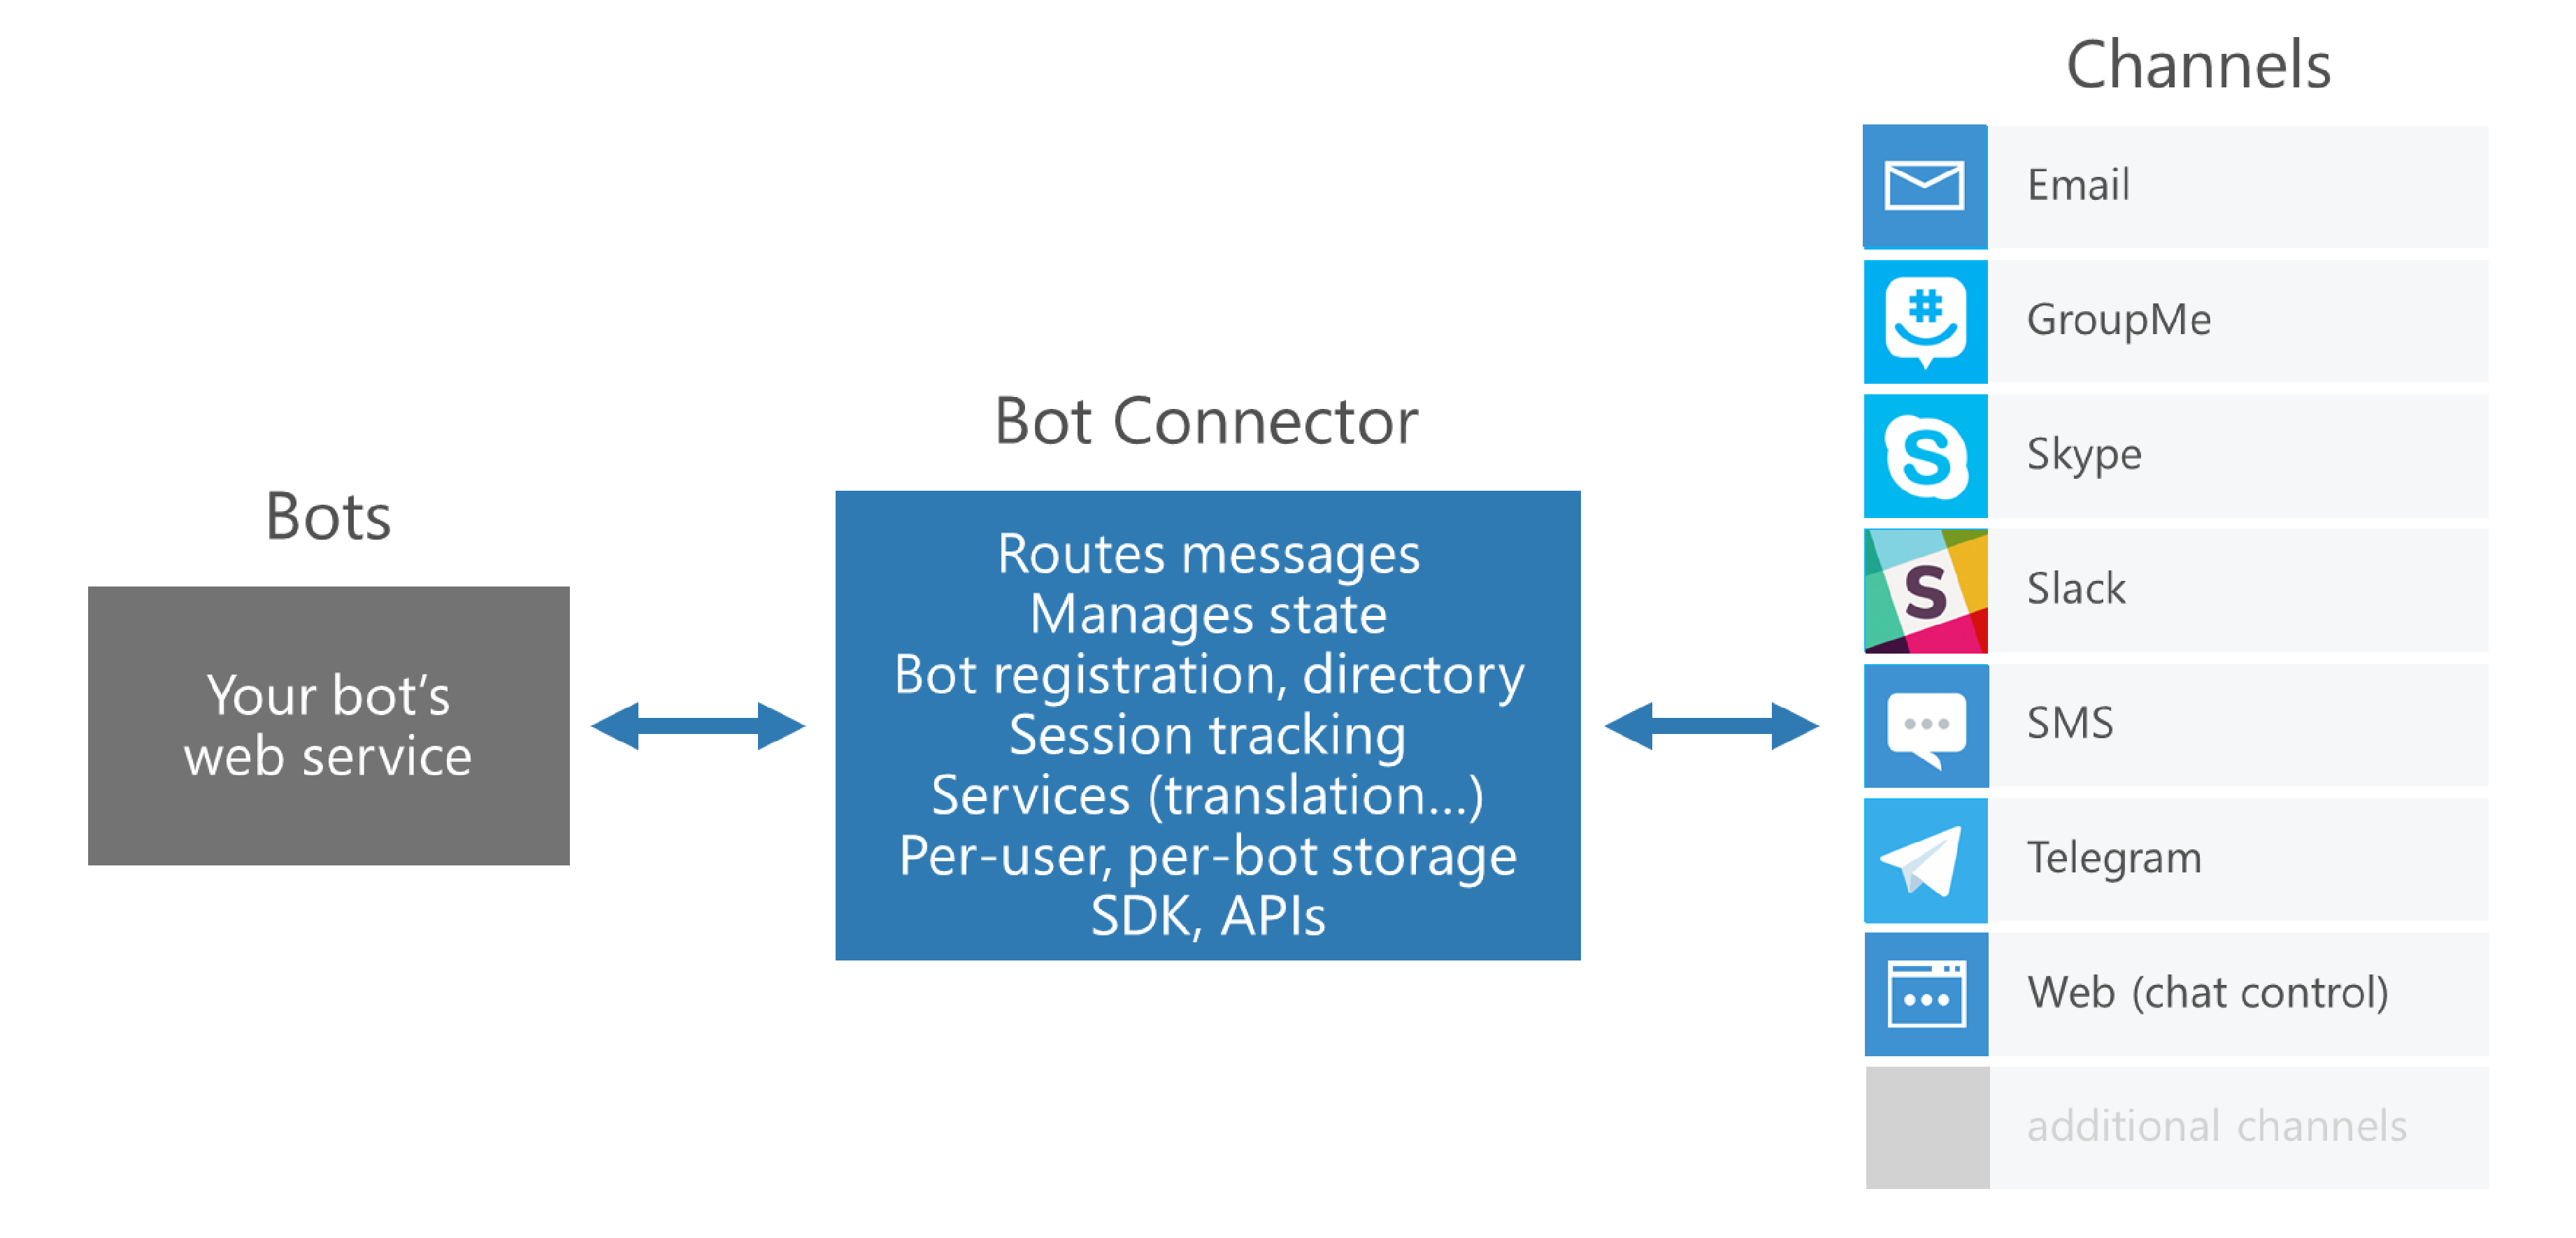
The bot contains all the logic for processing messages. The Bot Connector takes care of handling conversations and maintaining state, as well as communicating with the various platforms that end users will use to chat with our bot.
Creating the Bot Azure Function
Start by creating a new Azure Functions App. We'll use the C# HTTP Endpoint template to create a function as a starting point.
package.json
The first thing we want to do is bring in the Microsoft.Bot.Connector NuGet package. This package contains some core classes for interacting with the Bot Connector. To add packages to an Azure Function, add a project.json file to the function's folder:
{
    "frameworks": {
        "net46":{
            "dependencies": {
                "Microsoft.Bot.Connector": "1.0.0.0"
            }
        }
    }
}
When we save the file, a package restore will kick off and we'll see a project.lock.json appear in the function's folder.
The Function
Now we're ready to write the function. In run.csx, we'll add this code:
using System.Net;
using System.Net.Http.Headers;
using System.Threading.Tasks;
using Microsoft.Bot.Connector;

public static async Task<HttpResponseMessage> Run(HttpRequestMessage req, TraceWriter log)
{
    if (!HasValidAuthHeader(req.Headers))
    {
        return req.CreateResponse(HttpStatusCode.Forbidden, "Forbidden");
    }

    var message = await req.Content.ReadAsAsync<Message>();

    if (message.Type == "Message")
    {
        var replyMessage = message.CreateReplyMessage($"You sent {message.Text.Length} characters");
        return req.CreateResponse(HttpStatusCode.OK, replyMessage);
    }
    else
    {
        return req.CreateResponse(HttpStatusCode.OK, HandleSystemMessage(message));
    }
}

private static bool HasValidAuthHeader(HttpRequestHeaders headers)
{
    var actualAuthHeader = headers.GetValues("Authorization").First();
    var appId = Environment.GetEnvironmentVariable("AppId") ?? "YourAppId";
    var appSecret = Environment.GetEnvironmentVariable("AppSecret") ?? "YourAppSecret";
    var expectedAuthHeader = "Basic " +
        System.Convert.ToBase64String(System.Text.Encoding.UTF8.GetBytes(appId + ":" + appSecret));

    return actualAuthHeader == expectedAuthHeader;
}

private static Message HandleSystemMessage(Message message)
{
    if (message.Type == "BotAddedToConversation")
    {
        return message.CreateReplyMessage($"Welcome {message.From?.Name}!");
    }
    else if (message.Type == "BotRemovedFromConversation")
    {
        return message.CreateReplyMessage($"Bye {message.From?.Name}!");
    }

    return null;
}
Authentication
The first thing we do in the function is authenticate the incoming request. The framework uses basic auth, with the AppId as the username and AppSecret as the password. In an ASP.NET Web API application, there's a BotAuthentication filter that is included in the Bot Connector NuGet package that handles this. That won't work here, so we're rolling our own thanks to some code I found on StackOverflow.
If the secrets are available in the Function App's environment variables, we'll use those instead of the defaults.
Processing the Message
Now that we're authenticated, we deserialize the HTTP request body into a Microsoft.Bot.Connector.Message object.
At this point, it's entirely up to us what we want to do with the message. Here we'll simply reply with the length of the message. But we can do a lot more, such as call out to a LUIS natural language model or leverage a Bot Builder.
We can also respond to a system event, such as when the bot joins or leaves a conversation. There's a whole list of possible message types.
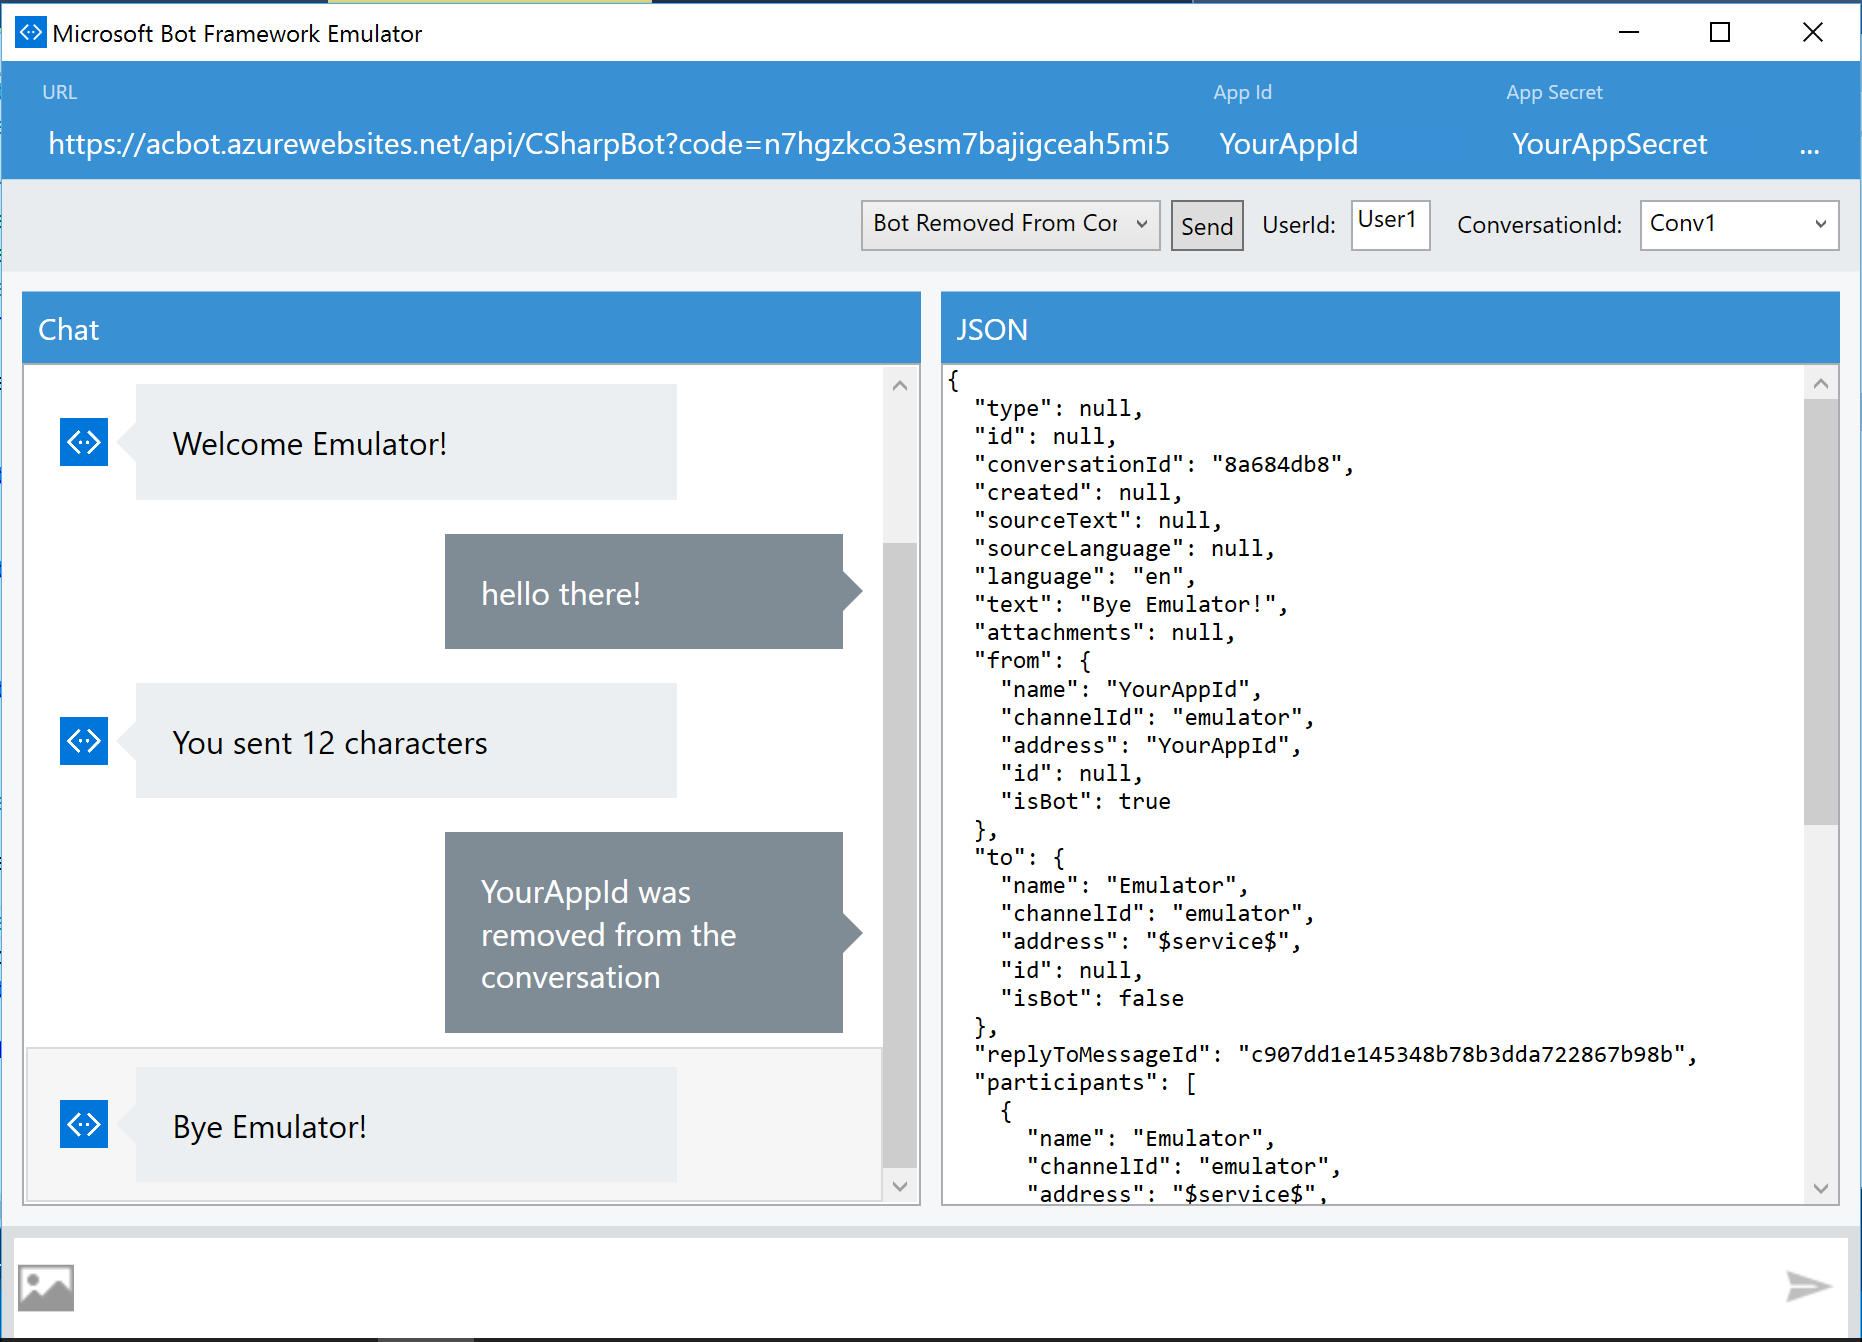
Testing with the Bot Emulator
Now it's time to test the bot. We can do this with the Bot Emulator which can be downloaded here.
Fire up the emulator, enter the Function's URL, and try it out!
Hooking It Up to the Bot Connector
The only thing left now is try our bot with the real Bot Connector. We'll need to sign up for an account, do some setup, and embed a web chat widget in a web page.
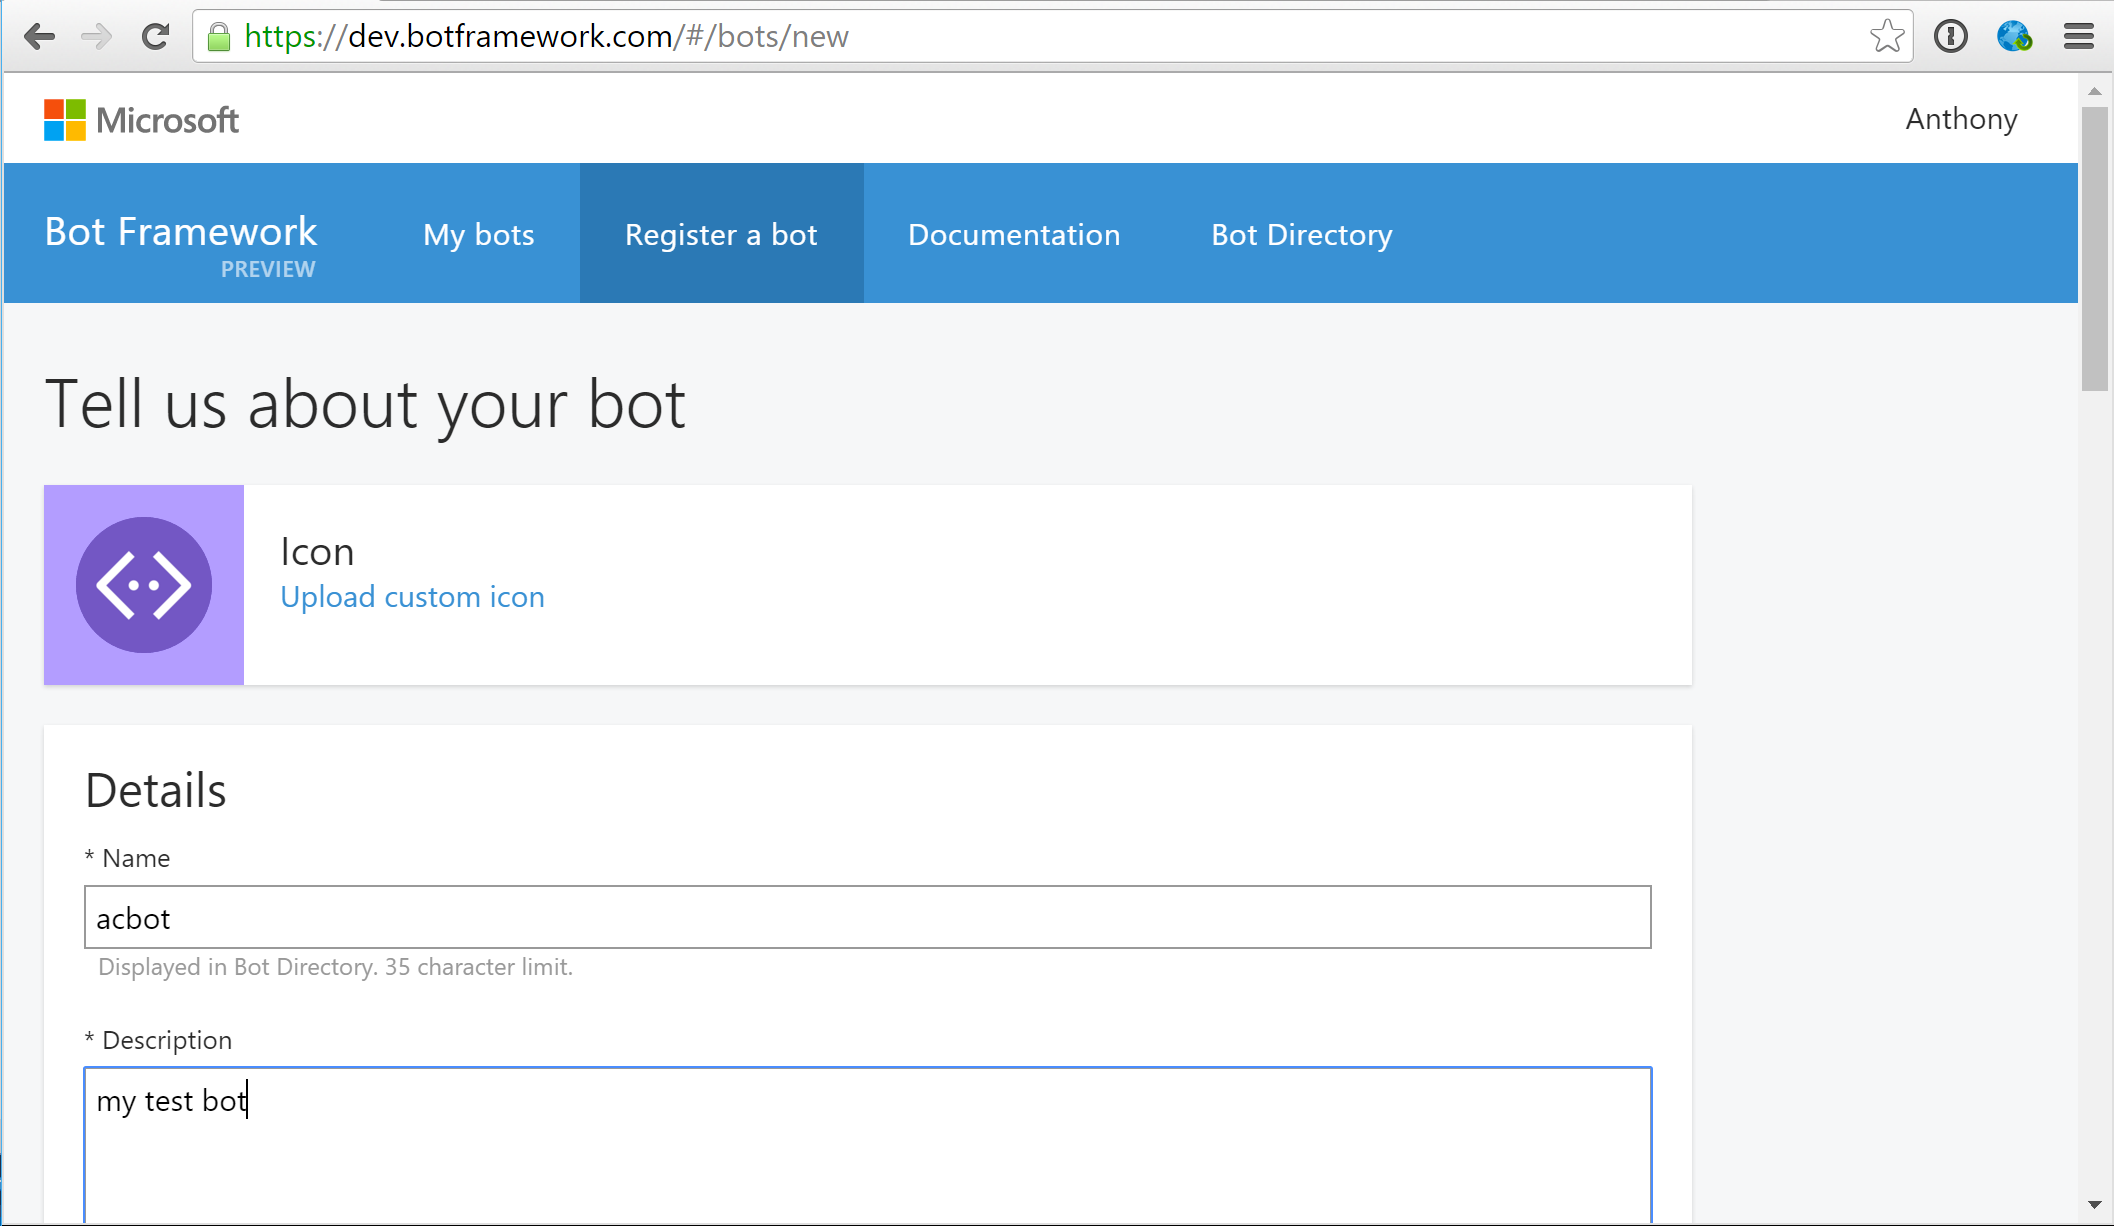
Signing Up for Bot Framework
Head over to dev.botframework.com and sign up for an account. Then register a new bot application. Use the same Azure Functions URL that we used with the Bot Emulator.
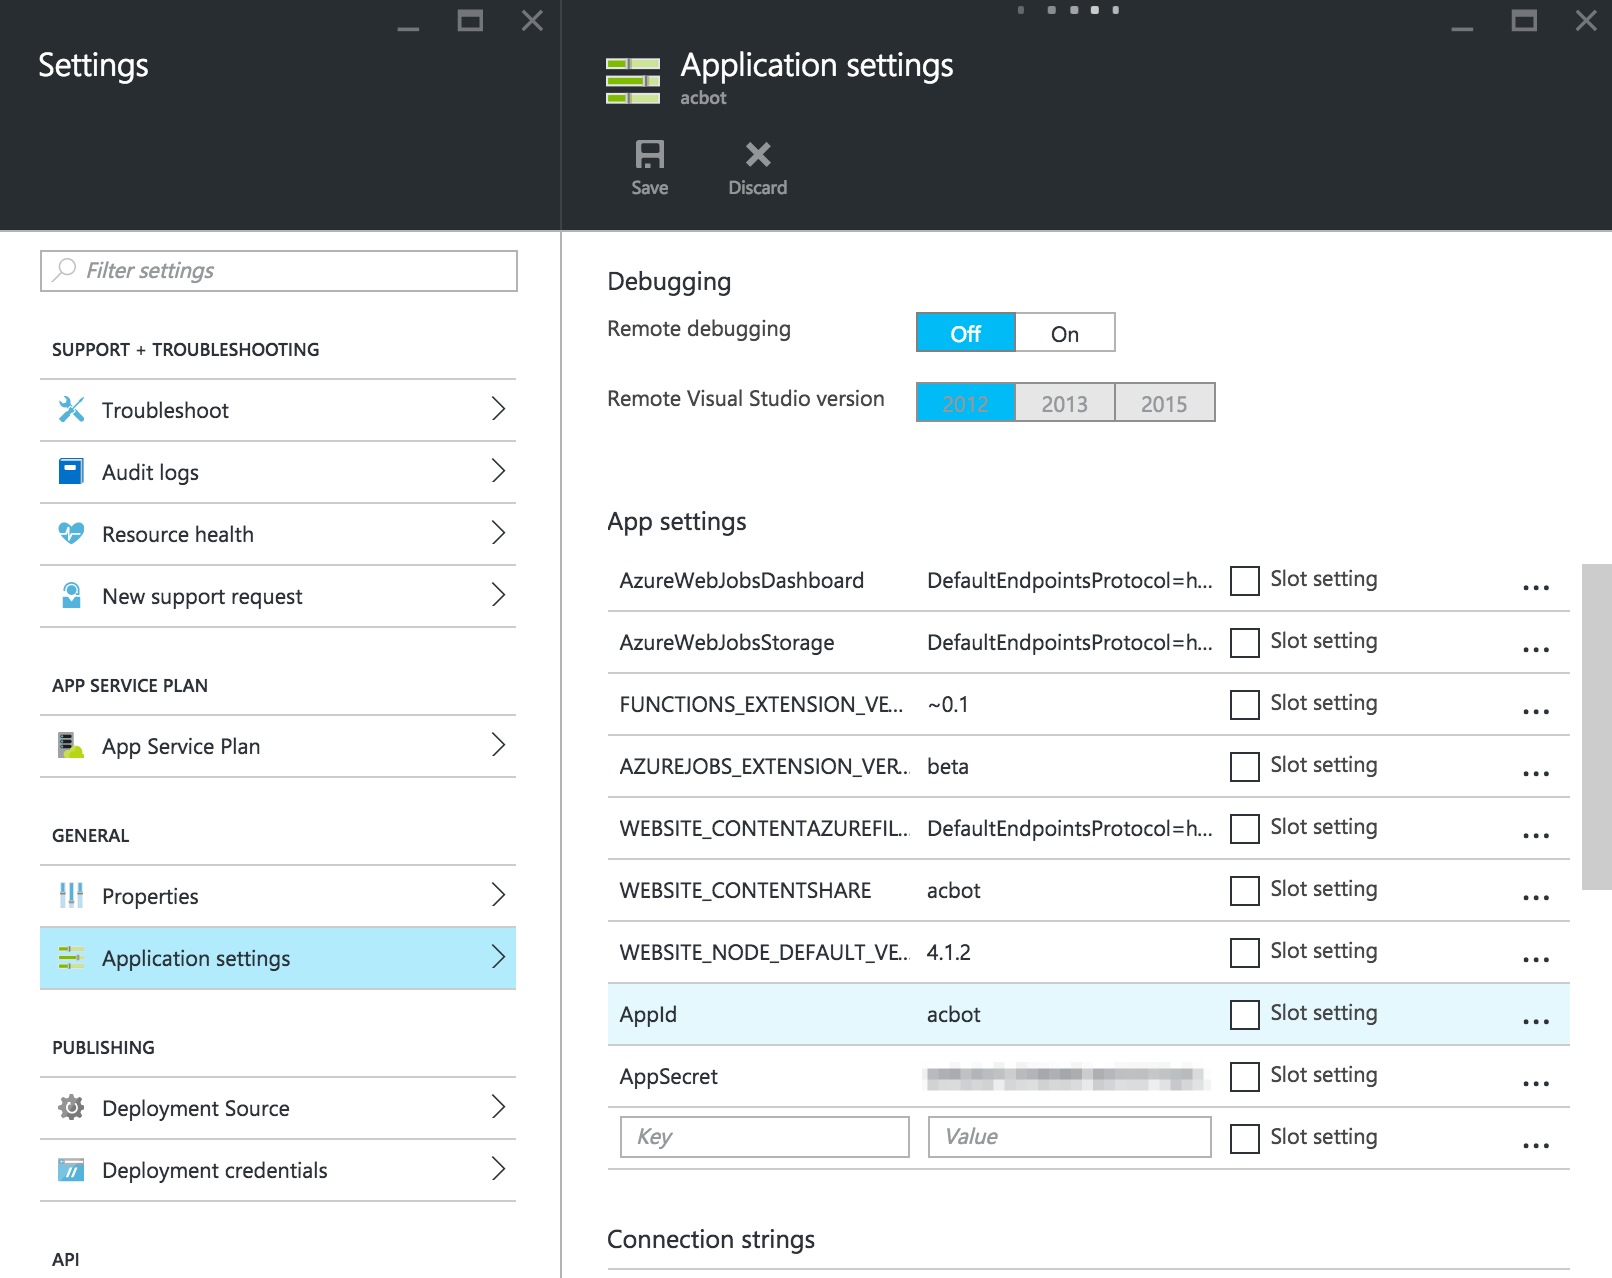
Set Secrets
Now that the bot is registered, we'll be shown the details of our bot. Take the bot's name plus one of its secrets and add it as environment variables for the app.
Embed the Web Chat Control
Among the many connectors to platforms like Slack and Skype, the Bot Connector also provides a chat interface that we can embed into any web page.
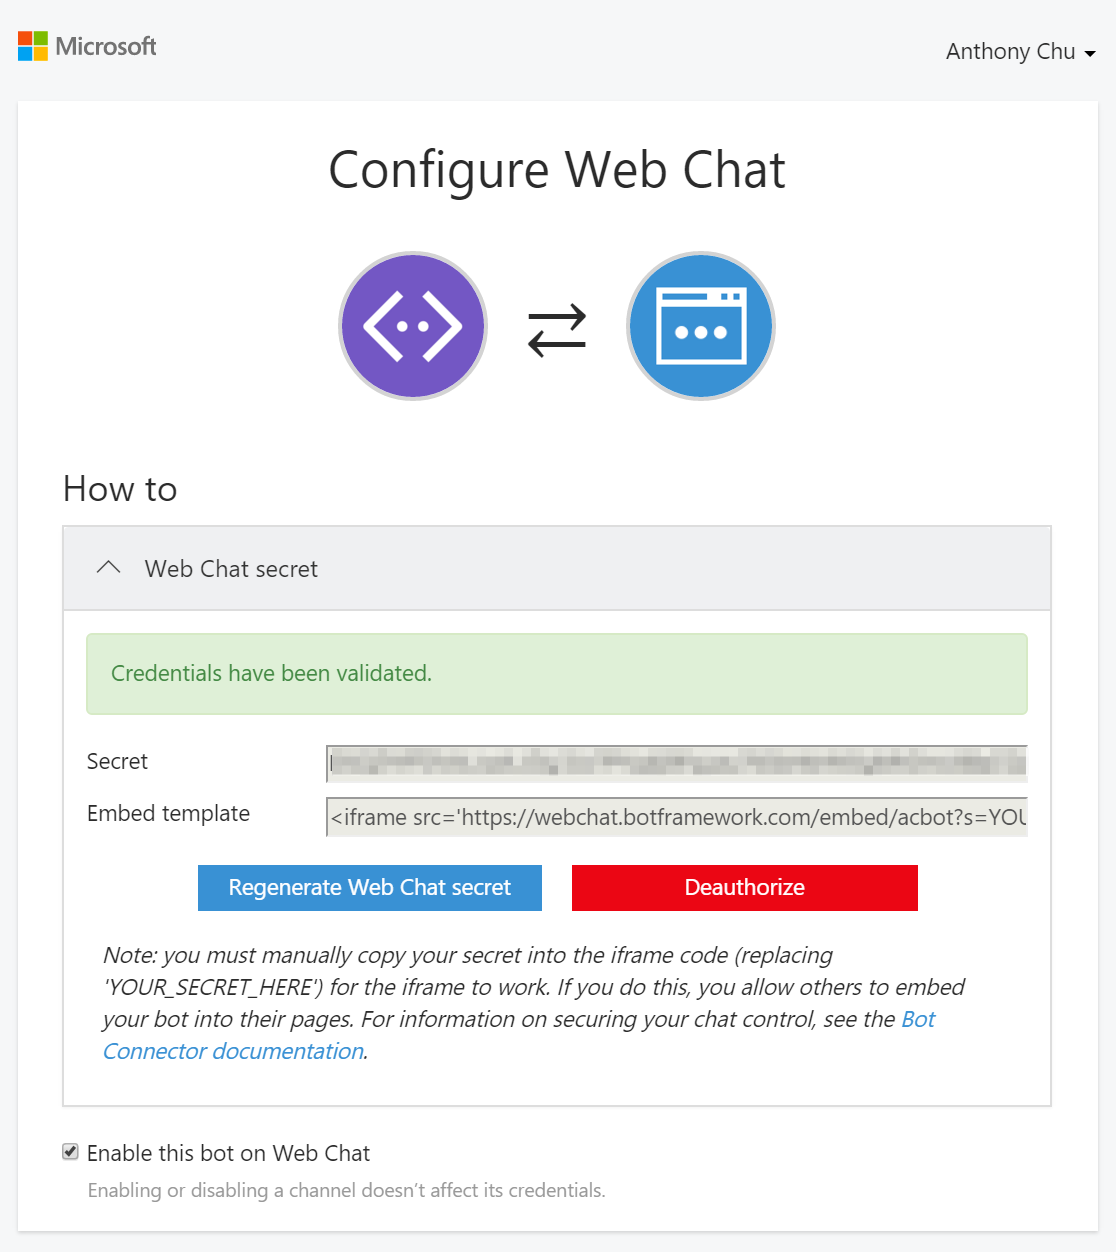
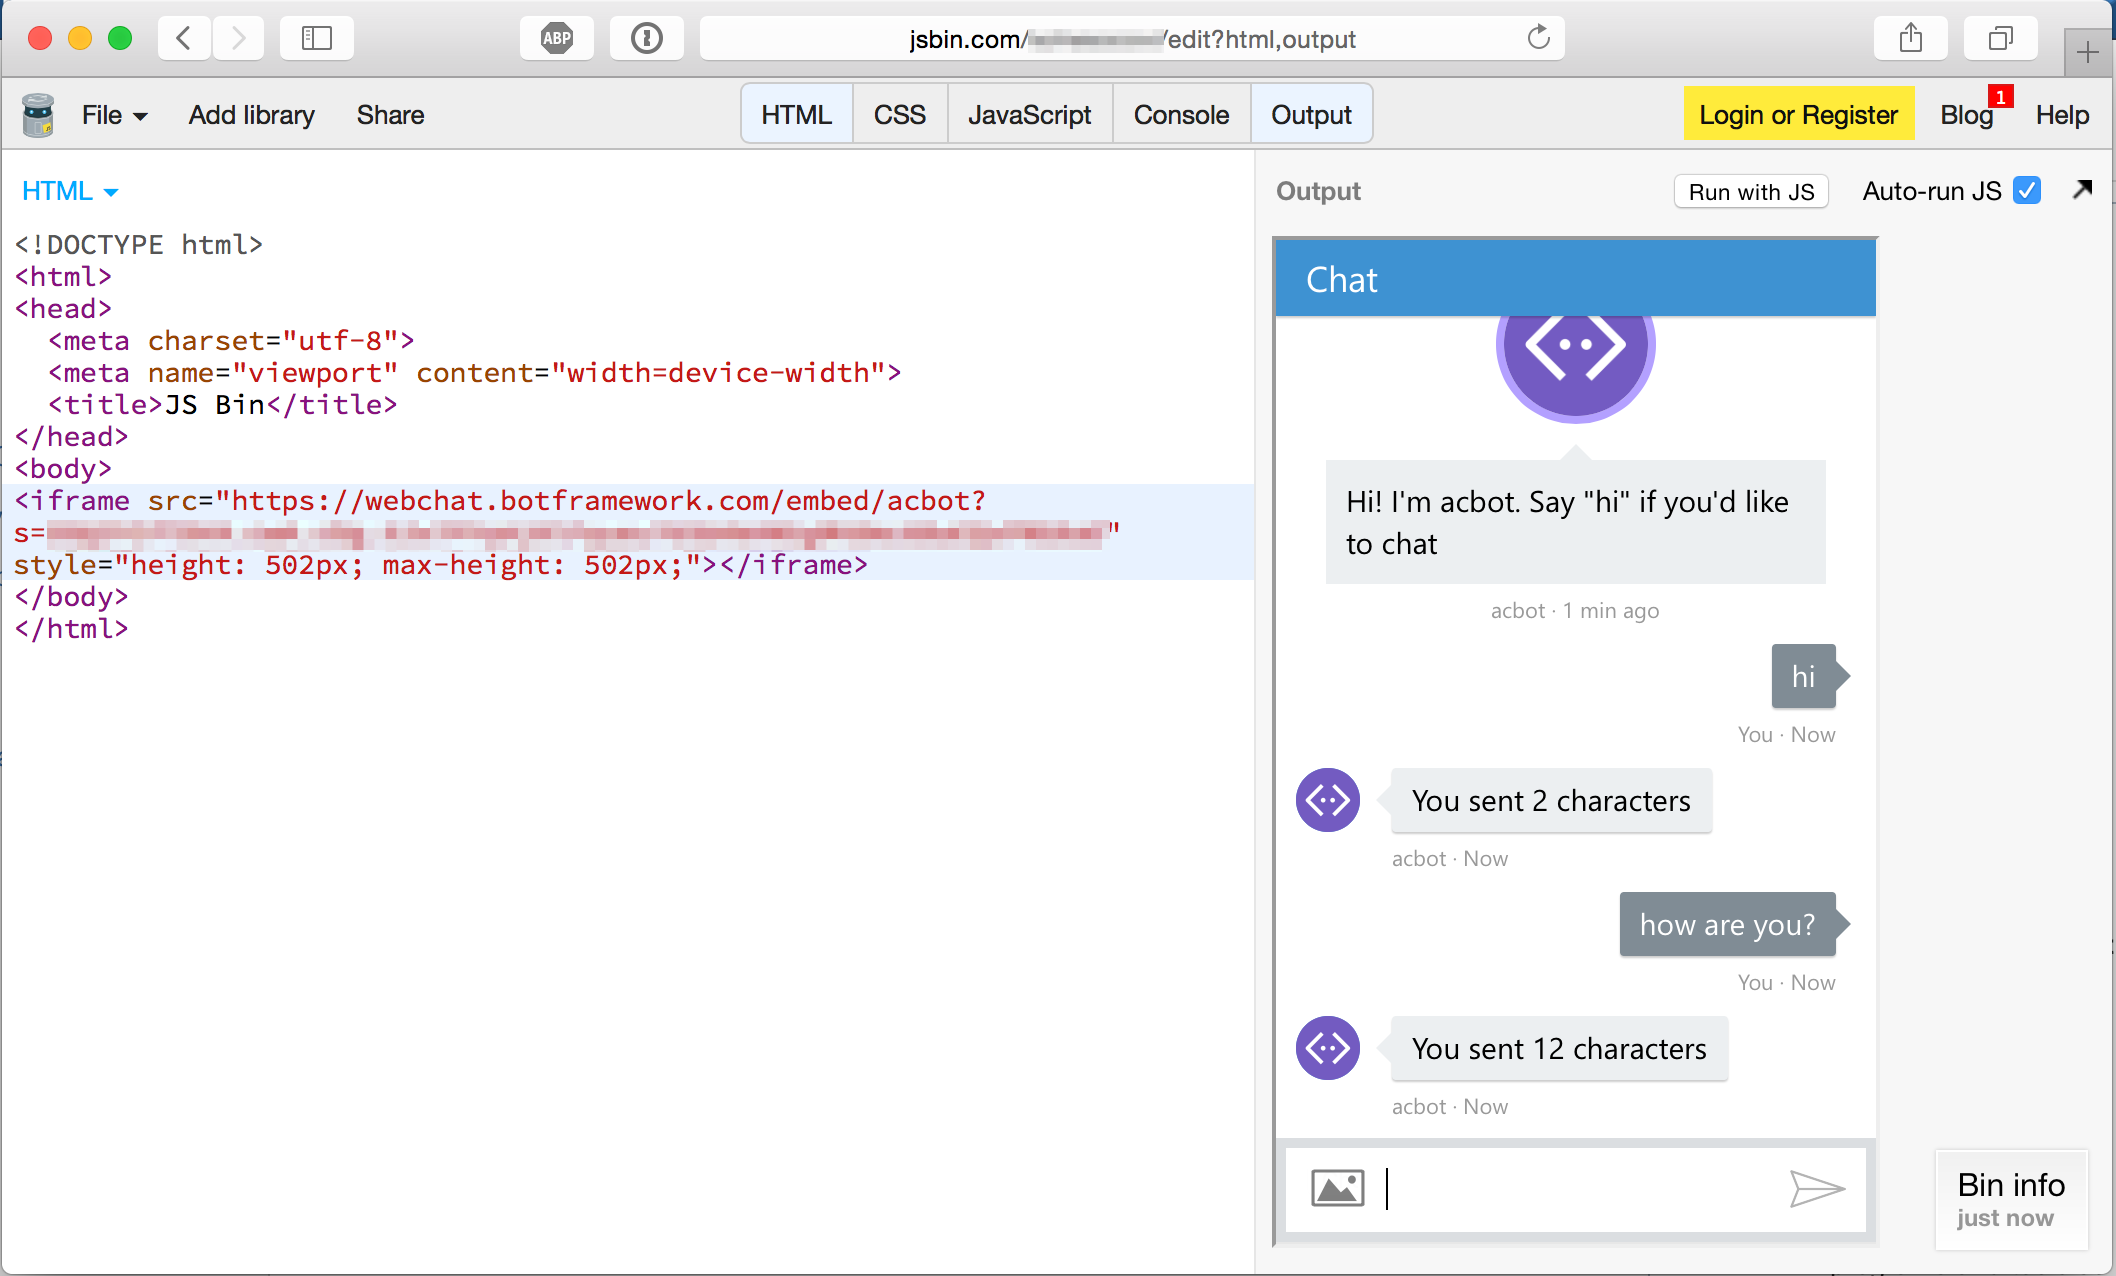
The first step is to click the Edit button of the Web Chat channel to create a secret for embedding the chat control. Then copy the iframe code snippet and put it into a web page. Here I'm using JSBin to try it, but we could've just as easily have hosted it on Azure Functions as well.
Update: The new Azure Bot Service uses Azure Functions to build a bot. Check out this video in which Shaun Luttin and I build a bot with it.
Microsoft announced an endless stream of awesome stuff during the Build conference this year. Two of my favorite are the new Microsoft Bot Framework and Azure Functions.
The Bot Framework makes it super easy to create a chat bot. The bots we create can be connected to platforms like Slack, Twilio, and Skype without writing additional code. We can also add machine learning to the mix by easily integrating Microsoft's LUIS (Language Understanding Intelligent Service) into any Bot Framework application.
The core logic of a bot is a REST endpoint. In the article, I'll walk through how to create a bot application and host it on Azure Functions. I'll assume a basic understanding of how to work with Azure Functions.
Anatomy of a Bot Application
A bot application is the gray box on the left side of this diagram from Microsoft:
The bot contains all the logic for processing messages. The Bot Connector takes care of handling conversations and maintaining state, as well as communicating with the various platforms that end users will use to chat with our bot.
Creating the Bot Azure Function
Start by creating a new Azure Functions App. We'll use the C# HTTP Endpoint template to create a function as a starting point.
package.json
The first thing we want to do is bring in the Microsoft.Bot.Connector NuGet package. This package contains some core classes for interacting with the Bot Connector. To add packages to an Azure Function, add a project.json file to the function's folder:
{
"frameworks": {
"net46":{
"dependencies": {
"Microsoft.Bot.Connector": "1.0.0.0"
}
}
}
}
When we save the file, a package restore will kick off and we'll see a project.lock.json appear in the function's folder.
The Function
Now we're ready to write the function. In run.csx, we'll add this code:
using System.Net;
using System.Net.Http.Headers;
using System.Threading.Tasks;
using Microsoft.Bot.Connector;
public static async Task<HttpResponseMessage> Run(HttpRequestMessage req, TraceWriter log)
{
if (!HasValidAuthHeader(req.Headers))
{
return req.CreateResponse(HttpStatusCode.Forbidden, "Forbidden");
}
var message = await req.Content.ReadAsAsync<Message>();
if (message.Type == "Message")
{
var replyMessage = message.CreateReplyMessage($"You sent {message.Text.Length} characters");
return req.CreateResponse(HttpStatusCode.OK, replyMessage);
}
else
{
return req.CreateResponse(HttpStatusCode.OK, HandleSystemMessage(message));
}
}
private static bool HasValidAuthHeader(HttpRequestHeaders headers)
{
var actualAuthHeader = headers.GetValues("Authorization").First();
var appId = Environment.GetEnvironmentVariable("AppId") ?? "YourAppId";
var appSecret = Environment.GetEnvironmentVariable("AppSecret") ?? "YourAppSecret";
var expectedAuthHeader = "Basic " +
System.Convert.ToBase64String(System.Text.Encoding.UTF8.GetBytes(appId + ":" + appSecret));
return actualAuthHeader == expectedAuthHeader;
}
private static Message HandleSystemMessage(Message message)
{
if (message.Type == "BotAddedToConversation")
{
return message.CreateReplyMessage($"Welcome {message.From?.Name}!");
}
else if (message.Type == "BotRemovedFromConversation")
{
return message.CreateReplyMessage($"Bye {message.From?.Name}!");
}
return null;
}
Authentication
The first thing we do in the function is authenticate the incoming request. The framework uses basic auth, with the AppId as the username and AppSecret as the password. In an ASP.NET Web API application, there's a BotAuthentication filter that is included in the Bot Connector NuGet package that handles this. That won't work here, so we're rolling our own thanks to some code I found on StackOverflow.
If the secrets are available in the Function App's environment variables, we'll use those instead of the defaults.
Processing the Message
Now that we're authenticated, we deserialize the HTTP request body into a Microsoft.Bot.Connector.Message object.
At this point, it's entirely up to us what we want to do with the message. Here we'll simply reply with the length of the message. But we can do a lot more, such as call out to a LUIS natural language model or leverage a Bot Builder.
We can also respond to a system event, such as when the bot joins or leaves a conversation. There's a whole list of possible message types.
Testing with the Bot Emulator
Now it's time to test the bot. We can do this with the Bot Emulator which can be downloaded here.
Fire up the emulator, enter the Function's URL, and try it out!
Hooking It Up to the Bot Connector
The only thing left now is try our bot with the real Bot Connector. We'll need to sign up for an account, do some setup, and embed a web chat widget in a web page.
Signing Up for Bot Framework
Head over to dev.botframework.com and sign up for an account. Then register a new bot application. Use the same Azure Functions URL that we used with the Bot Emulator.
Set Secrets
Now that the bot is registered, we'll be shown the details of our bot. Take the bot's name plus one of its secrets and add it as environment variables for the app.
Embed the Web Chat Control
Among the many connectors to platforms like Slack and Skype, the Bot Connector also provides a chat interface that we can embed into any web page.
The first step is to click the Edit button of the Web Chat channel to create a secret for embedding the chat control. Then copy the iframe code snippet and put it into a web page. Here I'm using JSBin to try it, but we could've just as easily have hosted it on Azure Functions as well.