
Event-Driven Serverless Containers with PowerShell Azure Functions and Azure Container Instances
Monday, April 29, 2019
Today, the Azure Functions team announced the public preview of their V2 runtime's support for PowerShell (PowerShell was previously in V1 as an experimental language).
In Azure Functions V2, PowerShell isn't just another language for writing serverless apps; it opens the door for many event-driven automation scenarios that weren't easily achieved with Azure Functions before. It uses a brand new PowerShell Core language worker built by the PowerShell team.
Using managed identities, a PowerShell Azure Function app can automatically log into a system-managed Azure Active Directory identity. When combined with the Azure PowerShell module, we can write Azure Functions that can securely manage any resource in Azure.
In this article, we'll look at how we can trigger and monitor batch jobs using PowerShell Azure Functions and Azure Container Instances.
Overview (tl;dr)
What are we doing?
There are two types of workloads that have traditionally been difficult to run on serverless function platforms like Azure Functions:
- Applications such as complex batch jobs that are difficult to refactor into serverless functions but can be packaged into a container
- Serverless functions that need to run for longer than the maximum duration allowed by the platform (Azure Functions running in App Service and Premium plans, however, do not have limitations on duration)
With PowerShell Azure Functions, we can react to events, such as HTTP requests or queue messages, and launch our containerized job using Azure Container Instances. Azure Functions can also be used to monitor a job's progress.
How do we do it?
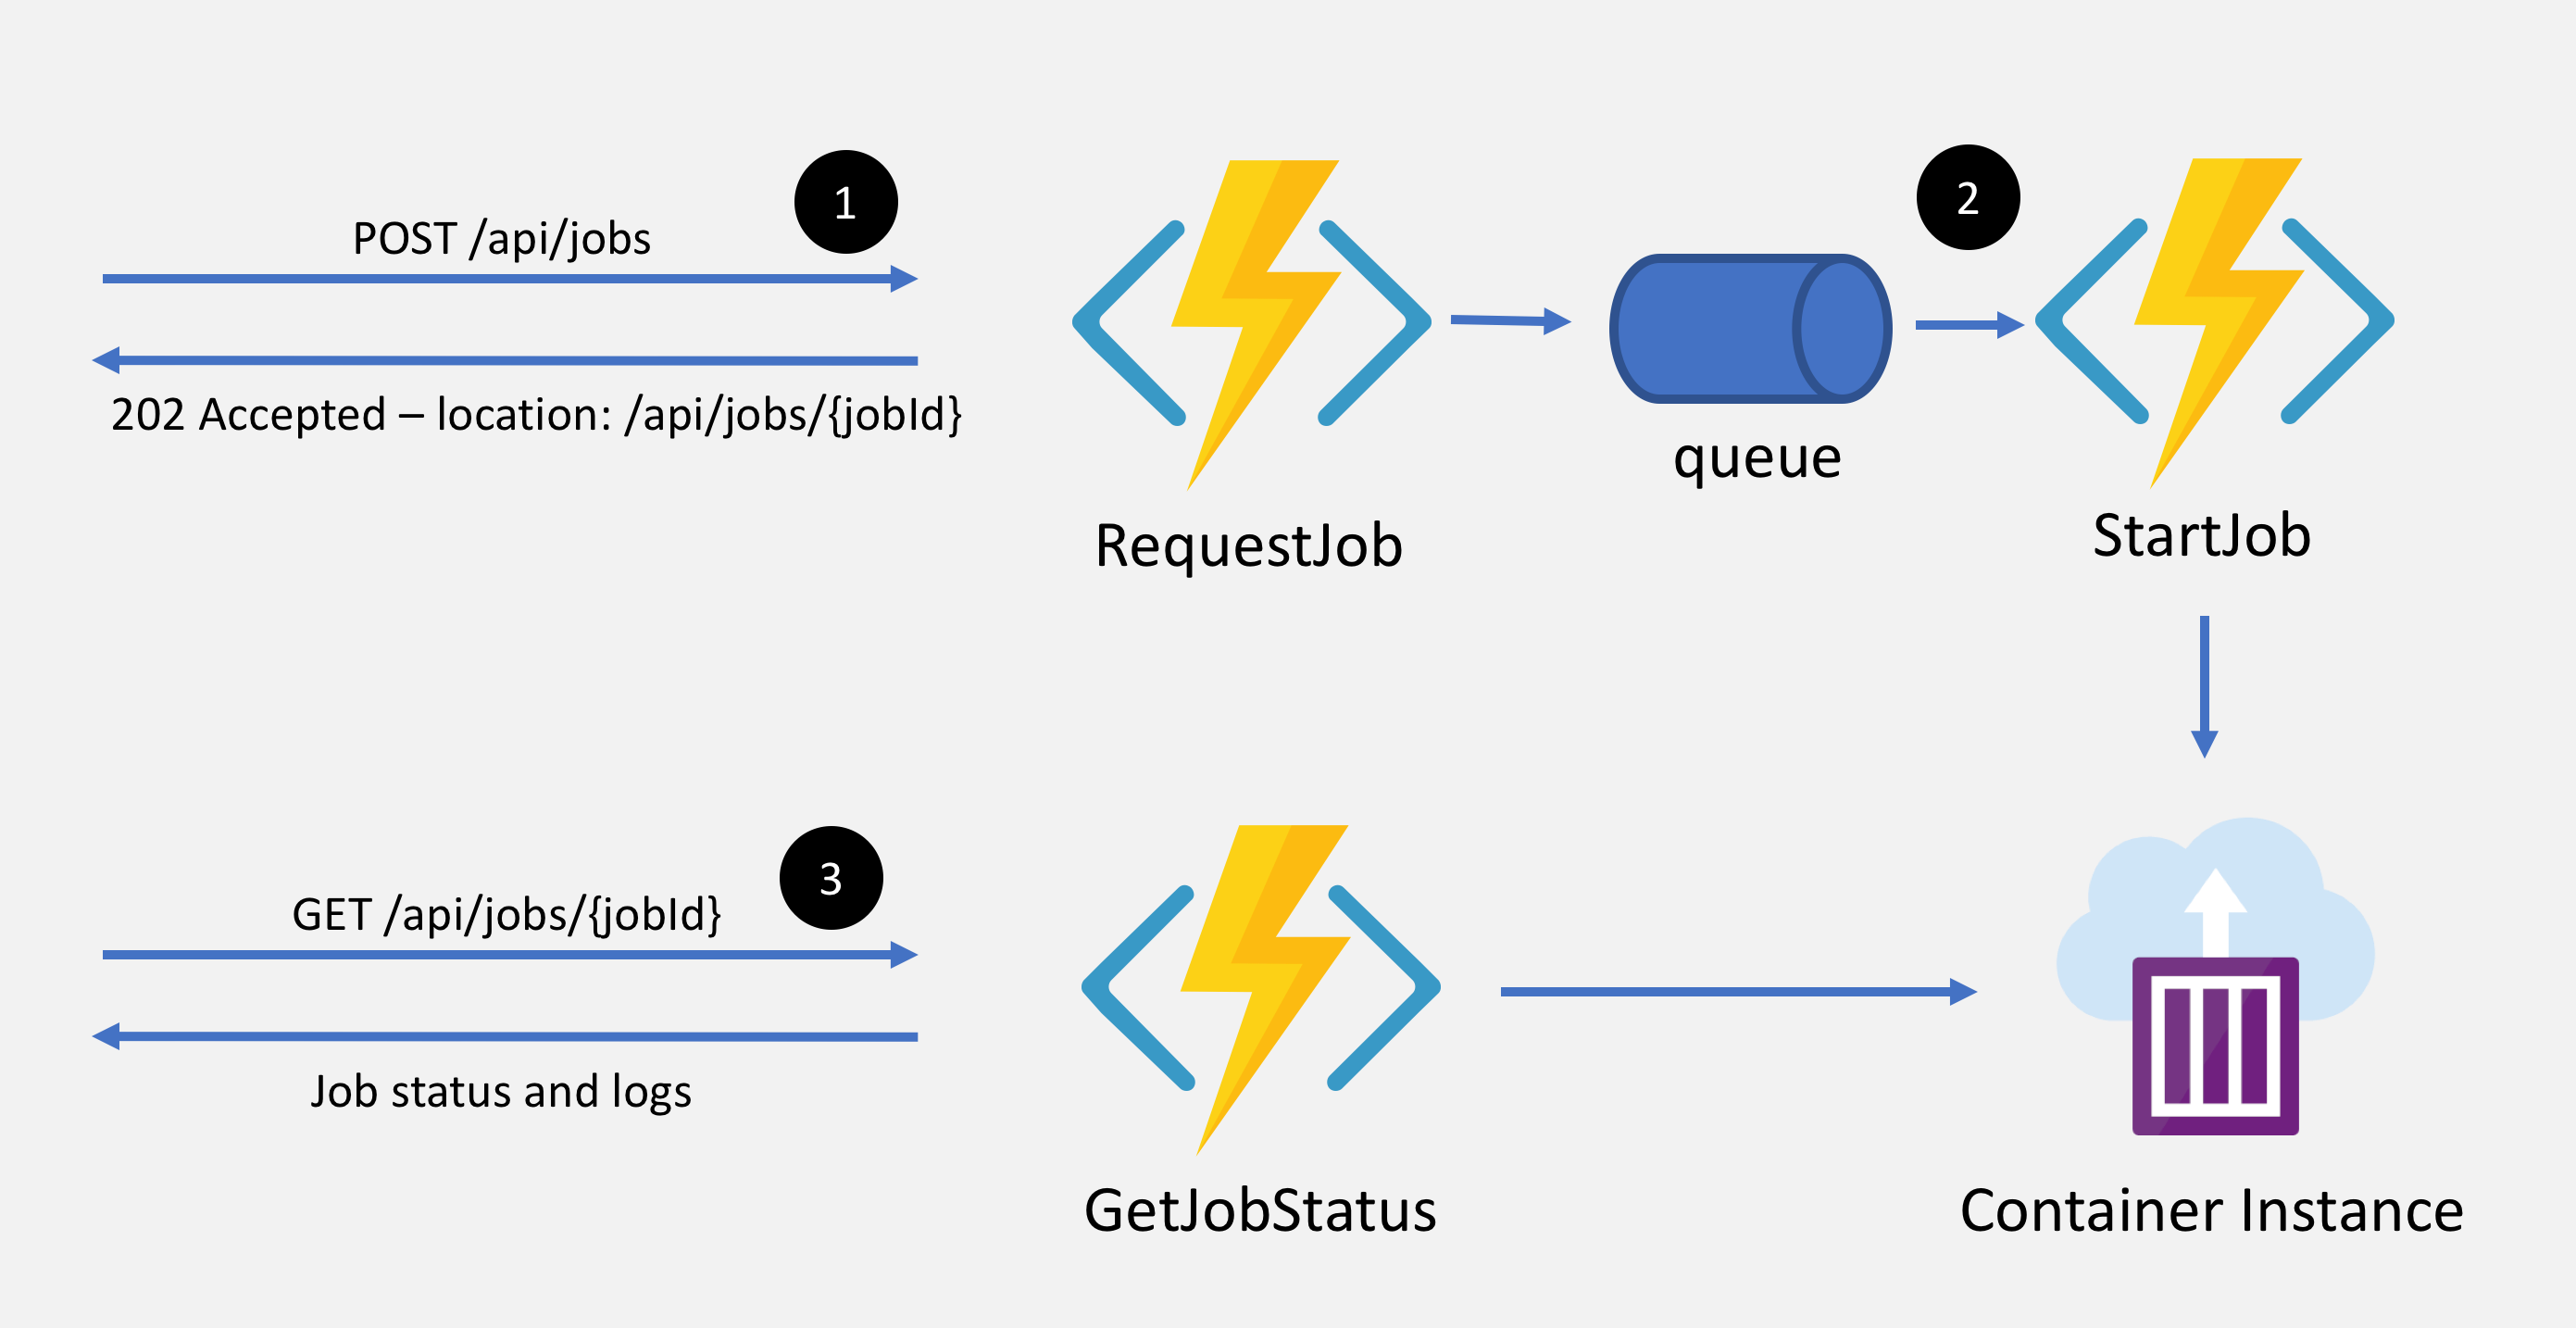
We'll build an Azure Function app to start and monitor containerized jobs.
- Trigger a job by making an HTTP POST to
/api/jobs; Azure Functions submits the job to an Azure Storage queue and returns an HTTP response with status code 202 Accepted and a location header containing a URL /api/jobs/{JobId}.
- A function will be triggered by a queue message and runs the
New-AzContainerGroup cmdlet to start our job.
- Make HTTP GET requests to
/api/jobs/{JobId} to monitor the job's progress.
The key pieces
Azure Container Instances
Azure Container Instances (ACI) is the easiest way to run containers in Azure. We can use it to run containers without worrying about provisioning infrastructure and we only pay for resources that are used.
We'll use the Azure PowerShell module in an Azure Function app to create and monitor containers in ACI.
Azure Functions
Azure Functions is Azure's flagship serverless platform. Serverless functions can be triggered by dozens of events and we can write them in C#, JavaScript/TypeScript, Java, Python, and starting today: PowerShell. (Python and PowerShell are currently in public preview.)
PowerShell Azure Functions use PowerShell Core — a newer version of PowerShell that runs on Windows, Linux, and macOS. We have access to all the modules that are supported by PowerShell Core, including the new Azure PowerShell module that makes it easy to manage resources in Azure.
Managed identities
Managed identities (formerly known as managed service identities or MSI) automatically provisions an Azure Active Directory service principal for our Azure resources, including Azure Functions.
Azure Storage queues
Every Azure Function app includes an Azure Storage account. Azure Storage has support for queues; we'll use them to asynchronously trigger an Azure Function to start an ACI to run a job.
Build the function app
Getting started
Source code
The source code for the app we're building is on GitHub.
Tools
Visual Studio Code is my favorite editor for pretty much everything. It has great support for Azure Functions as well as PowerShell (even on macOS!). To get started, install the Azure Functions Core Tools, the Azure Functions VS Code extension, and PowerShell Core.
To create a function app using the Functions Core Tools func (version 2.6.1048 and up, Functions Runtime version 2.0.12408 and up), run this command and select "PowerShell":
func init
Local configuration
For local development, Azure Functions supports placing environment variables in a local.settings.json file.
There are a couple of things that we need for this project. One is a Storage account in Azure and its connection string in a local setting named AzureWebJobsStorage.
The other is the name of the resource group (app setting ResourceGroupName) in Azure that we've already created. It will be where the container instances are created.
Azure PowerShell modules
Before we start coding, we need to ensure our app and local environment are configured for running Azure PowerShell modules.
In host.json, make sure managedDependency is enabled.
{
  "version": "2.0",
  "managedDependency": {
    "enabled": true
  }
}
And make sure there's a file named requirements.psd1 at the root of the function app that tells Azure Functions that we need the Az module to be available:
@{
    'Az' = '1.*'
}
Lastly, we need to ensure we are logged into Azure by running this command. (This is only required locally. When running in Azure, the application logs in using the app's managed identity. We'll talk about that later.)
Connect-AzAccount
Our function app will consist of three functions:
- RequestJob - HTTP triggered function to queue a job and return a status URL
- StartJob - Queue triggered function that creates the Azure Container Instance to run the actual job
- GetJobStatus - HTTP triggered function that returns the status of a job
RequestJob function
The RequestJob function responds to an HTTP POST at /api/jobs. It generates a job ID (a GUID) and adds it as a message to an Azure Storage queue. It then returns an HTTP status of 202 Accepted and a location header containing a URL for checking the job's status.
A PowerShell function consists of a folder with the name of the function that contains two files: function.json and run.ps1.
function.json describes the trigger as well as bindings for a function. Bindings are used to read additional information from or write information to other services. We will use the Storage queue binding to output our message to a queue.
// RequestJob/function.json
{
  "bindings": [
    {
      "authLevel": "function",
      "type": "httpTrigger",
      "direction": "in",
      "name": "Request",
      "methods": [
        "post"
      ],
      "route": "jobs"
    },
    {
      "type": "http",
      "direction": "out",
      "name": "Response"
    },
    {
      "type": "queue",
      "direction": "out",
      "name": "JobQueue",
      "queueName": "%JobQueueName%"
    }
  ]
}
The function is triggered by an HTTP POST request to a route named "jobs" (this will generate an HTTP route of /api/jobs). In addition, the function is configured with function level authorization, which means a correct authorization code must be provided before it will be triggered when it runs in Azure. We use this to provide a bit of security for our function so that jobs cannot be started by anonymous requests.
We're using a binding expression %JobQueueName% instead of a hardcoded value for the queue name. We can configure this value as an app setting in our function app.
# RequestJob/run.ps1
using namespace System.Net

param($Request, $TriggerMetadata)

$ContainerName = (New-Guid).ToString()
$StatusUrl = "/api/jobs/$($ContainerName)"

Push-OutputBinding -Name JobQueue -Value $ContainerName

Push-OutputBinding -Name Response -Value ([HttpResponseContext]@{
    StatusCode = [HttpStatusCode]::Accepted
    Headers = @{
        "Location" = $StatusUrl
        "Content-type" = "application/json"
    }
    Body = $StatusUrl
})
The function generates a GUID that will be used to name the Azure Container Instance. It is also the job ID that we will use to construct our status URL.
Using the queue binding named JobQueue that we defined in function.json, the function outputs the job ID to our queue.
It also uses the HTTP output binding to return a 202 Accepted status code with a location header containing the status URL.
Our function an be invoked by making an HTTP POST request to /api/jobs?code=<function-auth-code>. The function auth code can be left empty when running locally. When running in Azure, we can use the Azure portal to open the function to locate the function's full URL, including the authorization code. Once called, the function returns a response like this:
HTTP/1.1 202 Accepted
Content-Length: 46
Content-Type: application/json; charset=utf-8
Location: /api/jobs/2b2ed845-64e1-4b08-90f2-cf485ed4bdb4
Date: Mon, 22 Apr 2019 23:24:21 GMT

/api/jobs/2b2ed845-64e1-4b08-90f2-cf485ed4bdb4
We'll build the function named GetJobStatus later that will be called when we follow the URL specified in the location header.
StartJob function
Now that we have a function that places job IDs on a queue, we'll need a function that is triggered by messages on that queue and starts the jobs.
The function.json for our function has a single queue trigger:
// StartJob/function.json
{
  "bindings": [
    {
      "name": "JobId",
      "type": "queueTrigger",
      "direction": "in",
      "queueName": "%JobQueueName%"
    }
  ]
}
The function body looks like this:
# StartJob/run.ps1
param([string] $JobId, $TriggerMetadata)

New-AzContainerGroup -ResourceGroupName $env:ResourceGroupName -Name $JobId `
    -Image alpine -OsType Linux `
    -Command "/bin/sh -c `"for i in ``seq 1 30``; do sleep 1; echo `$i; done`"" `
    -RestartPolicy Never
It receives the job ID from the queue message and uses the New-AzContainerGroup cmdlet to start a container that runs our job. For the purposes of this demo, I'll simply use the Alpine Linux container and run a loop that outputs a number every second for 30 seconds. Hopefully your applications are more interesting than this.
That's how easy it is to start a container in ACI using a PowerShell Azure Function!
GetJobStatus function
Lastly, we need an HTTP endpoint that will retrieve the container's status from ACI. This function can be anonymous as its route includes the job ID's GUID which is pretty hard to guess.
// GetJobStatus/function.json
{
  "bindings": [
    {
      "authLevel": "anonymous",
      "type": "httpTrigger",
      "direction": "in",
      "name": "Request",
      "methods": [
        "get"
      ],
      "route": "jobs/{JobId}"
    },
    {
      "type": "http",
      "direction": "out",
      "name": "Response"
    }
  ]
}
# GetJobStatus/run.ps1
using namespace System.Net

param($Request, $TriggerMetadata)

$JobId = $Request.Params.JobId

$JobStatus = Get-AzContainerGroup -ResourceGroupName $env:ResourceGroupName -Name $JobId
$JobLogs = Get-AzContainerInstanceLog -ResourceGroupName powershell-func-aci -ContainerGroupName $JobId

If ($JobStatus.State -eq "Succeeded") {
    $StatusCode = [HttpStatusCode]::OK
} ElseIf ($JobStatus.State -eq "Failed") {
    $StatusCode = [HttpStatusCode]::InternalServerError
} Else {
    $StatusCode = [HttpStatusCode]::Accepted
}

Push-OutputBinding -Name Response -Value ([HttpResponseContext]@{
    StatusCode = $StatusCode
    Headers = @{
        "Content-type" = "application/json"
    }
    Body = @{
        "state" = $JobStatus.State
        "logs" = $JobLogs
    }
})
The function pulls the job ID from the HTTP route parameters and calls Get-AzContainerGroup to retrieve the ACI's status.
In addition, it calls Get-AzContainerInstanceLog to retrieve any logs that may have been outputted by the container.
We return the status and the logs. If the container is still running, we return an HTTP status code of 202 Accepted. If it's completed we return 200 OK (succeeded) or 500 Internal Server Error (failed).
Here's an example of a call to the status URL returned by the example call to RequestJob above while the container is still running (/api/jobs/2b2ed845-64e1-4b08-90f2-cf485ed4bdb4):
HTTP/1.1 202 Accepted
Content-Length: 85
Content-Type: text/plain; charset=utf-8
Date: Mon, 22 Apr 2019 23:24:42 GMT

{
  "state": "Running",
  "logs": "1\n2\n3\n4\n5\n6\n7\n8\n9\n10\n11\n12\n13\n14\n"
}
And here's what it looked like when completed:
HTTP/1.1 200 OK
Content-Length: 154
Content-Type: text/plain; charset=utf-8
Date: Mon, 22 Apr 2019 23:25:30 GMT

{
  "state": "Succeeded",
  "logs": "1\n2\n3\n4\n5\n6\n7\n8\n9\n10\n11\n12\n13\n14\n15\n16\n17\n18\n19\n20\n21\n22\n23\n24\n25\n26\n27\n28\n29\n30\n"
}
Deploy to Azure
Configure app settings
The first thing we need to do is create a Function app. Once the app is created, in the Azure Function app settings, configure the following settings:
FUNCTIONS_WORKER_RUNTIME - Make sure this is set to powershellResourceGroupName - Name of resource group where container instances will be created by the appJobQueueName - Name of the Storage queue to hold pending jobs
Configure managed identity
Managed identity automatically provisions a service principal in Azure AD for an app. Our functions can use the identity to authenticate with and execute commands with the Azure PowerShell module.
In a PowerShell Azure Functions project, we can create a script called profile.ps1. Inside, we check if the app is running in a managed identity enabled environment and log into Azure PowerShell using that identity. This is executed during each "cold start" of the PowerShell Azure Functions worker.
# profile.ps1
if ($env:MSI_SECRET -and (Get-Module -ListAvailable Az.Accounts)) {
    Connect-AzAccount -Identity
}
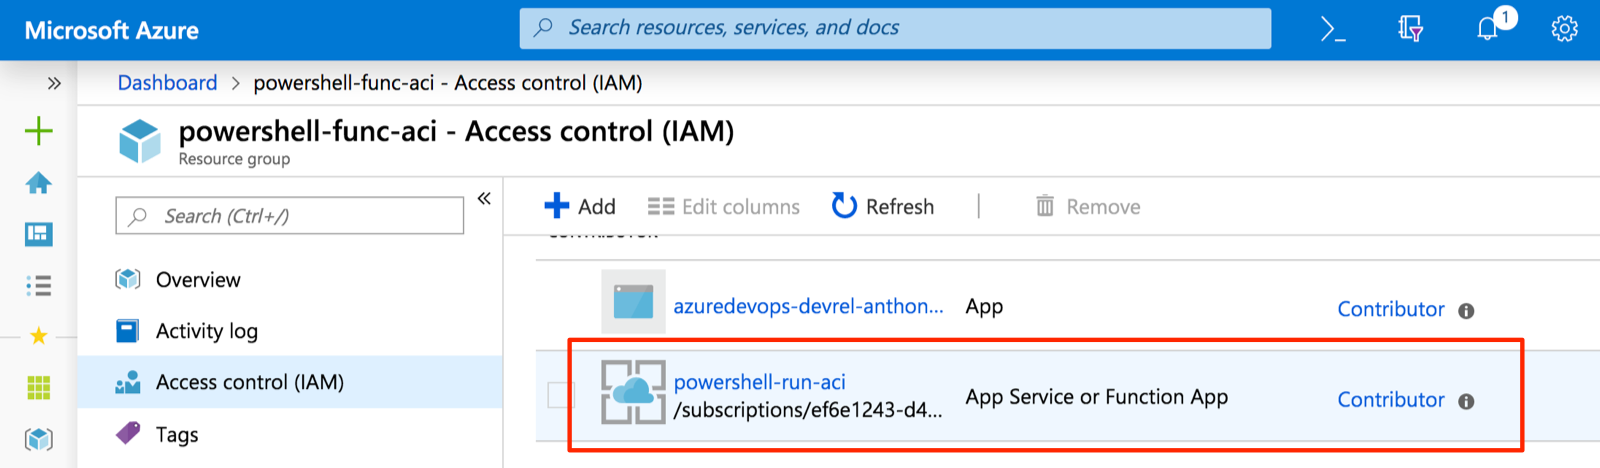
In order for our function app to be able to create container instances in the resource group we specified in the settings, we have to grant the app's managed identity contributor access to the resource group.
Deploy with Functions Core Tools
Once the app is configured, we can deploy our app by running the follow Functions Core Tools command:
func azure functionapp publish <name of the function app>
Test the app
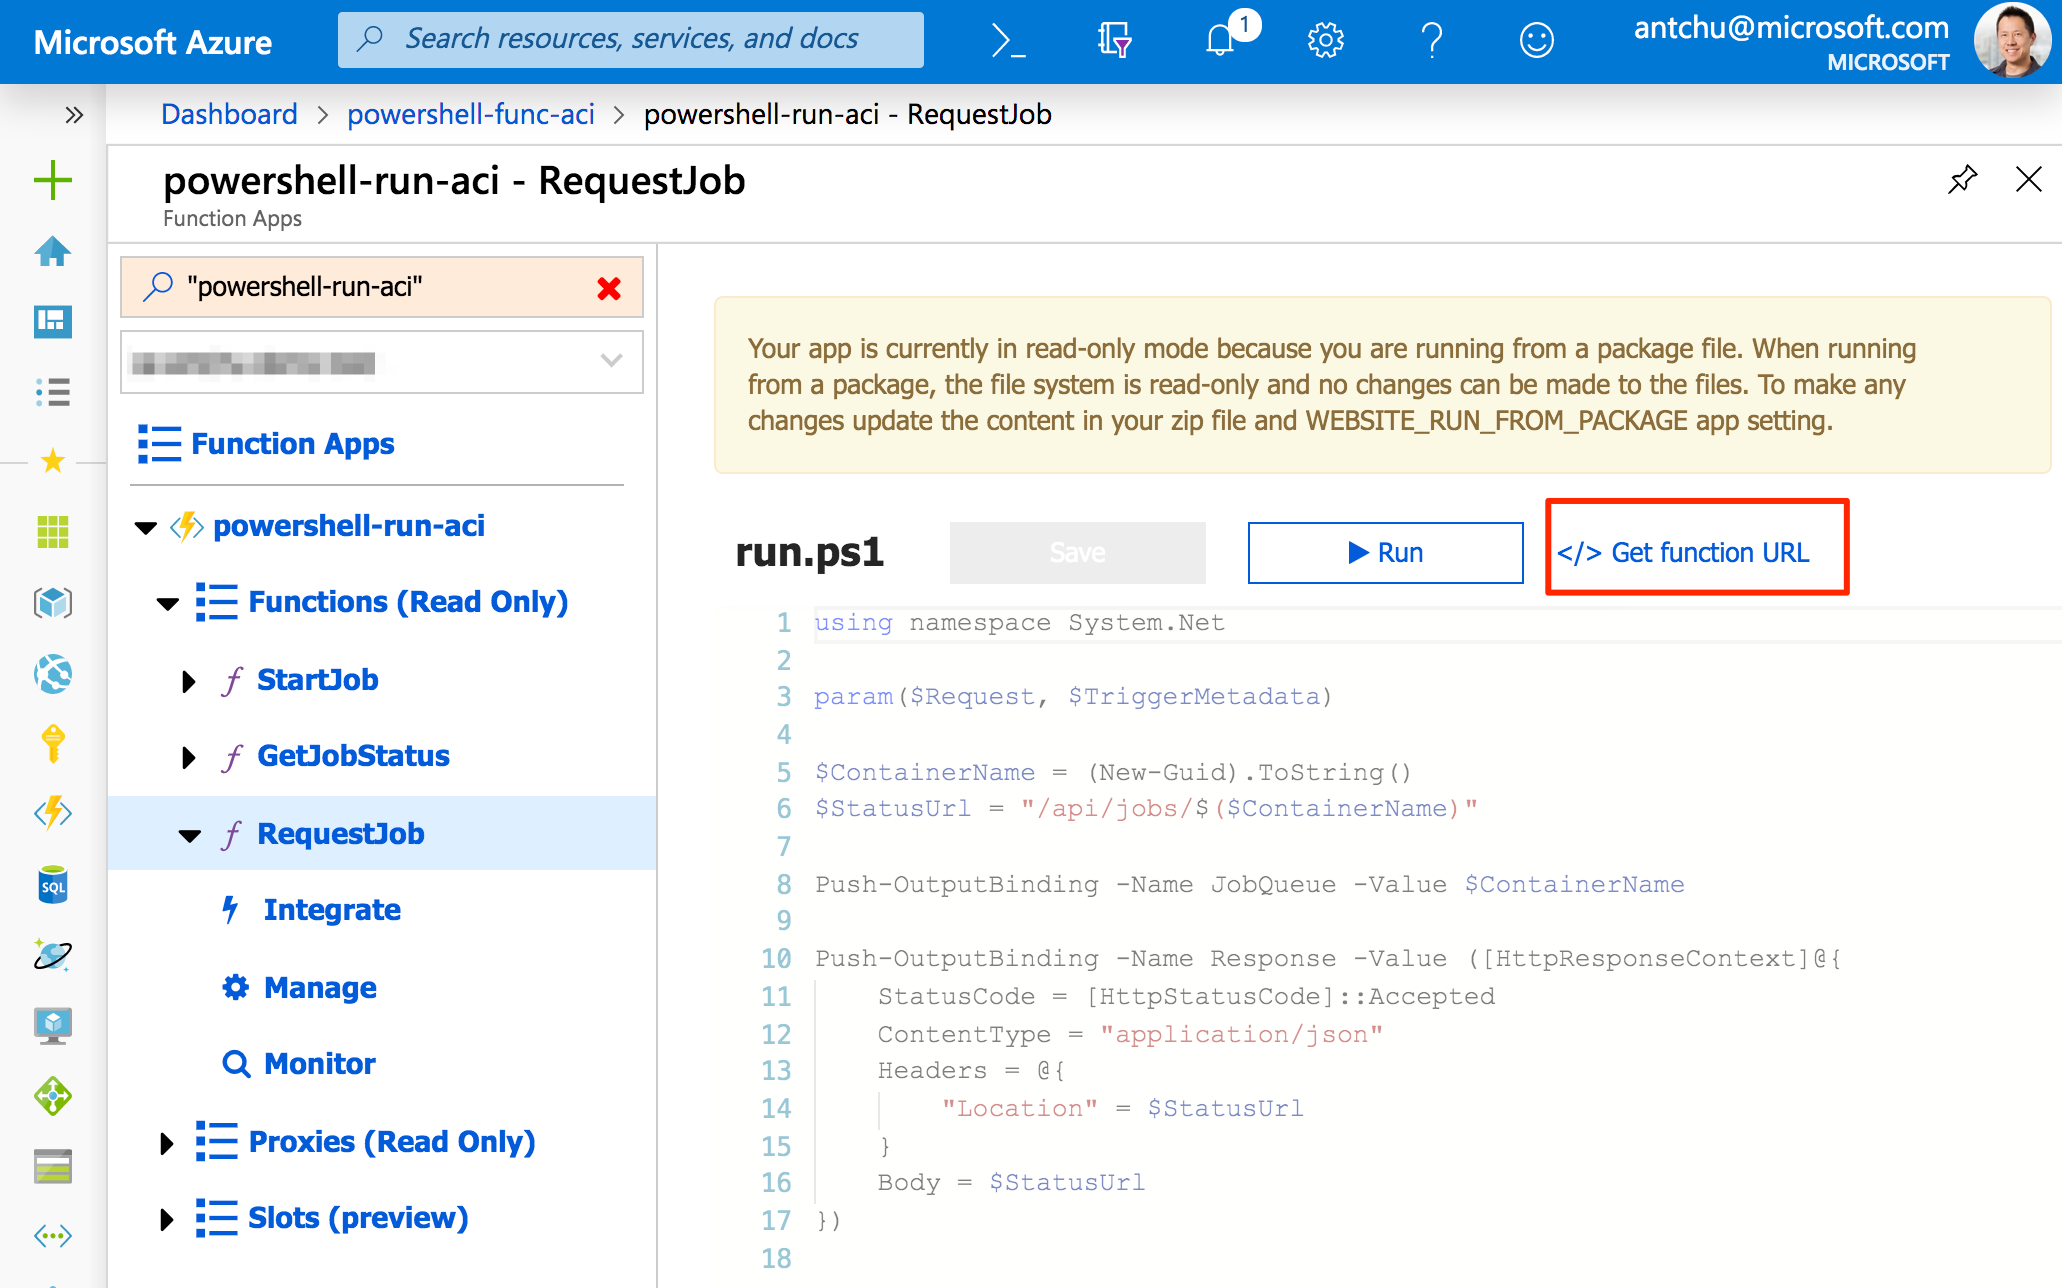
Once the app is deployed, open it in the Azure portal and select the RequestJob function. Click on Get function URL to retrieve the function's URL including the authorization code.
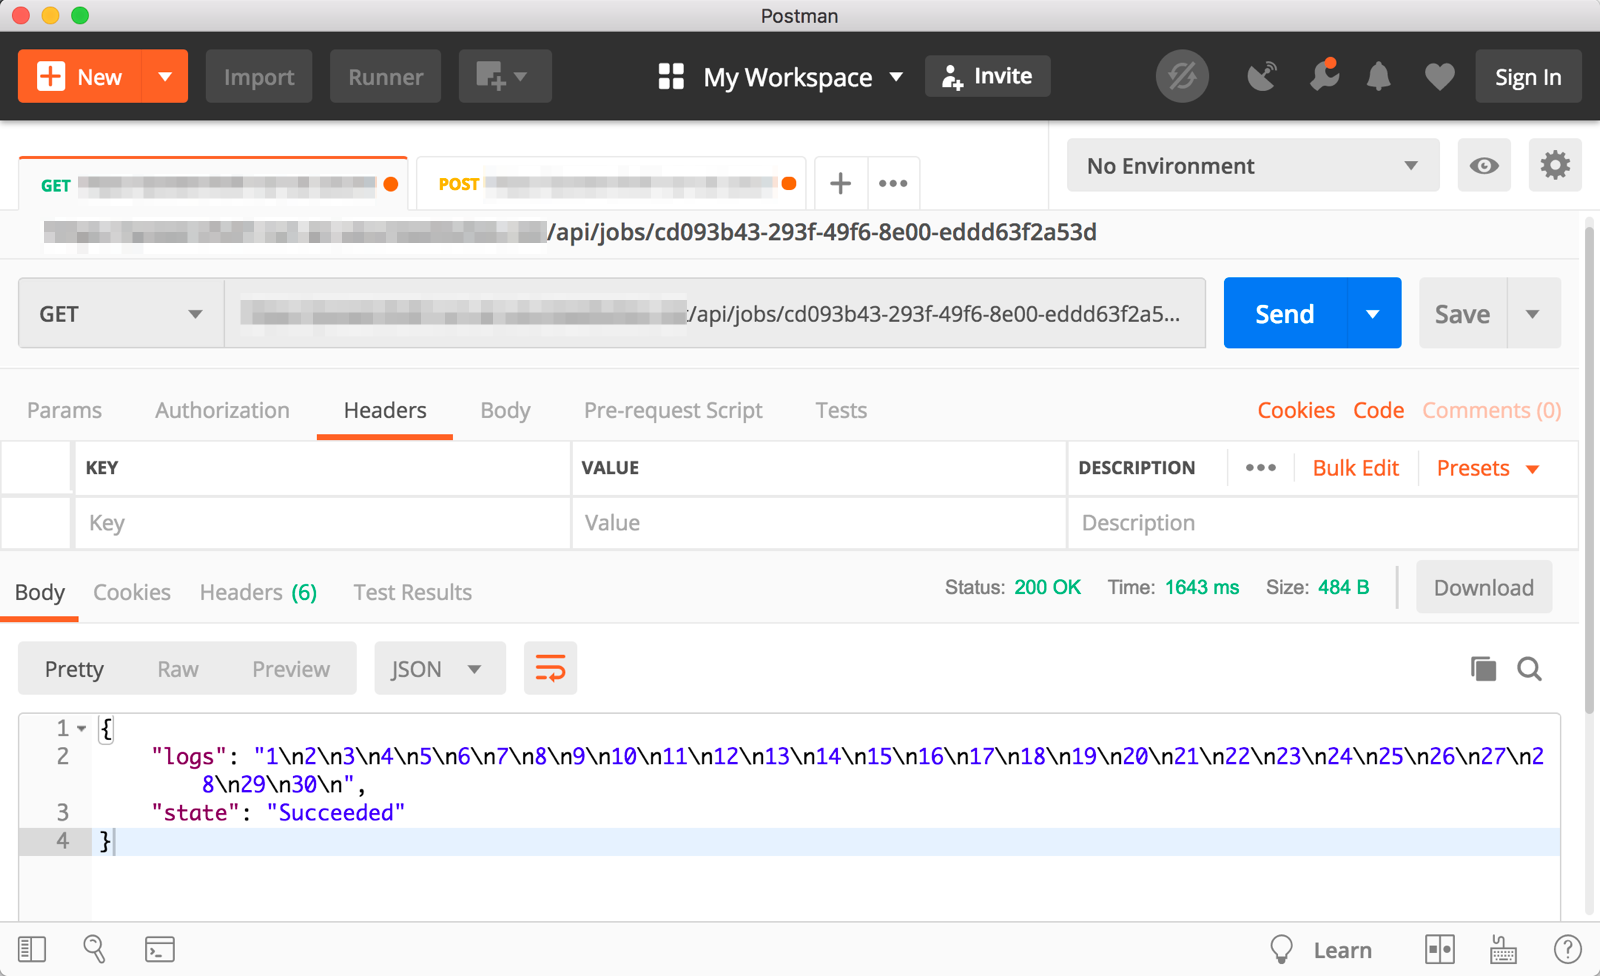
Use an app like Postman to make a POST request to the function to start a job. The function will respond with a status URL. Make a GET request to that URL to retrieve the job's current status and logs.
Resources
Today, the Azure Functions team announced the public preview of their V2 runtime's support for PowerShell (PowerShell was previously in V1 as an experimental language).
In Azure Functions V2, PowerShell isn't just another language for writing serverless apps; it opens the door for many event-driven automation scenarios that weren't easily achieved with Azure Functions before. It uses a brand new PowerShell Core language worker built by the PowerShell team.
Using managed identities, a PowerShell Azure Function app can automatically log into a system-managed Azure Active Directory identity. When combined with the Azure PowerShell module, we can write Azure Functions that can securely manage any resource in Azure.
In this article, we'll look at how we can trigger and monitor batch jobs using PowerShell Azure Functions and Azure Container Instances.
Overview (tl;dr)
What are we doing?
There are two types of workloads that have traditionally been difficult to run on serverless function platforms like Azure Functions:
- Applications such as complex batch jobs that are difficult to refactor into serverless functions but can be packaged into a container
- Serverless functions that need to run for longer than the maximum duration allowed by the platform (Azure Functions running in App Service and Premium plans, however, do not have limitations on duration)
With PowerShell Azure Functions, we can react to events, such as HTTP requests or queue messages, and launch our containerized job using Azure Container Instances. Azure Functions can also be used to monitor a job's progress.
How do we do it?
We'll build an Azure Function app to start and monitor containerized jobs.
- Trigger a job by making an HTTP POST to
/api/jobs; Azure Functions submits the job to an Azure Storage queue and returns an HTTP response with status code202 Acceptedand alocationheader containing a URL/api/jobs/{JobId}. - A function will be triggered by a queue message and runs the
New-AzContainerGroupcmdlet to start our job. - Make HTTP GET requests to
/api/jobs/{JobId}to monitor the job's progress.
The key pieces
Azure Container Instances
Azure Container Instances (ACI) is the easiest way to run containers in Azure. We can use it to run containers without worrying about provisioning infrastructure and we only pay for resources that are used.
We'll use the Azure PowerShell module in an Azure Function app to create and monitor containers in ACI.
Azure Functions
Azure Functions is Azure's flagship serverless platform. Serverless functions can be triggered by dozens of events and we can write them in C#, JavaScript/TypeScript, Java, Python, and starting today: PowerShell. (Python and PowerShell are currently in public preview.)
PowerShell Azure Functions use PowerShell Core — a newer version of PowerShell that runs on Windows, Linux, and macOS. We have access to all the modules that are supported by PowerShell Core, including the new Azure PowerShell module that makes it easy to manage resources in Azure.
Managed identities
Managed identities (formerly known as managed service identities or MSI) automatically provisions an Azure Active Directory service principal for our Azure resources, including Azure Functions.
Azure Storage queues
Every Azure Function app includes an Azure Storage account. Azure Storage has support for queues; we'll use them to asynchronously trigger an Azure Function to start an ACI to run a job.
Build the function app
Getting started
Source code
The source code for the app we're building is on GitHub.
Tools
Visual Studio Code is my favorite editor for pretty much everything. It has great support for Azure Functions as well as PowerShell (even on macOS!). To get started, install the Azure Functions Core Tools, the Azure Functions VS Code extension, and PowerShell Core.
To create a function app using the Functions Core Tools func (version 2.6.1048 and up, Functions Runtime version 2.0.12408 and up), run this command and select "PowerShell":
func init
Local configuration
For local development, Azure Functions supports placing environment variables in a local.settings.json file.
There are a couple of things that we need for this project. One is a Storage account in Azure and its connection string in a local setting named AzureWebJobsStorage.
The other is the name of the resource group (app setting ResourceGroupName) in Azure that we've already created. It will be where the container instances are created.
Azure PowerShell modules
Before we start coding, we need to ensure our app and local environment are configured for running Azure PowerShell modules.
In host.json, make sure managedDependency is enabled.
{
"version": "2.0",
"managedDependency": {
"enabled": true
}
}
And make sure there's a file named requirements.psd1 at the root of the function app that tells Azure Functions that we need the Az module to be available:
@{
'Az' = '1.*'
}
Lastly, we need to ensure we are logged into Azure by running this command. (This is only required locally. When running in Azure, the application logs in using the app's managed identity. We'll talk about that later.)
Connect-AzAccount
Our function app will consist of three functions: - RequestJob - HTTP triggered function to queue a job and return a status URL - StartJob - Queue triggered function that creates the Azure Container Instance to run the actual job - GetJobStatus - HTTP triggered function that returns the status of a job
RequestJob function
The RequestJob function responds to an HTTP POST at /api/jobs. It generates a job ID (a GUID) and adds it as a message to an Azure Storage queue. It then returns an HTTP status of 202 Accepted and a location header containing a URL for checking the job's status.
A PowerShell function consists of a folder with the name of the function that contains two files: function.json and run.ps1.
function.json describes the trigger as well as bindings for a function. Bindings are used to read additional information from or write information to other services. We will use the Storage queue binding to output our message to a queue.
// RequestJob/function.json
{
"bindings": [
{
"authLevel": "function",
"type": "httpTrigger",
"direction": "in",
"name": "Request",
"methods": [
"post"
],
"route": "jobs"
},
{
"type": "http",
"direction": "out",
"name": "Response"
},
{
"type": "queue",
"direction": "out",
"name": "JobQueue",
"queueName": "%JobQueueName%"
}
]
}
The function is triggered by an HTTP POST request to a route named "jobs" (this will generate an HTTP route of /api/jobs). In addition, the function is configured with function level authorization, which means a correct authorization code must be provided before it will be triggered when it runs in Azure. We use this to provide a bit of security for our function so that jobs cannot be started by anonymous requests.
We're using a binding expression %JobQueueName% instead of a hardcoded value for the queue name. We can configure this value as an app setting in our function app.
# RequestJob/run.ps1
using namespace System.Net
param($Request, $TriggerMetadata)
$ContainerName = (New-Guid).ToString()
$StatusUrl = "/api/jobs/$($ContainerName)"
Push-OutputBinding -Name JobQueue -Value $ContainerName
Push-OutputBinding -Name Response -Value ([HttpResponseContext]@{
StatusCode = [HttpStatusCode]::Accepted
Headers = @{
"Location" = $StatusUrl
"Content-type" = "application/json"
}
Body = $StatusUrl
})
The function generates a GUID that will be used to name the Azure Container Instance. It is also the job ID that we will use to construct our status URL.
Using the queue binding named JobQueue that we defined in function.json, the function outputs the job ID to our queue.
It also uses the HTTP output binding to return a 202 Accepted status code with a location header containing the status URL.
Our function an be invoked by making an HTTP POST request to /api/jobs?code=<function-auth-code>. The function auth code can be left empty when running locally. When running in Azure, we can use the Azure portal to open the function to locate the function's full URL, including the authorization code. Once called, the function returns a response like this:
HTTP/1.1 202 Accepted
Content-Length: 46
Content-Type: application/json; charset=utf-8
Location: /api/jobs/2b2ed845-64e1-4b08-90f2-cf485ed4bdb4
Date: Mon, 22 Apr 2019 23:24:21 GMT
/api/jobs/2b2ed845-64e1-4b08-90f2-cf485ed4bdb4
We'll build the function named GetJobStatus later that will be called when we follow the URL specified in the location header.
StartJob function
Now that we have a function that places job IDs on a queue, we'll need a function that is triggered by messages on that queue and starts the jobs.
The function.json for our function has a single queue trigger:
// StartJob/function.json
{
"bindings": [
{
"name": "JobId",
"type": "queueTrigger",
"direction": "in",
"queueName": "%JobQueueName%"
}
]
}
The function body looks like this:
# StartJob/run.ps1
param([string] $JobId, $TriggerMetadata)
New-AzContainerGroup -ResourceGroupName $env:ResourceGroupName -Name $JobId `
-Image alpine -OsType Linux `
-Command "/bin/sh -c `"for i in ``seq 1 30``; do sleep 1; echo `$i; done`"" `
-RestartPolicy Never
It receives the job ID from the queue message and uses the New-AzContainerGroup cmdlet to start a container that runs our job. For the purposes of this demo, I'll simply use the Alpine Linux container and run a loop that outputs a number every second for 30 seconds. Hopefully your applications are more interesting than this.
That's how easy it is to start a container in ACI using a PowerShell Azure Function!
GetJobStatus function
Lastly, we need an HTTP endpoint that will retrieve the container's status from ACI. This function can be anonymous as its route includes the job ID's GUID which is pretty hard to guess.
// GetJobStatus/function.json
{
"bindings": [
{
"authLevel": "anonymous",
"type": "httpTrigger",
"direction": "in",
"name": "Request",
"methods": [
"get"
],
"route": "jobs/{JobId}"
},
{
"type": "http",
"direction": "out",
"name": "Response"
}
]
}
# GetJobStatus/run.ps1
using namespace System.Net
param($Request, $TriggerMetadata)
$JobId = $Request.Params.JobId
$JobStatus = Get-AzContainerGroup -ResourceGroupName $env:ResourceGroupName -Name $JobId
$JobLogs = Get-AzContainerInstanceLog -ResourceGroupName powershell-func-aci -ContainerGroupName $JobId
If ($JobStatus.State -eq "Succeeded") {
$StatusCode = [HttpStatusCode]::OK
} ElseIf ($JobStatus.State -eq "Failed") {
$StatusCode = [HttpStatusCode]::InternalServerError
} Else {
$StatusCode = [HttpStatusCode]::Accepted
}
Push-OutputBinding -Name Response -Value ([HttpResponseContext]@{
StatusCode = $StatusCode
Headers = @{
"Content-type" = "application/json"
}
Body = @{
"state" = $JobStatus.State
"logs" = $JobLogs
}
})
The function pulls the job ID from the HTTP route parameters and calls Get-AzContainerGroup to retrieve the ACI's status.
In addition, it calls Get-AzContainerInstanceLog to retrieve any logs that may have been outputted by the container.
We return the status and the logs. If the container is still running, we return an HTTP status code of 202 Accepted. If it's completed we return 200 OK (succeeded) or 500 Internal Server Error (failed).
Here's an example of a call to the status URL returned by the example call to RequestJob above while the container is still running (/api/jobs/2b2ed845-64e1-4b08-90f2-cf485ed4bdb4):
HTTP/1.1 202 Accepted
Content-Length: 85
Content-Type: text/plain; charset=utf-8
Date: Mon, 22 Apr 2019 23:24:42 GMT
{
"state": "Running",
"logs": "1\n2\n3\n4\n5\n6\n7\n8\n9\n10\n11\n12\n13\n14\n"
}
And here's what it looked like when completed:
HTTP/1.1 200 OK
Content-Length: 154
Content-Type: text/plain; charset=utf-8
Date: Mon, 22 Apr 2019 23:25:30 GMT
{
"state": "Succeeded",
"logs": "1\n2\n3\n4\n5\n6\n7\n8\n9\n10\n11\n12\n13\n14\n15\n16\n17\n18\n19\n20\n21\n22\n23\n24\n25\n26\n27\n28\n29\n30\n"
}
Deploy to Azure
Configure app settings
The first thing we need to do is create a Function app. Once the app is created, in the Azure Function app settings, configure the following settings:
FUNCTIONS_WORKER_RUNTIME- Make sure this is set topowershellResourceGroupName- Name of resource group where container instances will be created by the appJobQueueName- Name of the Storage queue to hold pending jobs
Configure managed identity
Managed identity automatically provisions a service principal in Azure AD for an app. Our functions can use the identity to authenticate with and execute commands with the Azure PowerShell module.
In a PowerShell Azure Functions project, we can create a script called profile.ps1. Inside, we check if the app is running in a managed identity enabled environment and log into Azure PowerShell using that identity. This is executed during each "cold start" of the PowerShell Azure Functions worker.
# profile.ps1
if ($env:MSI_SECRET -and (Get-Module -ListAvailable Az.Accounts)) {
Connect-AzAccount -Identity
}
In order for our function app to be able to create container instances in the resource group we specified in the settings, we have to grant the app's managed identity contributor access to the resource group.
Deploy with Functions Core Tools
Once the app is configured, we can deploy our app by running the follow Functions Core Tools command:
func azure functionapp publish <name of the function app>
Test the app
Once the app is deployed, open it in the Azure portal and select the RequestJob function. Click on Get function URL to retrieve the function's URL including the authorization code.
Use an app like Postman to make a POST request to the function to start a job. The function will respond with a status URL. Make a GET request to that URL to retrieve the job's current status and logs.