
Dockerizing ASP.NET 4.x Apps with Windows Containers (Updated)
Wednesday, June 8, 2016
Update - December 23, 2016
Article and samples have been updated to work with the latest microsoft/iis image, Docker, and Windows Server 2016 updates.
Ever since ASP.NET Core came out, a big deal has been made that it runs on Linux and we can finally deploy ASP.NET inside Docker containers. While there's no doubt that it's a huge step forward for the platform; there's one thing that is often overlooked... This is only good news for green field projects and apps that can be ported to ASP.NET Core.
The majority of existing ASP.NET apps will never be ported to ASP.NET Core. There are many reasons an app can't be ported:
- Too many dependencies on System.Web
- WebForms!
- Third party dependencies that haven't been ported to .NET Core
- It runs perfectly fine in .NET 4.6 and earlier and doesn't make financial sense to port it
This is why Windows containers are so important. They let us bake our existing applications into Docker images and deploy them with the same tools as the rest of the Docker ecosystem.
Today we'll look at what it takes to build and run an ASP.NET 4.x WebForms app in a Windows container. We'll be using Windows Server Core 2016 TP5.
Dockerfile
This is the dockerfile. We'll be walking through it step by step.
FROM microsoft/iis

# Install Chocolatey
RUN @powershell -NoProfile -ExecutionPolicy Bypass -Command "$env:ChocolateyUseWindowsCompression='false'; iex ((New-Object System.Net.WebClient).DownloadString('https://chocolatey.org/install.ps1'))" && SET "PATH=%PATH%;%ALLUSERSPROFILE%\chocolatey\bin"

# Install build tools
RUN powershell add-windowsfeature web-asp-net45 \
    && choco install microsoft-build-tools -y --allow-empty-checksums -version 14.0.23107.10 \
    && choco install dotnet4.6-targetpack --allow-empty-checksums -y \
    && choco install nuget.commandline --allow-empty-checksums -y \
    && nuget install MSBuild.Microsoft.VisualStudio.Web.targets -Version 14.0.0.3 \
    && nuget install WebConfigTransformRunner -Version 1.0.0.1

# Delete existing files in wwwroot
RUN powershell remove-item C:\inetpub\wwwroot\iisstart.*

# Copy files
RUN md c:\build
WORKDIR c:/build
COPY . c:/build

# Restore packages, build, copy
RUN nuget restore \
    && "c:\Program Files (x86)\MSBuild\14.0\Bin\MSBuild.exe" /p:Platform="Any CPU" /p:VisualStudioVersion=12.0 /p:VSToolsPath=c:\MSBuild.Microsoft.VisualStudio.Web.targets.14.0.0.3\tools\VSToolsPath DockerDemo.sln \
    && xcopy c:\build\DockerDemo\* c:\inetpub\wwwroot /s

# Ensure container doesn't exit
CMD powershell \
    Write-Host IIS Started... ; \
    while ($true) { Start-Sleep -Seconds 3600 }
Base Image
FROM microsoft/iis
Because we're running ASP.NET WebForms, we need IIS. We're using the IIS image published by Microsoft. This is a Windows Server Core image with IIS enabled.
Build Tools
# Install Chocolatey
RUN @powershell -NoProfile -ExecutionPolicy Bypass -Command "$env:ChocolateyUseWindowsCompression='false'; iex ((New-Object System.Net.WebClient).DownloadString('https://chocolatey.org/install.ps1'))" && SET "PATH=%PATH%;%ALLUSERSPROFILE%\chocolatey\bin"

# Install build tools
RUN powershell add-windowsfeature web-asp-net45 \
    && choco install microsoft-build-tools -y --allow-empty-checksums -version 14.0.23107.10 \
    && choco install dotnet4.6-targetpack --allow-empty-checksums -y \
    && choco install nuget.commandline --allow-empty-checksums -y \
    && nuget install MSBuild.Microsoft.VisualStudio.Web.targets -Version 14.0.0.3 \
    && nuget install WebConfigTransformRunner -Version 1.0.0.1

# Delete existing files in wwwroot
RUN powershell remove-item C:\inetpub\wwwroot\iisstart.*
Next, we install Chocolatey and a bunch of tools necessary for building our project. This includes MSBuild, NuGet, and a bunch of build targets that are generally present if Visual Studio is installed. If you've set up a build server before, this should be familiar.
There's also a line where we enabled ASP.NET 4.5 support.
The base IIS installation includes a couple of files in wwwroot. We remove them using a line of powershell.
Copying the Source Code
# Copy files
RUN md c:\build
WORKDIR c:/build
COPY . c:/build
Now we copy our source code to a build folder. We'll build our application in here. Notice that Docker commands use / and Windows commands use \.
Building the Project
# Restore packages, build, copy
RUN nuget restore \
    && "c:\Program Files (x86)\MSBuild\14.0\Bin\MSBuild.exe" /p:Platform="Any CPU" /p:VisualStudioVersion=12.0 /p:VSToolsPath=c:\MSBuild.Microsoft.VisualStudio.Web.targets.14.0.0.3\tools\VSToolsPath DockerDemo.sln \
    && xcopy c:\build\DockerDemo\* c:\inetpub\wwwroot /s
Here we're restoring NuGet packages, building the solution, and copying the output to the wwwroot folder.
Entrypoint
# Ensure container doesn't exit
CMD powershell \
    Write-Host IIS Started... ; \
    while ($true) { Start-Sleep -Seconds 3600 }
The very last step is creating an infinite loop in powershell as the default command to run when the container starts up. This prevents the container from exiting.
That's it, we're done!
Building the Docker Image
Now that the dockerfile is ready, we can build it with this command:
docker build -t docker-demo .
Running a Container
And now that the Docker image is built, we can use it to start up a container using this command:
docker run -d -p 80:80 docker-demo
We're running the container in detached mode and exposing port 80. Starting in Windows Server 2016 TP5, exposing port(s) in containers will automatically open them in Windows Firewall.
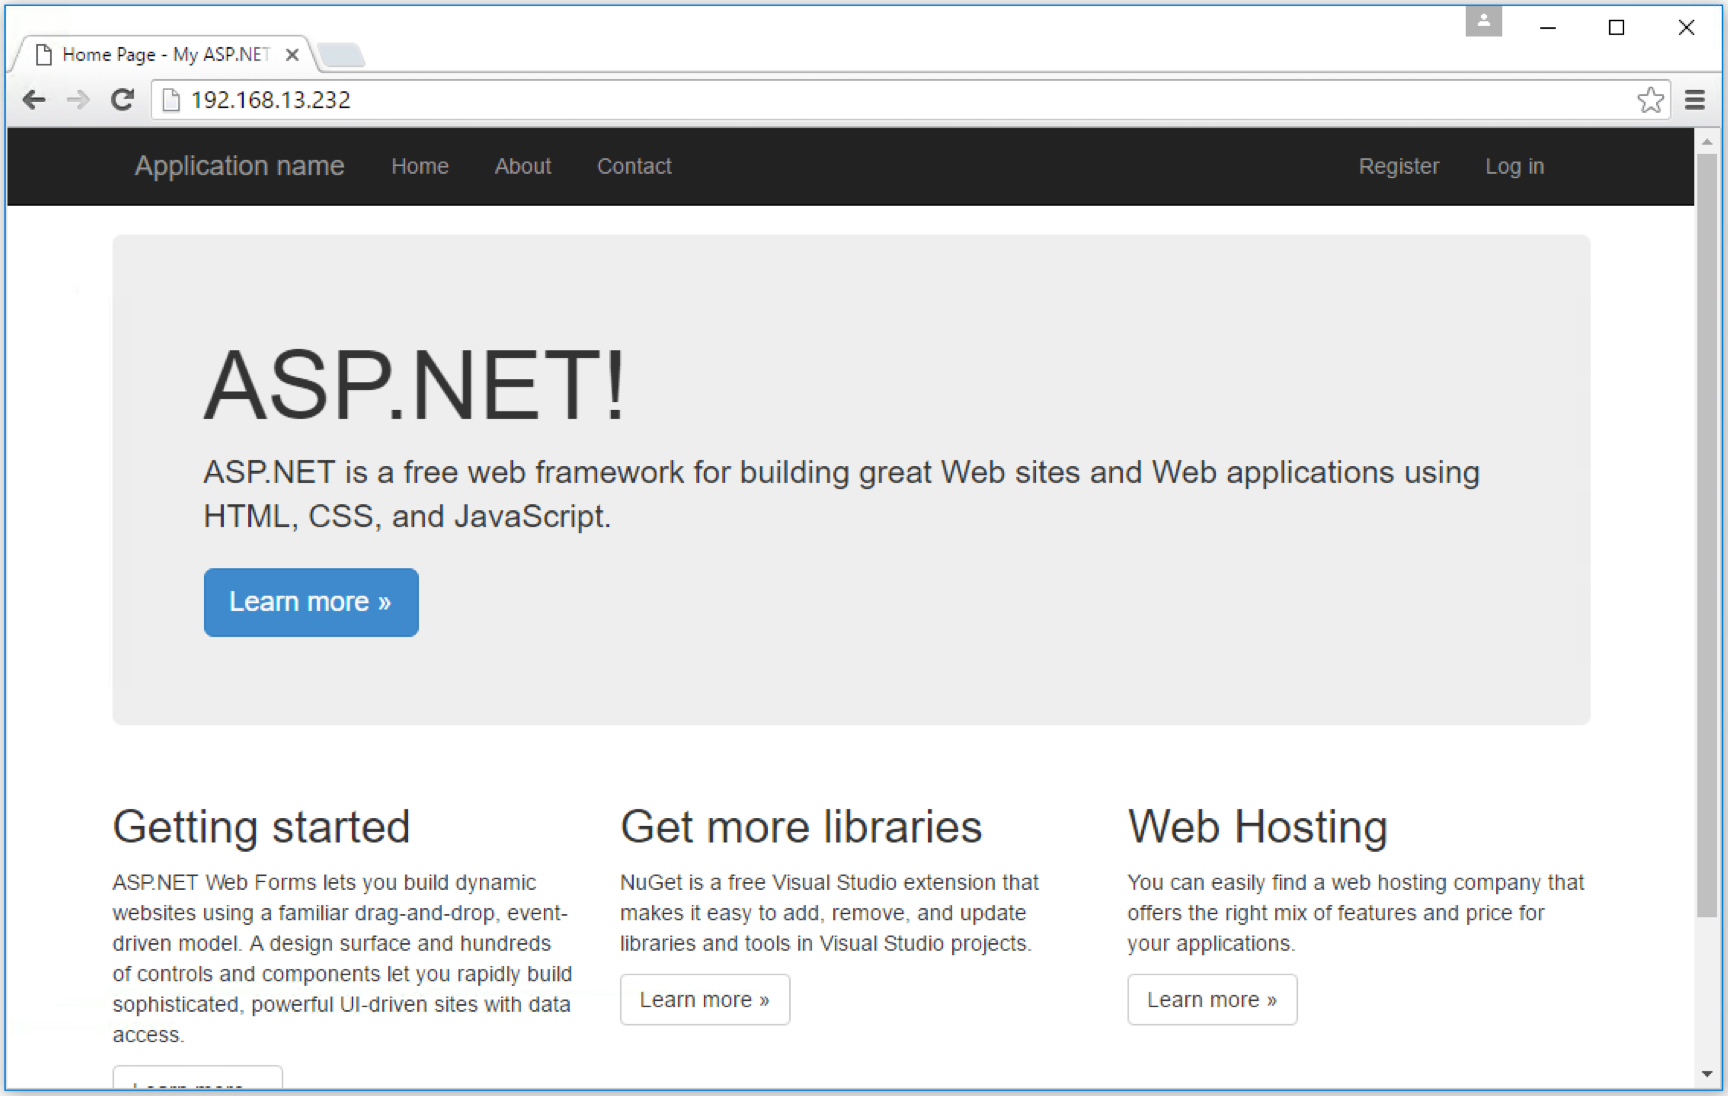
Now we can browse to the Docker host's IP at port 80 from another machine. (To connect from the container host itself, see below)
Browsing from the Container Host
As of Windows Server 2016 Technical Preview 5, we cannot browse to our container from the container host using localhost. This has to do with where the NAT is in relation to the rest of the networking stack. Going to localhost will not reach the running container(s).
To connect to our container, we have to use its NAT's IP address. To find out what it is, we have to first find the container's name:
docker ps
Locate our container and note its name. We can then use docker inspect to get it's properties:
docker inspect {container-name}
This would return the container's setting in a JSON file. Somewhere in there is its NAT's IP address. Use it in place of localhost to connect to the container using a browser on the container host.
Source Code
https://github.com/anthonychu/aspnet-4.x-docker-windows-container
The dockerfile is based on the Docker Labs example.
Update: Web.config Transforms
I've also added an article about how to apply web.config transforms.
Update - December 23, 2016
Article and samples have been updated to work with the latest
microsoft/iisimage, Docker, and Windows Server 2016 updates.
Ever since ASP.NET Core came out, a big deal has been made that it runs on Linux and we can finally deploy ASP.NET inside Docker containers. While there's no doubt that it's a huge step forward for the platform; there's one thing that is often overlooked... This is only good news for green field projects and apps that can be ported to ASP.NET Core.
The majority of existing ASP.NET apps will never be ported to ASP.NET Core. There are many reasons an app can't be ported:
- Too many dependencies on System.Web
- WebForms!
- Third party dependencies that haven't been ported to .NET Core
- It runs perfectly fine in .NET 4.6 and earlier and doesn't make financial sense to port it
This is why Windows containers are so important. They let us bake our existing applications into Docker images and deploy them with the same tools as the rest of the Docker ecosystem.
Today we'll look at what it takes to build and run an ASP.NET 4.x WebForms app in a Windows container. We'll be using Windows Server Core 2016 TP5.
Dockerfile
This is the dockerfile. We'll be walking through it step by step.
FROM microsoft/iis
# Install Chocolatey
RUN @powershell -NoProfile -ExecutionPolicy Bypass -Command "$env:ChocolateyUseWindowsCompression='false'; iex ((New-Object System.Net.WebClient).DownloadString('https://chocolatey.org/install.ps1'))" && SET "PATH=%PATH%;%ALLUSERSPROFILE%\chocolatey\bin"
# Install build tools
RUN powershell add-windowsfeature web-asp-net45 \
&& choco install microsoft-build-tools -y --allow-empty-checksums -version 14.0.23107.10 \
&& choco install dotnet4.6-targetpack --allow-empty-checksums -y \
&& choco install nuget.commandline --allow-empty-checksums -y \
&& nuget install MSBuild.Microsoft.VisualStudio.Web.targets -Version 14.0.0.3 \
&& nuget install WebConfigTransformRunner -Version 1.0.0.1
# Delete existing files in wwwroot
RUN powershell remove-item C:\inetpub\wwwroot\iisstart.*
# Copy files
RUN md c:\build
WORKDIR c:/build
COPY . c:/build
# Restore packages, build, copy
RUN nuget restore \
&& "c:\Program Files (x86)\MSBuild\14.0\Bin\MSBuild.exe" /p:Platform="Any CPU" /p:VisualStudioVersion=12.0 /p:VSToolsPath=c:\MSBuild.Microsoft.VisualStudio.Web.targets.14.0.0.3\tools\VSToolsPath DockerDemo.sln \
&& xcopy c:\build\DockerDemo\* c:\inetpub\wwwroot /s
# Ensure container doesn't exit
CMD powershell \
Write-Host IIS Started... ; \
while ($true) { Start-Sleep -Seconds 3600 }
Base Image
FROM microsoft/iis
Because we're running ASP.NET WebForms, we need IIS. We're using the IIS image published by Microsoft. This is a Windows Server Core image with IIS enabled.
Build Tools
# Install Chocolatey
RUN @powershell -NoProfile -ExecutionPolicy Bypass -Command "$env:ChocolateyUseWindowsCompression='false'; iex ((New-Object System.Net.WebClient).DownloadString('https://chocolatey.org/install.ps1'))" && SET "PATH=%PATH%;%ALLUSERSPROFILE%\chocolatey\bin"
# Install build tools
RUN powershell add-windowsfeature web-asp-net45 \
&& choco install microsoft-build-tools -y --allow-empty-checksums -version 14.0.23107.10 \
&& choco install dotnet4.6-targetpack --allow-empty-checksums -y \
&& choco install nuget.commandline --allow-empty-checksums -y \
&& nuget install MSBuild.Microsoft.VisualStudio.Web.targets -Version 14.0.0.3 \
&& nuget install WebConfigTransformRunner -Version 1.0.0.1
# Delete existing files in wwwroot
RUN powershell remove-item C:\inetpub\wwwroot\iisstart.*
Next, we install Chocolatey and a bunch of tools necessary for building our project. This includes MSBuild, NuGet, and a bunch of build targets that are generally present if Visual Studio is installed. If you've set up a build server before, this should be familiar.
There's also a line where we enabled ASP.NET 4.5 support.
The base IIS installation includes a couple of files in wwwroot. We remove them using a line of powershell.
Copying the Source Code
# Copy files
RUN md c:\build
WORKDIR c:/build
COPY . c:/build
Now we copy our source code to a build folder. We'll build our application in here. Notice that Docker commands use / and Windows commands use \.
Building the Project
# Restore packages, build, copy
RUN nuget restore \
&& "c:\Program Files (x86)\MSBuild\14.0\Bin\MSBuild.exe" /p:Platform="Any CPU" /p:VisualStudioVersion=12.0 /p:VSToolsPath=c:\MSBuild.Microsoft.VisualStudio.Web.targets.14.0.0.3\tools\VSToolsPath DockerDemo.sln \
&& xcopy c:\build\DockerDemo\* c:\inetpub\wwwroot /s
Here we're restoring NuGet packages, building the solution, and copying the output to the wwwroot folder.
Entrypoint
# Ensure container doesn't exit
CMD powershell \
Write-Host IIS Started... ; \
while ($true) { Start-Sleep -Seconds 3600 }
The very last step is creating an infinite loop in powershell as the default command to run when the container starts up. This prevents the container from exiting.
That's it, we're done!
Building the Docker Image
Now that the dockerfile is ready, we can build it with this command:
docker build -t docker-demo .
Running a Container
And now that the Docker image is built, we can use it to start up a container using this command:
docker run -d -p 80:80 docker-demo
We're running the container in detached mode and exposing port 80. Starting in Windows Server 2016 TP5, exposing port(s) in containers will automatically open them in Windows Firewall.
Now we can browse to the Docker host's IP at port 80 from another machine. (To connect from the container host itself, see below)
Browsing from the Container Host
As of Windows Server 2016 Technical Preview 5, we cannot browse to our container from the container host using localhost. This has to do with where the NAT is in relation to the rest of the networking stack. Going to localhost will not reach the running container(s).
To connect to our container, we have to use its NAT's IP address. To find out what it is, we have to first find the container's name:
docker ps
Locate our container and note its name. We can then use docker inspect to get it's properties:
docker inspect {container-name}
This would return the container's setting in a JSON file. Somewhere in there is its NAT's IP address. Use it in place of localhost to connect to the container using a browser on the container host.
Source Code
https://github.com/anthonychu/aspnet-4.x-docker-windows-container
The dockerfile is based on the Docker Labs example.
Update: Web.config Transforms
I've also added an article about how to apply web.config transforms.