
Azure Resource Manager Templates Tips and Tricks
Sunday, October 11, 2015
Over the past week, I spent some time automating Azure App Service infrastructure with Azure Resource Manager (ARM) templates. I discovered a few tips and tricks along the way that I'll describe in detail below...
- Take an environment name as a parameter
- Create sticky slot settings
- Variables aren't just for strings
- Change the time zone of your web app
A big thanks to David Ebbo's talk at BUILD and his sample "WebAppManyFeatures" template; they are super handy resources for anyone who is working on writing their own ARM templates.
I've created a modified version of David's "WebAppManyFeatures" template that demonstrates the four tips I describe here:
https://gist.github.com/anthonychu/9ea3aca12df863504aa4
Environment Name Parameter
ARM templates are useful for creating the entire infrastructure for an application. Often this means creating infrastructure for each deployment environment (Dev, QA, Production, etc). Instead of passing in names for the service plans and web apps, I find it useful to pass in a name for the environment and use it as a suffix for all the names. This way we can easily use the same template to set up any environment.
{
    // ...
    "parameters": {
        "environmentName": {
            "type": "string"
        }
    },
    "variables": {
        "appServicePlanName":
            "[concat('awesomeserviceplan-', parameters('environmentName'))]",
        "siteName":
            "[concat('awesomesite-', parameters('environmentname'))]"
    }
    // ...
}
In the above example, if we pass in "dev" as the environmentName, we get "awesomeserviceplan-dev" and "awesomesite-dev" as our resource names.
Sticky Slot Settings
App settings and connection strings for a Web App slot can be marked as a "slot setting" (i.e., the setting is sticky to the slot). It's not well documented how to specify sticky slot settings in an ARM template. It turns out we can do this using a config resource section called "slotconfignames" on the production site. Simply list the app setting and connection string keys that need to stick to the slot:
{
    "apiVersion": "2015-08-01",
    "name": "slotconfignames",
    "type": "config",
    "dependsOn": [
        "[resourceId('Microsoft.Web/Sites', variables('siteName'))]"
    ],
    "properties": {
        "connectionStringNames": [ "ConnString1" ],
        "appSettingNames": [ "AppSettingKey1", "AppSettingKey2" ]
    }
}
Here's how it'll look like in the portal:

Object Variables
Variables are not only useful for declaring text that is used in multiple places; they can be objects too! This is especially handy for settings that apply to multiple Web Apps in the template.
{
    // ...
    "variables": {
        "siteProperties": {
            "phpVersion": "5.5",
            "netFrameworkVersion": "v4.0",
            "use32BitWorkerProcess": false, /* 64-bit platform */
            "webSocketsEnabled": true,
            "alwaysOn": true,
            "requestTracingEnabled": true, /* Failed request tracing, aka 'freb' */
            "httpLoggingEnabled": true, /* IIS logs (aka Web server logging) */
            "logsDirectorySizeLimit": 40, /* 40 MB limit for IIS logs */
            "detailedErrorLoggingEnabled": true, /* Detailed error messages  */
            "remoteDebuggingEnabled": true,
            "remoteDebuggingVersion": "VS2013",
            "defaultDocuments": [
                "index.html",
                "hostingstart.html"
            ]
        }
    },
    // ...
}
And now we can use the siteProperties variable for the production site as well as its staging slot:
{
    "apiVersion": "2015-08-01",
    "name": "[variables('siteName')]",
    "type": "Microsoft.Web/sites",
    "location": "[parameters('siteLocation')]",
    "dependsOn": [
        "[resourceId('Microsoft.Web/serverfarms', variables('appServicePlanName'))]"
    ],
    "properties": {
        "serverFarmId": "[variables('appServicePlanName')]"
    },
    "resources": [
        {
            "apiVersion": "2015-08-01",
            "name": "web",
            "type": "config",
            "dependsOn": [
                "[resourceId('Microsoft.Web/Sites', variables('siteName'))]"
            ],
            "properties": "[variables('siteProperties')]"
        },
        {
            "apiVersion": "2015-08-01",
            "name": "Staging",
            "type": "slots",
            "location": "[parameters('siteLocation')]",
            "dependsOn": [
                "[resourceId('Microsoft.Web/Sites', variables('siteName'))]"
            ],
            "resources": [
                {
                    "apiVersion": "2015-08-01",
                    "name": "web",
                    "type": "config",
                    "dependsOn": [
                        "[resourceId('Microsoft.Web/Sites/Slots', variables('siteName'), 'Staging')]"
                    ],
                    "properties": "[variables('siteProperties')]"
                }
            ]
        }
    ]
}
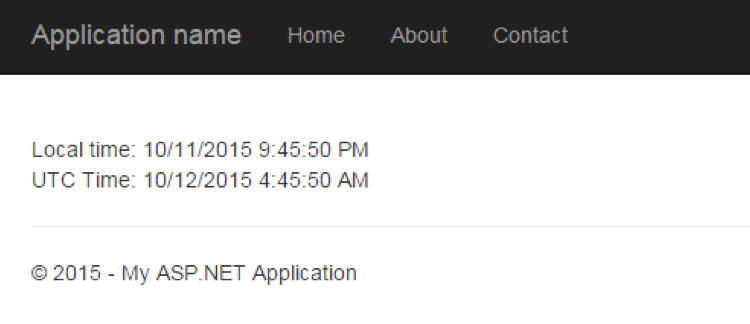
Custom Time Zone
There's a little-known setting in Azure App Service that allows you to set the time zone on a per-app basis. It is done by creating an app setting called WEBSITE_TIME_ZONE in the portal. It means we can also do this in an ARM template:
{
    "apiVersion": "2015-08-01",
    "name": "appsettings",
    "type": "config",
    "dependsOn": [
        "[resourceId('Microsoft.Web/Sites', variables('siteName'))]"
    ],
    "properties": {
        "WEBSITE_TIME_ZONE": "Pacific Standard Time"
    }
}
For more information on the time zone setting, check out this article.
Here is a full ARM template containing the above tips:
https://gist.github.com/anthonychu/9ea3aca12df863504aa4
Over the past week, I spent some time automating Azure App Service infrastructure with Azure Resource Manager (ARM) templates. I discovered a few tips and tricks along the way that I'll describe in detail below...
- Take an environment name as a parameter
- Create sticky slot settings
- Variables aren't just for strings
- Change the time zone of your web app
A big thanks to David Ebbo's talk at BUILD and his sample "WebAppManyFeatures" template; they are super handy resources for anyone who is working on writing their own ARM templates.
I've created a modified version of David's "WebAppManyFeatures" template that demonstrates the four tips I describe here:
https://gist.github.com/anthonychu/9ea3aca12df863504aa4
Environment Name Parameter
ARM templates are useful for creating the entire infrastructure for an application. Often this means creating infrastructure for each deployment environment (Dev, QA, Production, etc). Instead of passing in names for the service plans and web apps, I find it useful to pass in a name for the environment and use it as a suffix for all the names. This way we can easily use the same template to set up any environment.
{
// ...
"parameters": {
"environmentName": {
"type": "string"
}
},
"variables": {
"appServicePlanName":
"[concat('awesomeserviceplan-', parameters('environmentName'))]",
"siteName":
"[concat('awesomesite-', parameters('environmentname'))]"
}
// ...
}
In the above example, if we pass in "dev" as the environmentName, we get "awesomeserviceplan-dev" and "awesomesite-dev" as our resource names.
Sticky Slot Settings
App settings and connection strings for a Web App slot can be marked as a "slot setting" (i.e., the setting is sticky to the slot). It's not well documented how to specify sticky slot settings in an ARM template. It turns out we can do this using a config resource section called "slotconfignames" on the production site. Simply list the app setting and connection string keys that need to stick to the slot:
{
"apiVersion": "2015-08-01",
"name": "slotconfignames",
"type": "config",
"dependsOn": [
"[resourceId('Microsoft.Web/Sites', variables('siteName'))]"
],
"properties": {
"connectionStringNames": [ "ConnString1" ],
"appSettingNames": [ "AppSettingKey1", "AppSettingKey2" ]
}
}
Here's how it'll look like in the portal:
Object Variables
Variables are not only useful for declaring text that is used in multiple places; they can be objects too! This is especially handy for settings that apply to multiple Web Apps in the template.
{
// ...
"variables": {
"siteProperties": {
"phpVersion": "5.5",
"netFrameworkVersion": "v4.0",
"use32BitWorkerProcess": false, /* 64-bit platform */
"webSocketsEnabled": true,
"alwaysOn": true,
"requestTracingEnabled": true, /* Failed request tracing, aka 'freb' */
"httpLoggingEnabled": true, /* IIS logs (aka Web server logging) */
"logsDirectorySizeLimit": 40, /* 40 MB limit for IIS logs */
"detailedErrorLoggingEnabled": true, /* Detailed error messages */
"remoteDebuggingEnabled": true,
"remoteDebuggingVersion": "VS2013",
"defaultDocuments": [
"index.html",
"hostingstart.html"
]
}
},
// ...
}
And now we can use the siteProperties variable for the production site as well as its staging slot:
{
"apiVersion": "2015-08-01",
"name": "[variables('siteName')]",
"type": "Microsoft.Web/sites",
"location": "[parameters('siteLocation')]",
"dependsOn": [
"[resourceId('Microsoft.Web/serverfarms', variables('appServicePlanName'))]"
],
"properties": {
"serverFarmId": "[variables('appServicePlanName')]"
},
"resources": [
{
"apiVersion": "2015-08-01",
"name": "web",
"type": "config",
"dependsOn": [
"[resourceId('Microsoft.Web/Sites', variables('siteName'))]"
],
"properties": "[variables('siteProperties')]"
},
{
"apiVersion": "2015-08-01",
"name": "Staging",
"type": "slots",
"location": "[parameters('siteLocation')]",
"dependsOn": [
"[resourceId('Microsoft.Web/Sites', variables('siteName'))]"
],
"resources": [
{
"apiVersion": "2015-08-01",
"name": "web",
"type": "config",
"dependsOn": [
"[resourceId('Microsoft.Web/Sites/Slots', variables('siteName'), 'Staging')]"
],
"properties": "[variables('siteProperties')]"
}
]
}
]
}
Custom Time Zone
There's a little-known setting in Azure App Service that allows you to set the time zone on a per-app basis. It is done by creating an app setting called WEBSITE_TIME_ZONE in the portal. It means we can also do this in an ARM template:
{
"apiVersion": "2015-08-01",
"name": "appsettings",
"type": "config",
"dependsOn": [
"[resourceId('Microsoft.Web/Sites', variables('siteName'))]"
],
"properties": {
"WEBSITE_TIME_ZONE": "Pacific Standard Time"
}
}
For more information on the time zone setting, check out this article.
Here is a full ARM template containing the above tips: https://gist.github.com/anthonychu/9ea3aca12df863504aa4